
Install Instructions

Professional Plumbing Installation Guide
15
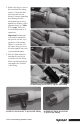
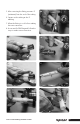
Continue expanding and rotating until
the tubing and ring are snug against
the shoulder on the expander head.
See Table 3-1 on page 13 for the
recommended number of expansions.
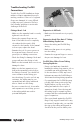
Important! Rotating the tool between
expansions will provide smooth, even
expansion of the tubing. Failure to
rotate the tool will cause deep grooves
in the tubing which can result in
potential leak paths.
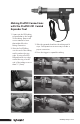
6. After the final expansion, immediately
remove the tool and insert the fitting.
Ensure the tubing and ring seat against
the shoulder of the fitting.
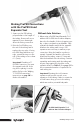
Important! You should feel some
resistance as the fitting goes into
the tubing. If you do not feel any
resistance, the tubing may be over
expanded and will require additional
time to shrink over the fitting.
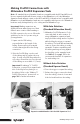
Expansion with Milwaukee M12 ProPEX Expansion Tool
3, 5
4
4
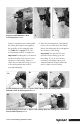
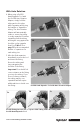
Expansion with Milwaukee M18
ProPEX Expansion Tool
6d
6b
6e
6c
6a
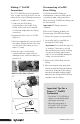
ProPEX Fitting Inserted into
1
⁄2" Uponor PEX Tubing. Make the Fitting with a
Milwaukee M12 ProPEX Expansion Tool.
ProPEX Fitting Inserted into 1" Uponor PEX Tubing. Make the Fitting with a Milwaukee
M18 ProPEX Expansion Tool.