
Install Instructions


Professional Plumbing Installation Guide
37
Common Components
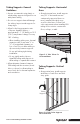
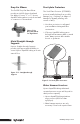
Bend Supports
• Use Uponor bend
supports to hold
the tubing in a
90-degree bend.
It is common to
use bend supports
when exiting a slab
to control the
direction of the
tubing out of the slab.
• Snap-on bend supports are available
in metal and plastic for
3
⁄8",
1
⁄2" and
3
⁄4" PEX.
• PVC conduit supports are available for
3
⁄8" to 1" PEX tubing as an alternative
to the snap-on bend supports.
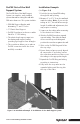
Drop Ear Bend Supports
• Drop Ear Bend Supports provide a
rigid, connection-free, 90-degree exit
from a standard 2" x 4" (or larger) stud
wall or floor.
• Nail the flange to the front edge of the
stud for support. A horizontal brace is
required to position the Drop Ear Bend
Support between two studs.
• Drop Ear Bend Supports are
available in metal and plastic for
3
⁄8" and
1
⁄2" PEX.
Figure 5-7:
Support for
90-degree Bend
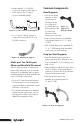
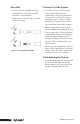
ProPEX Out-of-the-Wall
Support System
The ProPEX Out of the Wall Support
System is a complete, easily installed
system that makes exiting the wall with
PEX easier than ever. This system includes:
• PEX Wall Support Bracket with
alternating
1
⁄2" and
3
⁄4" holes
•
1
⁄2" Plastic Bend Support
• ProPEX Escutcheon in chrome or white
finish for
1
⁄2" PEX tubing
• The plastic bend support snaps into
the mating wall support bracket,
providing rigid support from all angles.
• The escutcheon allows you to make a
ProPEX connection inside the sleeve
and fully concealed.
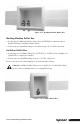
Installation Example
(See Figure 5-9)
1. Feed the Uponor AquaPEX tubing
through the wall opening.
2. Measure 2" to 2
3
⁄16" from the wall and
mark the tubing. Note: If you cut the
tubing at 2
3
⁄16", this will allow enough
length for additional adjustments, but
may require re-cutting.
3. Square-cut the tubing after measuring
for the desired cut location.
4. Slide the ProPEX Escutcheon towards
exposed tubing. Then slide the flared
sleeve over the exposed tubing and
position the escutcheon against the wall.
5. Slide on the ProPEX Ring until it hits
the stop edge.
6. Ensure that you have properly aligned
all components. If necessary, remove
the escutcheon and sleeve; then re-cut
the tubing to the appropriate length.
7. Expand the ProPEX Ring and tubing
according to instructions.
8. Fully insert the stop valve into the
expanded tubing until the ring hits
the stop of the valve.
Figure 5-9: Installation Example of ProPEX Out-of-the-Wall Support System