
User Guide


86 l uponorengineering.com
Water system
disinfection
Uponor recommends ushing
an AquaPEX plumbing system
with clean, potable water.
When system disinfection is
required, disinfect the piping in
accordance with AWWA C651-
86, Standard for Disinfecting
Water Mains, or local codes.
Important: To prevent
reduced service life of system
components, do not allow
disinfection solutions to remain
in the system longer than
24 hours. Flush the system
with potable water after
disinfection. Use a chlorine
solution of 50 parts per million
(ppm) for 24 hours or 200 ppm
for three hours for disinfection.
Pressure-testing
procedures
It is important to properly
pressure test an Uponor
plumbing system in
accordance with local code. If
testing with air, it is important
the system pressure not
exceed 120 psi.
The following procedure is
acceptable for testing with
air, water or a mixture of
both for Uponor AquaPEX
piping and ProPEX ttings or
hybrid systems combined with
metallic piping.
Important: When
pressure testing
hybrid systems (i.e., those that
include both thermoplastic
piping materials, such as
CPVC or PP-R, and Uponor
AquaPEX and ProPEX
ttings), isolate the Uponor
system from the other
thermoplastic materials in the
system before following the
recommended procedure.
Also, consult the appropriate
pipe manufacturer’s
installation recommendations
when testing systems
comprised of other
thermoplastic materials.
The intent of pressure testing
a domestic-water system is to
meet local code requirements
while ensuring the system
is free from leaks. Pressure
testing is not a substitute
for the correct installation of
an Uponor AquaPEX and
ProPEX plumbing system.
It is essential the Uponor
system is accurately sized,
supported and protected while
also accounting for thermal
movement during installation.
Importance of conditioning
PEX-a pipe
Uponor recommends
conditioning the system at 1.5
times the test pressure, or 120
psi. The following conditioning
procedure is unique to PEX-a
pipe due to the high degree of
crosslinking and associated
thermal and elastic properties
of the pipe.
When pressure is applied
against the inner wall of PEX-a
pipe, the internal diameter
(I.D.) of the pipe will slightly
increase, causing the pressure
to drop while the system
equalizes. After a period of 30
minutes, the PEX piping will
be sufciently conditioned to
start the pressure test.
Conditioning and sustained
pressure testing procedure
1. Visually conrm all
connections are properly
made per Uponor
installation guidelines.
2. Ensure all components,
xtures and equipment
not rated for the test
pressure are isolated
from the test system.
3. Ensure all other
thermoplastic piping
materials are isolated
from the test system.
4. Fill the system with
potable water, air or a
mixture of both.
5. Condition the system to
1.5 times the required test
pressure for 30 minutes.
This will require constant
pumping or cycling the valve
and compressor to maintain
a pressure of 1.5 times the
test pressure. If cycling
the valve and compressor,
apply additional pressure
once the psi has dropped
10 lbs.
6. After conditioning the
system for 30 minutes,
quickly relieve excess
pressure by opening the
valve. Close the valve when
the system has reached the
desired test pressure.
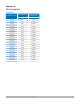
Note: Uponor recommends a
test pressure of 80 psi (unless
local code dictates higher
pressures).
7. Once the valve is closed,
conrm a slight rise in
pressure (3 to 6 psi). This
increase will occur as the
pipe’s I.D. is shrinking
from its conditioned state
to equalize at the lower
pressure.
8. Visually check for leakage
and monitor the pressure
for the duration specied
by local code. (A typical
pressure test can range
from 2 to 24 hours.)
9. If there is no reduction in
pressure, the system is
presumed to be free from
leaks.
Note: Slight uctuations of
pressure are normal due
to ambient temperature
changes, especially during
long durations (e.g., 24
hours).
10. Flush the system as
required by code.
Important: If using
water to pressure test
the system, purge all water
from the system prior to the
ambient air temperatures
falling to 32ºF (0ºC). Failing to
remove the water from the
system during freezing
temperatures can result in
damage to the piping and
associated equipment.
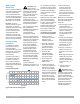
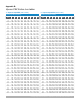
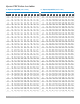
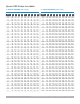
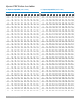
Figure 6-49: Pressure testing graph
Pressure testing graph
60
70
80
90
100
110
120
130
140
0102030405060708090100 110120
Pressure (psi)
Time (min.)
Pressure testing graph
System pressure