
User Guide

16 l uponorengineering.com
Troubleshooting
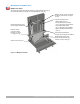
ProPEX connections
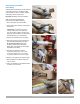
Trouble-free ProPEX
installations begin with a tool
that is maintained in proper
working condition. If the tool or
segment ngers are damaged,
it is very difcult to make a
proper connection. Refer to
the following guidelines to
assist with challenges in the
eld.
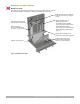
Fittings won’t seal
• Make sure the expander
head is securely tightened
onto the tool.
• Ensure the segment ngers
are not bent. If the head does
not completely close when
the drive unit is fully retracted
or the handles of the manual
tool are open, replace the
head.
• Examine the tool for
excess grease on the
segment ngers. Remove
excess grease prior to
making connections.
• Check the tting for damage.
Nicks and gouges will cause
the tting to leak.
• Make sure the internal driver
cone is not damaged or bent.
• Make sure the last expansion
is not held in the expanded
position before the tting is
inserted. You should feel
some resistance as the tting
goes into the piping. If you
do not feel any resistance,
the piping may be over
expanded and will require
additional time to shrink over
the tting.
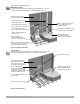
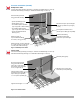
• Be sure to rotate the tool
⅛ turn after each expansion
to avoid deep grooves in the
piping which can result in
potential leak paths.
Expansion is difcult
• Make sure the internal cone
is properly greased.
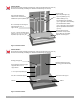
Expansion head slips
out of piping when
making expansions
• Ensure the piping and
ProPEX ring are dry.
• Make sure that grease is
not getting into the piping.
• Examine the segment
ngers to ensure they are
not damaged or bent.
ProPEX ring slides down
piping during expansion
• Ensure your hands are clean
while handling the piping.
Any sweat or oils on your
hands can act as a lubricant.
Due to the smoothness of
PEX, any form of lubricant
can cause the ProPEX ring
to slide down the piping
during expansion.
• If you anticipate the ProPEX
ring may possibly slide
down, position the ring
slightly farther over the end
of the piping and make the
rst couple of expansions
slowly. Once the ring and
the piping begin to expand
together, continue with the
normal number and type of
expansions.
• Place your thumb against the
ProPEX ring to help support
it and feel for any movement.
If caught early, you can slide
the ring up the piping and
expand as described in the
previous bullet point.
More than the recommended
number of expansions
are needed to make a
connection
• Ensure the head is hand-
tightened to the expander
tool.
• Examine the segment ngers
for damage.
• Be sure to completely cycle
the tool on each expansion
(i.e., close the manual
tool handle or release the
trigger).
Cold-weather expansions
• Temperatures affect the
time required for the piping
and ring to shrink onto
the tting. The colder the
temperature, the slower the
contraction time.
• Warming ProPEX ttings
and ProPEX rings reduces
contraction time. Put ttings
and rings in your pockets
prior to installation to keep
them warm.
• Fewer expansions are
necessary in temperatures
below 40ºF (4.4ºC).
Note: Do not use a heat gun
on EP ttings to speed up the
contraction time as this could
result in damage to the tting.
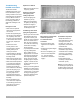
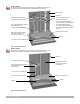
Expansion with proper rotation
Expansion without proper rotation