
User Guide


Plumbing Design Assistance Manual l Chapter 2 – Making ProPEX connections l 11
2a
6
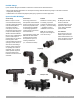
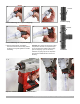
Making a ProPEX
connection
1. Square cut the PEX piping
perpendicular to the length
of the piping. Remove all
excess material or burs
that might affect the
tting connection.
2. Slide the ProPEX ring over
the end of the piping until it
reaches the stop edge.
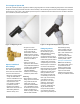
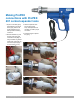
3. The Milwaukee tool comes
with built-in auto rotation,
meaning the head will
automatically rotate to
ensure the piping is
evenly expanded.
Note: To cancel the expansion
process quickly, pull and
release the trigger.
4. Press the trigger to initiate
the rotation of the head. A
green light will turn on and
the work light will blink.
Insert the pipe and ring
and release the trigger.
When the expansion head
has reached its maximum
diameter, it will retract.
Important! Do not force the
pipe and ring on the head
during any expansion.
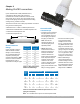
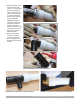
5. After the tool has retracted,
the green indicator light
blinks three times. Press
the trigger and repeat the
expansion process.
6. Repeat the process until
the pipe and ring are snug
against the shoulder of the
expansion head. Repeat the
expansion one or two more
times depending on the
ambient temperature.
Note: Fewer expansions
are required in colder
temperatures.
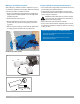
7. After nal expansion,
immediately remove the tool
and insert the tting.
1 4
2b
7