
User Guide


8 l uponorengineering.com
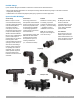
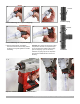
1
2
3, 5
4
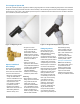
Expansion with Milwaukee M12 ProPEX Expansion Tool
3
⁄8" and
1
⁄2"
Milwaukee
expansion head
Shoulder
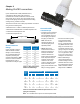
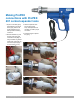
Making ProPEX connections with Milwaukee
M12 or M18 ProPEX expansion tools
Note: All standard Uponor expander heads are compatible with the M12 and M18 tools. Uponor expander
heads will not auto-rotate on the Milwaukee tools (only Milwaukee expansion heads will auto-rotate on the
M12 and M18). H-heads are not compatible with Milwaukee tools and Milwaukee heads are not compatible
with Uponor tools. Milwaukee heads are easily distinguished by color coding and the Milwaukee logo.
Important! Making
expansions are slightly
different when using a tool
that features auto rotation.
When making a ProPEX
connection, be sure to follow
the guidelines for the tool you
are using in your application.
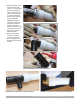
1. Square cut the PEX piping
perpendicular to the length
of the piping. Remove all
excess material or burrs
that might affect the tting
connection.
2. Slide the ProPEX ring over
the end of the piping until
it reaches the stop edge. If
using a ProPEX ring without
a stop edge, extend
the ring
over the end of the piping
no
more than
1
⁄16" (1mm).
Important! If making a ⅜"
ProPEX connection, rst
expand each side of the
ring before placing it on the
piping. Refer to the “Making
⅜" ProPEX connections”
instructions on page 14
for further information.
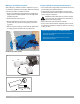
With auto
rotation
(standard
Milwaukee heads)
3. Milwaukee ProPEX
expansion tools come with
built-in auto rotation. If using
a Milwaukee expansion
head, simply hold the
piping and tool in place
while holding the trigger
to expand the piping. The
head will automatically
rotate to ensure the piping is
evenly expanded. Continue
expanding and rotating until
the piping and ring are snug
against the shoulder on the
expander head. See Table
2-2 for the recommended
number of expansions for
each piping size.
Note: Do not force the pipe
onto the expander head.
Ensure the expander head is
rotating during each expansion.
Without auto
rotation (standard
Uponor heads)
4. Press the trigger to expand
the piping.
5. Release the trigger, remove
the head from the piping,
rotate it ⅛ turn and slide the
head back into the piping.
Continue expanding and
rotating until the piping and
ring are snug against the
shoulder
on the expander
head. See Table 2-2
for the
recommended number of
expansions.
Important! Rotating the
tool between expansions
will provide smooth, even
expansion of the piping.
Failure to rotate the tool
will cause deep grooves in
the piping which can result in
potential leak paths.
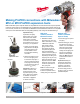
3
⁄4" to 3" Milwaukee
expansion head
Shoulder