Instruction manual ENGLISH XVC-XBC BakerTop 596622 - 596632 - 596642 ChefTop 596505 - 596510 - 596511 - 596512 596522 - 596523 - 596523 - 596525 596532 - 596535 596542 - 596543 - 596548 Italiano
INTRODUCTION ___________________________________3 FORWARD _______________________________________4 PICTOGRAM DESCRIPTION _________________________4 SAFETY REGULATIONS _____________________________5 INSTRUCTIONS FOR THE INSTALLER ________________8 INSTRUCTIONS FOR THE USER _____________________44 The company reserves the right to apply improvement modifications to appliances and accessories at any time without advance notice.
ChefTop™ BakerTop™ INTRODUCTION Dear Customer, We thank you for having purchased an oven / complementary accessory from the ChefTop™/BakerTop™ line. ChefTop™/BakerTop™ ovens are the climax of Unox research and guarantee minimum occupation of space with superlative performance while offering outstanding cooking management at any condition of use and load.
Forward This manual shows the installation and use of the ChefTop™ e BakerTop™line of ovens. ChefTop™ ovens and their accessories allow complete COOKING SOLUTIONS using MAXI.Link technology dedicated to superb cuisine, such as: oven plus , oven plus SlowTop temperature maintainer and combination of two or more ovens. The ChefTop™ line of ovens come in gas and electric models, have digital control and capacities of: 3, 5 GN 2/3; 3, 5, 7, 10, 20 GN 1/1; 6, 10, 20 GN 2/1.
ChefTop™ BakerTop™ Safety regulations Safety regulations for installation and maintenance Read this guide carefully before installing and maintaining the appliance, and conserve this guide with care for any future consultation of users.
$W DSSOLDQFH FRPPLVVLRQLQJ WHVW EXUQHU H[KDXVW JDVHV VWHDP DQG KRW DLU &2 &22 UHFRUGLQJ WKH UHJLVWHUHG values on the appliance. The burner settings must be checked and adjusted by a specialised technician for values of non-diluted CO greater than 1000 ppm. Safety regulations for use Read this guide carefully before using the appliance and performing routine maintenance, and conserve this guide with care for any future consultation of users.
ChefTop™ BakerTop™ ([WUDFW WKH SUREH IURP WKH FRUH RI IRRGV EHIRUH UHPRYLQJ WUD\V IURP WKH RYHQ DQG SODFH LW LQ WKH H[WHUQDO SUREH holder. Before extracting the tray check that the probe cable is not in the way. Handle the probe with care because it is extremely sharp and, after use, reaches high temperatures.
INSTRUCTIONS FOR THE INSTALLER Contents Unpacking _______________________________________________________________________________ 9 Removing the protective film and silicone cap ___________________________________________________12 Checking pack contents ____________________________________________________________________12 Getting started ___________________________________________________________________________14 Positioning _______________________________________________________________________________1
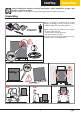
ChefTop™ BakerTop™ Before installing the appliance carefully read chapter “Safety regulations“ at page 5 and chapter “Forward” at page 4. 'XULQJ LQVWDOODWLRQ ZHDU SURSHU SURWHFWLYH FORWKLQJ SURWHFWLYH IRRWZHDU JORYHV HWF Unpacking Check the package at reception for any visible damage. If damage is found, promptly contact UNOX and DO NOT install the appliance.
Follow the instructions in the figure and conserve several screws and plastic supports for the next installation; the screws that fasten the plastic supports to the wooden pallet can be disposed of.
ChefTop™ BakerTop™ The packaging materials, given their potential danger, must be kept out of reach of children and animals, and correctly disposed of in compliance with local regulations. UNOX has followed the NON-STEP Efforts philosophy for years to increase the environmental computability of its products to reduce energy consumption and wastes. UNOX wishes to protect the environment and invites the consumer to dispose of waste in recycling bins.
Removing the protective film and silicone cap Slowly detach the protective films from the appliance: clean any glue residue with appropriate solvents without using tools, abrasive detergents or acids that could ruin the surfaces. The removed film, given its potential danger, must be kept out of reach of children and animals; and correctly disposed of in compliance with local regulations.
ChefTop™ BakerTop™ FREE-STANDING OVENS WITHOUT TROLLEY x2 x1 ISH ENGL NO ITALIA ual man ion one ruct ruzi Inst g d'ist isun uale nwe Man ngsa tion ienu Bed tilisa s d’U ione ice rucc Not Inst ual Man x xxx xxx xxx XB XV- x1 x1 For technician: cut and paste the correct current setting label Per l’installatore: tagliare ed attaccare la corretta etichetta di settaggio 2E G20 20 mbar 2E+ G20/G25 20/25 mbar 2H G20 20mbar 2H G20 25 mbar 2L G25 25 mbar 2LL G25 20 mbar 2S G25.
Getting started FREE-STANDING TROLLEY OVENS 1 2 2 1 English 14
ChefTop™ BakerTop™ Positioning Characteristics of the installation area Max 35°C Max 70% Min 5°C Install the appliance in areas: - dedicated and conform to cooking industrial foods; - having adequate air ventilation; - that comply with the laws in effect on system and work safety; - protected against atmospheric agents; - with temperatures between +5° to +40°C maximum; - having a maximum humidity of 70%.
7KH LQVWDOODWLRQ DUHDV PXVW EH HTXLSSHG ZLWK HOHFWULFDO SOXPELQJ DQG JDV XWLOLWLHV RQO\ IRU JDV RYHQV WKDW FRPSO\ with the regulations on system and work safety of the country of use.
ChefTop™ BakerTop™ Appliance distances Position the appliance respecting the distances in the figure and so that the back wall is easily accessible for appliance connections and maintenance. m 5 cin. m m 5 cin. m n. micm 90 Do not install the appliance near easily inflammable or heat sensitive materials, walls or furniture. Otherwise, protect them with appropriate non-inflammable materials in compliance with fire prevention regulations. m 5 cin. m FLAMERESISTANT PANEL n. mi m c 5 m 45 in.
Positioning - COUNTERTOP OVENS The countertop ovens can be positioned: - on the floor; - on wheels; - on own or UNOX substructures; VWDFNHG RQ RWKHU 812; DSSOLDQFHV 0D[L /,1. Floor or wheeled-base positioning The floor beneath the appliances must: - be flame and heat resistant; - be perfectly level; - have a flat and even surface; - able to support the appliance weight at full load without undergoing deformation or structural failure.
ChefTop™ BakerTop™ Positioning: substructures Before anchoring on a UNOX substructure or on one of your own, always check that the substructure is perfectly flat using a spirit or digital level. If otherwise, the UNOX substructure can be levelled by acting on the feet, making sure to avoid completely unscrewing them. Anchoring on user's substructure (i.e. steel tables, etc...
Anchoring on UNOX substructures (UNOX - high open stand) 1 3 4 2 English 20 x4
ChefTop™ BakerTop™ Positioning: appliance stacking (Maxi.LINK) Use UNOX's oven stacking kit when stacking several units. It maintains the proper distance between appliances and simplifies electrical, plumbing and exhaust connections. Follow the instructions on the oven stacking kit for kit assembly. The oven should never be placed immediately above other ovens or other sources of heat.
Positioning TROLLEY FREE-STANDING OVENS WITH/WITHOUT Ovens of this type must exclusively be set on floors that meet the following requirements: - be flame and heat resistant; - be perfectly level; - have a flat and even surface; - are able to support the appliance weight at full load without undergoing deformation or structural failure.
ChefTop™ BakerTop™ SOLUTION B SOLUTION A 3 6 5 4 1 2 screws not supplied 2 3 1 11 12 1 10 2 3 9 4 8 7 6 5 5 24h 4 only for free-standing trolley ovens If the floor is not perfectly flush, a loading ramp with a maximum incline of 4° may be used to simplify trolley loading. The maximum floor incline allowed is 2°. If floor incline exceeds this value, hot liquids may spill from the trays during loading/extraction and cause burns.
Adjustments Door closure adjustment After positioning the oven, proceed as follows if the door handle fails to close in the correct upright position: n check that the appliance is flush by using a spirit or digital level; o-t if the appliance is level, adjust the closure latch as shown in the following figures. If the problem persists, repeat this procedure, loosening the latch fixing screws further.
ChefTop™ BakerTop™ 4 3 2 OK! 5 9 7 10 8 6 11 25 English
Electrical connections Before installing the appliance carefully read chapter “Safety regulations“ at page 5. LI2293A0 - Printed: 06-2012 Subject to technical changes. Connections to the power main and the electrical system must comply with the regulations in force in the country of installation of the appliance; and all connections must be performed by qualified installer authorised by UNOX.
ChefTop™ BakerTop™ For proper electrical connections, the appliance must: - Be wired into an equipotential system according to what is stated in the regulations in force. This connection must . The be performed between different appliances with the terminal marked with the equipotential symbol ZLUH PXVW KDYH D PD[LPXP FURVV VHFWLRQ RI PP DFFRUGLQJ WR ,(& (1 VWDQGDUG DQG be yellow-green.
LPG gas connection ( only for gas ovens) Before installing the appliance carefully read chapter “Safety regulations“ at page 5. Connections to the gas supply and the gas utility lines must comply with the regulations in force in the country of installation of the appliance; and all connections must be performed by qualified installer authorised by UNOX. Failure to comply with these regulations may cause damage and injuries, invalidates the guarantee and relieves UNOX of all liabilities.
ChefTop™ BakerTop™ Table C MODELS XBC615EG XBC815EG XVC315EG XVC515EG XVC715EG XVC1215EG XVC2015EG Ø INIJECTOR [1/100 mm] column B 345 225 375 235 275 180 330 215 360 230 345 225 375 235 340 GAS column A G20, G25, G25.1 G30, G31 G20, G25, G25.1 G30, G31 G20, G25, G25.1 G30, G31 G20, G25, G25.1 G30, G31 G20, G25, G25.1 G30, G31 G20, G25, G25.1 G30, G31 G20, G25, G25.1 G30, G31 G20, G25, G25.
CONTROL PANEL 1 5 sec. 2 4 3 5 6 n Enter the hidden menu by si- 7 multaneously pressing the two buttons onds. 10 sec for 5 sec- Press the button until calling up the display: 12 - FrU o Press the button until calling up "GAS" on the screen. p q Press the EXWWRQV XQWLO VHOHFWLQJ WKH JDV XVHG FDXWLRQ * DOVR LQFOXGHV W\SH * DQG * LQFOXGHV W\SH * r To save changes hold the s Exit by pressing the button for 5 seconds until to hear acoustic signal confirmation button.
ChefTop™ BakerTop™ Post-connection checks Check the items listed in the table after connecting the oven to the gas utility or after adjusting to a new type of gas. ¥ Check: Check result The air-tightness of the gas circuit using NON-CORROSIVE foam substances. Never use flames! 1RPLQDO VXSSO\ SUHVVXUH XVLQJ D IOXLG SUHVVXUH JDXJH H J D HOHFWULF PDQRPHWHU ,I YDOXHV GHWHFWHG GHYLDWH IURP PLQ DQG PD[ SUHVVXUH OLVWHG LQ WKH ´7HFKQLFDO mbar.........................
Plumbing connections Plumbing: water supply The rear of the appliance contains: A PHWHUV RI KRVH PHFKDQLFDO ILOWHU DQG µ DWWDFKPHQW ZLWK QRQ UHWXUQ YDOYH IRU SOXPELQJ Before connecting the water pipe to the appliance, flush it out with water in order to eliminate any residue which has accumulated inside it.
ChefTop™ inse &R et .D OX UN UNOX.Det&Rinse Unox.PURE-RO 2 e .Pur OX From BakerTop™ UN e ins &R et .D OX UN To re .Pu OX UN e ur .P OX R IN TE WA m Fro 1 UN e ur X.P NO U To R IN TE WA Unox.PURE e ur .P OX m Fro UN e ur X.
Plumbing: water drainage The drain is located: - on the bottom of countertop ovens - on the back of free-standing ovens with or without trolley . Connect the bend/siphon to a rigid pipe or flexible hose and connect the assembly to waste water drainage. UNOX recommends its proprietary rigid pipes and flexible hoses. 7KH ZDVWH ZDWHU GUDLQLQJ IURP WKH RYHQ PD\ EH KRW & The pipes used for water drainage must be able to withstand high temperatures and not be made of metal.
ChefTop™ BakerTop™ Drainage specifications FREE-STANDING OVENS WITH/ WITHOUT TROLLEY The drainage system must: - be a siphon-type; - have a one meter maximum length; - have a minimum incline of 4%; - have a diameter that is NOT less than the drain pipe attachment; - be dedicated to each appliance; if this is not the case, make sure that the main drainage pipe is sized sufficiently to ensure that water flows away properly without any problems; - be free of kinks.
Indicative example of plumbing in MAXI.Link columns HOOD OVEN 1 ø8 ø10 OVEN 2 3/4 ø8 ø8 PROVER ø8 Unox.
ChefTop™ BakerTop™ Indicative example of plumbing in MAXI.Link columns HOOD OVEN 1 ø8 ø10 OVEN 2 3/4 ø8 ø8 PROVER ø8 37 Unox.PURE.
Smoke exhaust ( only for electrical ovens) Cooking produces hot smoke and odours that are evacuated through an exhaust pipe on the top portion of the appliance. Make sure that no objects or materials that may obstruct fume evacuation or become damaged by the temperature or fumes are placed above the smoke exhaust. Do not leave flammable materials near the smoke exhaust. Outdoor evacuation of smoke can be done using: D KRRG RI DGHTXDWH SRZHU and size for the type of oven.
ChefTop™ Smoke and gas exhaust ( BakerTop™ Only for gas ovens) An exhaust pipe evacuates smoke and odours from the oven cavity as well as the exhaust gases. Evacuation may be done in various manners: select the method best suited to the nominal power of the appliances installed; and follow the local/national installation regulations of the country of use. Ovens with kW rating < 14 direct evacuation into the oven's installation environment.
Connecting stacked appliances (MAXI.Link) Connecting appliance with RJ45 cable 3 4 RJ45 6 RJ45 All ChefTop and BakerTop ovens are factory prepared WR EH FRQQHFWHG WRJHWKHU RU WR DFFHVVRULHV SURYHU KRRG EODVW FKLOOHU RVPRVLV V\VWHP HWF The accessories connect to the oven by means of RJ45 connectors located on the back of the ovens, which 2 automatically connect. n Disconnect all appliances from the electricity mains. o Remove the rear panel to access the power board.
ChefTop™ BakerTop™ Table E No. appliances BakerTop™ Range Devices No. appliances ChefTop™ Range Devices 1 2 3 4 6 BakerTop™ Oven - MASTER BakerTop™ Oven - CONTROLLED 1 BakerTop™ Oven - CONTROLLED 2 BakerTop™ Oven - CONTROLLED 3 Prover 1 2 3 4 5 7 Reverse osmosis system 6 8 Static oven - Deck oven 9 Hood 10 Ovex.
Connecting the external USB interface kit and safety thermostat reset button Consult the instructions on the external peripherals and accessories to mount and manage these. $Q RYHUKHDWLQJ UHVHW EXWWRQ $ DQG DQ 5- DWWDFKPHQW SRUW IRU VHUYLFLQJ % DUH VHULHV IHDWXUHV HTXLSSHG on the right hand side of the oven. 7KH IROORZLQJ XVHU LQWHUIDFH NLWV 2YH[ 1(7 DUH DYDLODEOH RQ UHTXHVW “Unox.
ChefTop™ BakerTop™ Examples of correct and incorrect installation OK! 2c m OK! OK! 180 cm OK! >5 OK! 0c 43 m English
INSTRUCTIONS FOR THE USER Contents General appliance operating instructions _______________________________________________________45 Cooking advice ___________________________________________________________________________45 Loading and using the trolleys ________________________________________________________________46 Using the core probe ______________________________________________________________________47 ´0$67(5µ RYHQV ´&21752//('µ RYHQV DQG FRQQHFWHG DFFHVVRULHV ______________________________4
ChefTop™ BakerTop™ INSTRUCTIONS FOR THE USER Before using the appliance: - make sure that you have a system conformity and use permit certificate that is issued by a UNOX authorised installer; - carefully read chapter “Safety regulations“ at page 5 - read the chapter “Forward” at page 4.
Trolley loading and use ( only free-standing trolley ovens) Use only UNOX trolleys, trays and grills. /RDG WKH WUROOH\V ZLWKRXW RYHUORDGLQJ WKHP LW LV normal for the trolley to be pushed downward and lower in height, depending on how full the trays are. 7KH WUROOH\ LV ORDGHG LQWR WKH RYHQ XVLQJ WKH ERWWRP trolley guides. Lock the trays into place when moving the trolley as shown in the figure.
ChefTop™ BakerTop™ Core probe positioning OK During the cooking cycle, the probe detects the temperature at the "core" of the product: it reaches the temperature set by the user when the product is perfectly cooked both on its surface and innermost portion. The core probe must be poked deep into the food being cooked; make sure that the probe head reaches the product's "core" - the innermost portion - without piercing its way through.
“MASTER” ovens, “CONTROLLED” ovens and connected accessories If you own more than one UNOX appliance, we recommend that a specialised technician: - connect all appliance with an RJ45 cable; FRQILJXUH RQH RI WKH RYHQV DV PDLQ XQLW 0$67(5 DQG DOO RWKHU RYHQV XS WR XQLWV DV DX[LOLDU\ &21752//(' This makes it possible to manage the interconnected "MASTER" oven, the "CONTROLLED" ovens and all FRPSOHPHQWDU\ DSSOLDQFHV H J SURYHUV VLPSO\ E\ DFWing on the control panel of the "MAST
ChefTop™ COOKING SYSTEM Pollo 2 3 1 4 BakerTop™ (only for ChefTop™ ovens) The range of ChefTop™ ovens, thanks to ADAPTIVE.Clima technology and an array of dedicated accessories, makes it possible to cook chicken/fowl with significant savings in time, appliance cleaning and disposal of fats and oils. n Rack Pollo KROGV FKLFNHQ Thanks to the Pollo, rack, the oven cavity space is optimised to allow larger loads: the rack's design cooks every chicken to perfection.
Use 1 2 3 4 13 5 6 7 3UHVV UHSHDWHGO\ WR VHOHFW WKH 67(36 WKH VFUHHQ displays the STEP in use. 7KH VFUHHQ GLVSOD\V WKH WLPH RU FRUH SURYH WHPperature set. 7KH VFUHHQ GLVSOD\V WKH VHW FDYLW\ WHPSHUDWXUH RU Delta "t". 3UHVV WKH EXWWRQ UHSHDWHGO\ WR VHOHFW WKH SDUDPHWHUV WR VHW WHPSHUDWXUH FRRNLQJ GXUDWLRQ HWF The active parameter is indicated by the blinking corresponding icon: 8 12 9 10 11 6ZLWFKHV RQ WKH DSSOLDQFHV VWDUWV VWRSV WKH FRRNing cycle.
ChefTop™ BakerTop™ Basic notions The appliances can be used in MANUAL or PROGRAMMED mode. The MANUAL mode implies that the following parameters for each cooking cycle are set by the user: FRRNLQJ WLPH RU FRUH WHPSHUDWXUH E\ PHDQV RI FRUH SUREH WKH WZR SDUDPHWHUV UHFLSURFDOO\ H[FOXGH HDFK RWKHU RYHQ FDYLW\ WHPSHUDWXUH RU 'HOWD W 'HOWD W FDQ EH VHW RQO\ LI WKH FRUH SUREH LV XVHG &/,0$ /X[ SHUFHQWDJH RI RYHQ FDYLW\ VWHDP LQSXW UHOHDVH 67($0 3OXV '5< 3OXV - airflow speed.
MANUAL mode TIME CONFIGURATION TEMPERATURE CONFIG. SELECT SELECT DRY.Maxi STEAM.Maxi SELECT 2..9 TEMPERATURE CONFIG. STEP STEP x2 CORE PROBE CONFIGURATION START/STOP SELECT DRY.Maxi SELECT DELTA “t” CONFIGURATION STEAM.Maxi SELECT x2 SELECT Pressing the button moves from one STEP to the next; the current STEP is shown on the screen "1".
ChefTop™ BakerTop™ SETTING COOKING DURATION 7,0( :,7+ &25( 352%( Cooking duration can be set by establishing: - cooking TIME H J PLQ RU - the CORE TEMPERATURE measured by the probe H J & - insert the probe into the smallest remaining product; - close the door and press the button: the oven will propose the same previous core temperature. The two values reciprocally exclude each other: selecting the time in the same STEP excludes the core temperature parameter and vice-versa.
SETTING THE COOKING TEMPERATURE OF DELTA "T" Cooking temperature can be set by establishing: - an oven cavity TEMPERATURE H J & RU - by using the '(/7$ ´tµ IXQFWLRQ RQO\ LI XVLQJ WKH FRUH SUREH 1 The two values exclude each other: Delta "t" will be excluded if selecting the oven cavity parameter and vice-versa.
ChefTop™ BakerTop™ SETTING CLIMA LUX '5< 0D[L DQG 67($0 0D[L 1 3 2 The oven cavity internal climate setting is indicated by the CLIMA LUX™ ellipse and is set using the buttons. DRY.Maxi The 10 BLUE LEDs indicate the percentage of target KXPLGLW\ LQVLGH WKH RYHQ FDYLW\ 67($0 PD[L STEAM.Maxi DRY.Maxi™ The patented DRY.Maxi™ technology makes it possible to quickly extract all the humidity from the oven cavity, whether it was released by the products in the oven or generated by the STEAM.
6(77,1* 7+( $,5)/2: 63(('6 $,5 0axi The motor rotation speed and their work modes can be set by pressing the EXWWRQ ZLWK RXW UHYHUVH URWDWLRQ 6SHHG LV WKH GHIDXOW YDOXH ZKHQ the button is first pressed, while repeated pressing sets the speed to 5, 4, 3, 2, 1 and P. 1 Pulsed mode The pulsed mode switches off the motor as well as the resistors when the set temperature has been reached. The fan rotation direction is reversed each time the motor is switched on.
ChefTop™ BakerTop™ PROGRAMMED Mode ChefUNOX - BakerUNOX LAST PROGRAM +3 REGEN - STEAM - GRILL FAKIRO GRILL - PAN FRY MULTITIME - FAKIRO PIZZA POLLO - COMBI BAKE BAGUETTE - ROASTING CRISPY ROAST - NIGHT ROAST BRAISE APPEARS ONLY IF A MANUAL PROGRAMME WAS ENGAGED RESTART APPEARS ONLY IF A PROGRAMME IS INTERRUPTED ACM01 … ACM20 PURE PUMP LOADING P01 COOL POSITION OF PROGRAMMES SAVED BY THE USER LONG WASHING MED WASHING SHORT WASHING QUICK WASHING SEMI AUTO WASHING H2O WASHING P99 LAST PROGRAM
PURE :$7(5 ),/7(5,1* 6<67(0 6(77,1*6 The PURE function accesses a hidden menu from which FDQ EH VHW WKH ZDWHU VRIWHQHU ILOWHULQJ V\VWHP 5HYHUVH RVPRVLV NLW ZLWK ´8QR[ 385( 52µ SXPS RU ´8QR[ 385(µ ILOWHUV n Press the EXWWRQ UHSHDWHGO\ XQWLO VFUHHQ ´ µ displays the message PURE. o The message "END" appears on screen. p Press the button, the message "PIN" appears: q Press the button, the message "HDR" appears.
ChefTop™ BakerTop™ Assigning a name to a programme n Press . o Use the buttons to input the 1st let- ter of the programme name. Press 3 1 again buttons to select the and use the 2nd letter. Repeat the same operation for all sucFHVVLYH OHWWHUV XS WR D PD[LPXP RI OHWWHUV 2 p To end letter input, press the button and check the name entered: button to access the if correct, press the cooking parameters settings; in incorrect, press the input the letters.
RECALLING AND STARTING A SAVED PROGRAM n Press the button. o press the buttons until the target program appears on screen "8". p start it by pressing the START/STOP button. The oven beeps to signal cooking phase end. 2 1 Press the button for 2/3 seconds to interrupt START/STOP the cooking cycle in advance. When a saved cooking program is started, the oven preheats automatically to the set preheating temperature.
ChefTop™ ChefUnox - BakerUnox BakerTop™ 35(6(7 $8720$7,& 352*5$00(6 The oven comes with a library of preset automatic programmes for cooking specific foods VHH WDEOH RQ IROORZLQJ SDJH . Select the various programmes to cook an endless variety of foods: several programmes allow adjustment of different parameters to satisfy personal tastes. 1 n Press the 2 button. o Use the button to select the desired pro- gramme. 5(*(1 67($0 *5,// )$.
TEMPERATURE ADJUSTMENT - CLIMALUX - FAN SPEED F Press the button until the temperature icon G Set preheating temperature using the buttons. H Press the EXWWRQ XQWLO WKH ´&OLPD/X[µ PHVsage appears. blinks. F G I 6HW WKH GHVLUHG YDOXHV 67($0 SOXV RU '5< SOXV using the q buttons.
COOKING... Cooking/Baking ESSENTIAL advised ChefTop™ +3 REGEN Regeneration from 3°C - ChefTop™ STEAM Steamed vegetables, hard-boiled eggs, steamed rice...
$&0 !$&0 6$9,1* &22.,1* 352*5$00(6 :,7+ $'$37,9( &/,0$ This technology allows the oven to constantly control all FRRNLQJ SDUDPHWHUV WHPSHUDWXUH UHDO KXPLGLW\ OHYHO LQ WKH FDYLW\ HWF Therefore, the oven is able to recognise the amount of food loaded into it and consequentially adjusts the parameters of the programme selected in function of the actual load.
ChefTop™ COOL BakerTop™ 29(1 &$9,7< &22/,1* )81&7,21 The "COOL" function cools the oven cavity only by running the fans. The function can also be engaged while the door is open to speed cooling. The oven cavity temperature is displayed for the entire cooling duration. 3 1 2 n Access the programming menu by pressing the 'XULQJ ´&22/µ PRGH RYHQ FDYLW\ FRROLQJ WKH DSSOLDQFH DOVR IXQFWLRQV ZKLOH the door is open.
q The washing programme is interrupted: Programmes Time * $ DW WKH HQG RI WKH WLPH OLVWHG LQ WKH WDEOH QRQ DGMXVWDEOH QUICK WASHING 30 min -> % LQ DGYDQFH E\ SUHVVLQJ indefinite override of the current washing program; the H2O WASHING programme starts automatically and canQRW EH VWRSSHG PLQXWH GXUDWLRQ ,I WKHUH LV D SRZHU IDLOure while the H20 WASHING programme is running, the programme resumes from its interrupted point as soon as power is restored; SHORT WASHING 39 min MED WASHING 58
ChefTop™ BakerTop™ Oven-user interface The ovens show any alarm/warning messages regarding WKH RYHQ RU LQVWDOOHG SHULSKHUDOV SURYHUV RU KRRGV RQ their display screens. 7KH ZDUQLQJ PHVVDJHV WARNING VLJQDO PDOIXQFtions that nevertheless allow the appliance and peripherals to operate, though with a restricted set of functions. Pressing button THE SCREEN.
Display Description Effect Troubleshooting WF - OVEN ALARM WF01 Warning: cavity 1 probe The oven continues to run using the cavity 2 probe, therefore temperature adjustments may be less accurate WF02 Warning: cavity 2 probe The oven continues to run using the cavity 1 probe, therefore temperature adjustments may be less accurate WF03 Warning: core probe The oven continues to run but the core probe cannot be used for cooking cycles WF04 Warning motor tachometer: alarm AF08 may be triggered afte
ChefTop™ Display Description BakerTop™ Effect Troubleshooting The static oven stops all operating cycles and blocks any display screen configuration Contact the Customer Assistance Service Effect Troubleshooting The static oven stops all operating cycles and blocks any display screen configuration Contact the Customer Assistance Service Effect Troubleshooting AS - STATIC OVEN ALARM AS01 Bottom thermostat safety alarm AS02 Ceiling thermostat safety alarm AS03 Oven dektop communications alar
Display Description Effect Troubleshooting AL - PROVER ALARM AL01 Cavity probe alarm AL02 Communications failure alarm AL10 Incorrect CRC alarm in EEPROM for essential parameters Display Description The prover stops any operating cycle and stops any successive display screen settings Effect Contact the Customer Assistance Service Troubleshooting WL - PROVER WARNING WL01 Error humidity probe WL02 Error of temperature board WL03 Error of resistor compartment probe WL10 Error in EEPROM C
ChefTop™ Display Description Effect BakerTop™ Troubleshooting AO - REVERSE OSMOSIS ALARM AO01 Pressure gauge alarm: excessive pressure AO02 Low pressure alarm AO03 Effect Display Reverse osmosis stops all water treatment cycles Contact the Customer Assistance Service Communications failure alarm Description Effect Troubleshooting WO - REVERSE OSMOSIS WARNING WO01 Osmosis filter to be replaced WO02 Intake filters obstructed WO03 NTC temperature above threshold Display Description Osmo
Routine maintenance Any routine maintenance procedure must be performed: - after disconnecting the appliance from the power, water and gas supplies( ONLY FOR GAS OVENS); DIWHU KDYLQJ SXW RQ WKH SURSHU SHUVRQDO SURWHFWLRQ HTXLSPHQW L H JORYHV HWF Clean the oven cavity daily to maintain proper levels of hygiene and to keep the stainless steel inside the oven cavity from getting ruined or corroding.
ChefTop™ BakerTop™ Internal part of the oven cavity Failure to clean the oven cavity daily as hereafter described can make the accumulated fatty substances or food residues inside the cavity catch fire - danger of fire! CLEANING WITH ROTOR.KLEAN® 7KH RYHQV FRPH HTXLSSHG ZLWK RQH WZR LPSHOOHU V IRU cleaning the oven cavity. Follow the procedure below for correct cleaning: UNOX.
WASHING BY HAND 1 2 Follow the procedure below for cleaning the oven cavity: - switch on the oven and set the temperature to 55°C DQG VWHDP 67($0 0D[L WR - run the oven for 10 minutes; - wait for the surfaces to cool off and clean with a soft cleaning cloth; - rinse completely to remove all residues. Remove the side grill holder to make cleaning easier as shown in the figure. Clean the grill holders with soapy water or specific cleaners; do not clean inside the dishwasher.
ChefTop™ BakerTop™ If the appliance is not permanently connected to a drainage system, the conical plug that seals the drain pipe must be removed before starting any washing cycles. Replace the plug after this procedure. OK Inside and outside oven door window glass Wait for the windows to cool off. Use only a soft cleaning cloth dampened with a little soap and water or specific glass cleaners. Rinse and dry completely.
only for gas ovens Appliances that evacuate exhaust gas through a flue must have qualified installer inspect it periodically in compliance with the laws in force in the country of installation. Request written documentation of the inspection.
ChefTop™ BakerTop™ After-sales assistance In case of any malfunctions, disconnect the appliance from its power and water supply. Consult the solutions proposed in the “Table F”. If the solution is not listed in the table, contact a UNOX authorized technical customer service.
Certification EU declaration of conformity for electrical appliances Manufacturer: UNOX S.p.A.
OVENS PLANET ® International B.V. Groot Mijdrechtstraat 42 Postbus 32 3640 AA Mijdrecht Tel. +31 (0)297-282341 - Fax. +31(0)297-287405 BAKERTOP-CHEFTOP nl ma 2012 www.emga.com info@emga.com www.unox.