
Manual

July 2017 | uniz3d.com
18
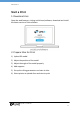
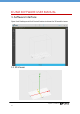
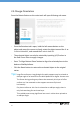
2.5 Change Orientation
Press the Rotate Button on the main tools will open following sub menu.
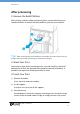
Once the Rotation tab is open, hold the left mouse button on the
object and move the mouse to freely rotate the object around the X- or
Y-axis in Unlock XY, and around the Z-axis in Lock XY.
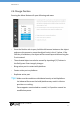
The activated object can also be rotated by inputting X/Y/Z values in
the field. Press Enter to apply changes.
Press ‘To Align Bottom Plane’ button to align the selected plane to the
bottom of build platform.
Click the Reset button to restore the activated object to the original
status.
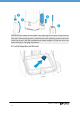
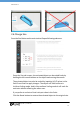
Tips: Large Flat surfaces or Long Straight line with supports may be printed at
oblique angle of at least 10º to the build platform for higher success rate.
The forces during peeling may distort the extremely thin layer of a flat
surface or a line mounted on the support structures if printed
horizontally.
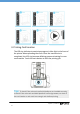
If a planar surface or thin line is oriented at an oblique angle, there is
only little overhang for each new layer.
Thin-walled parts occupy significant less area in a slice when printed at
an oblique angle.