USER MANUAL
MAN70628 REV A TABLE OF CONTENTS A WELCOME 2 SPECIFICATIONS OF SLASH 2 B SETTING UP YOUR PRINTER 3 THE 3D PRINTING SYSTEM 3 ACTION BUTTON COLOR GUIDE 4 PRODUCT DESCRIPTION 5 QUICK GUIDE 6 START A PRINT 11 AFTER PROCESSING 13 C UNIZ SOFTWARE USER MANUAL 14 SOFTWARE INTERFACE 14 START YOUR FIRST PRINTING JOB 16 ADDITIONAL TOOLS 28 D TROUBLE SHOOTING 29 E MAINTENANCE MANUAL 33 July 2017 | uniz3d.
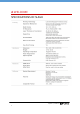
A WELCOME SPECIFICATIONS OF SLASH July 2017 | uniz3d.
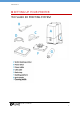
MAN70628 REV A B SETTING UP YOUR PRINTER THE SLASH 3D PRINTING SYSTEM July 2017 | uniz3d.
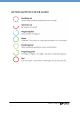
ACTION BUTTON COLOR GUIDE July 2017 | uniz3d.
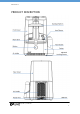
MAN70628 REV A PRODUCT DESCRIPTION July 2017 | uniz3d.
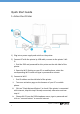
Quick Start Guide 1. Active Your Printer 1) Plug into a power supply and switch on the printer. 2) Connect PC with the printer by USB cable, connect to the printer's WIFI. i. Find the SSID and password for this printer on the side label of the printer. ii. Open the Wi-Fi Setting on your PC or mobile phone, select the corresponding Wi-Fi name and type in password to connect. 3) Connect to Wi-Fi i. Find IP address on the side label of the printer. ii.
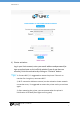
MAN70628 REV A 4) Printer activation Log in your Uniz account, enter your email address and password (to sign up and activate on Uniz official website if you do not have an account), finish the activation by clicking on “Activate” button. Tips: 1.
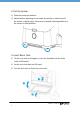
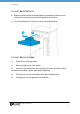
2. Put the printer 1) Place the printer on platform. 2) Adjust the four adjusting screws under the printer to make it level if the printer is slightly tilted. The printer is leveled if leveling bubble is in the center on build platform. 3. Insert Resin Tank 1) Tilt the resin tank to 30 degrees, insert the fixed bolt into the holes inside of LED panel. 2) Put the resin tank back on LCD panel. 3) Turn the lock catch to fasten the resin tank. July 2017 | uniz3d.
MAN70628 REV A 4. Insert Build Platform 1) Keep the metal surface of build platform downward, make sure the locking arm is opened, put the build platform on the arm. 2) Turn the locking arm clockwise to lock the build platform. 5.
WARNING.Be aware of the needle in the opening, do not touch. Keep the vent hole open when pumping resin, otherwise the resin pumping system may burst inside the printer. Use the provided small rubber stopper to close the vent hole when stocking or changing resin bottle. 6. Install Liquid Level Sensor July 2017 | uniz3d.
MAN70628 REV A Start a Print 1. Download Uniz Open the web browser, visiting uniz3d.com/software, download and install the latest version of Uniz software. 2. Prepare Slice for Print 1) Upload 3D model. 2) Adjust the position of the model. 3) Adjust the angle of the model properly. 4) Add supports. 5) Set up the slicing parameters and start to slice. 6) Select printer to upload slices and start to print July 2017 | uniz3d.
3. Printing Confirmation The LED ring indicates transmission progress in blue light in the front of the printer when uploading the slices. Once the transmission is completed, the LED ring becomes blinking green and waiting for user confirmation. Touch the main button to start the printing job.
MAN70628 REV A After processing 1. Remove the Build Platform After printing, take on rubber protective gloves, rotate the locking arm counterclockwise to unlock the build platform, pull out and remove it. Tips: After removing the build platform, remember to close the top cover to prevent the remaining resin being cured by external light. 2. Wash Your Print Use tissue to wipe off the remaining resin, rinse the model on the build platform by alcohol, the gap and hole should be cleaned particularly.
C UNIZ SOFTWARE USER MANUAL 1. Software Interface Open Uniz Desktop and click Control button to show the 3D model viewer. 1.1 3D Viewer July 2017 | uniz3d.
MAN70628 REV A 1.2 Main Tools 1.3 Additional Tools 1.4 Printer Control The Printer Control icon will not be present until your printer is connected to your computer. Once connected, click on the Printer Control button to control the printer. When multiple printers are connected, multiple icons will show up to control the corresponding printers. July 2017 | uniz3d.
1.5 Status Bar The status bar appears along the lower edge of the window and shows software progress, such as the loading, generating support, and slicing progresses. 2. Start Your First Printing Job Once the printer hardware is set up, make sure the power is plugged in and printer is turned on, and connected to your computer via USB. 2.
MAN70628 REV A 2.4 Change Position Pressing the Move Button will open following sub menu Once the Position tab is open, hold the left mouse button on the object and move the mouse to move the object freely in the X-Y plane. If the Shift key is held down, the object will be moved up and down along the Z-axis instead. The activated object can also be moved by inputting X/Y/Z values in the field, press Enter to apply changes. Bring active part in contact with platform.
2.5 Change Orientation Press the Rotate Button on the main tools will open following sub menu. Once the Rotation tab is open, hold the left mouse button on the object and move the mouse to freely rotate the object around the X- or Y-axis in Unlock XY, and around the Z-axis in Lock XY. The activated object can also be rotated by inputting X/Y/Z values in the field. Press Enter to apply changes. Press ‘To Align Bottom Plane’ button to align the selected plane to the bottom of build platform.
MAN70628 REV A 2.6 Change Size Press the Size Button on the main tools will open following sub menu. Once the Size tab is open, the activated object can be scaled freely by holding the left mouse button on the object and moving the mouse. The activated object can also be scaled by inputting X/Y/Z values in the field. Press Enter to apply changes. The object will scale uniform in Uniform Scaling mode. And in Non-uniform Scaling mode it will scale for each axis without affecting the other axes.
Tips: Change object’s size will break generated supports. Note that Change size by modify scale value do not support multi-select. 2.7 Generate Supports Most models need additional support structures to print successfully, especially those with overhangs. Press the Supports Button on the main tools to open the Supports sub menu. Once the Supports tab is open, supports can be added to the active object by pressing the Generate button.
MAN70628 REV A Lift, lifts the activated object form the build platform up 5mm. Down, pushes the activated object down to the build platform. Generate, generates the support structure using the current settings for all selected models. Edit, allow manually add, modify, or delete support structures. Entry/Exit Manual Edit Press the Edit button, the system entry manual edit support mode. Whether the model is selected or not, you can edit supports manually.
You can also change the Support Radius, Header Length, or Point Size sliders to modify support properties. Delete Support Once a support is selected, press “DELETE” key to remove it. Tips: The Lift, Down, Generate buttons are only enable when a model is being selected and activated. 2.8 Slice Press the Slice Button on the main tools will open twosub menus, the left menu is to start Slice and Show Slices, and the right drag bar and menu is for customization of slice profile. a.
MAN70628 REV A Thickness is the layer thickness, which is related to Z resolution. Exposure Time is the exposure time of a layer in this segment, it may vary due to different layer thickness setting or different resin types, i.e. zWax resin takes about 2x exposure time per layer compare to zABS. Cool Down Time is the time to cool down the exposed layer to protect the polymer film from overheating.
Hollowing hollows segment of the object. The Wall Thickness can be changed at Wall Thickness of Hollowing in Advanced Setting. This works only with simple slice geometries, and the object must be thicker than twice the Wall Thickness. Pause sets a pre-set pause at the layer of choice during printing, the pause can be resumed after pressing the Resume button in the printing control tab. b.
MAN70628 REV A 2.9 PRINT Once a printer is connected to your computer, a circle button will show up on the right toolbar. a. Print Tools Press the printer icon to open the Printer Control Panel .The Printer Control Panel is used to control the printer for printing and regular maintenance. Click the circle again to close the Panel. Start Job: Click Start Button , the system will send the current slice data to printer and start printing.
Cancel Job: Click Cancel Job to cancel the current printing job. Fill Resin: Click Fill Click again to stop. to start pumping resin from the bottle into the tank. Redraw Resin: Click Redraw to start redrawing resin from the tank back into the bottle. Click again to stop. Full Screen Clean: Click Clean to expose the entire screen in order to fully cure and clean the resin at the bottom of the tank. Debris from previous jobs may damage the LCD screen in the next job.
MAN70628 REV A b. Print Process Send Data to Printer: Click Start Button printer. to send current slice to this Complete File Transfer: Once you click Start, Uniz Desktop’s progress bar and the printer's front LED circle button will indicate the file transfer progress. Confirm Print Job: Make sure that your printer is ready to print and then touch the printer's front LED circle button to confirm print job.
3. Additional Tools New Scene The current scene will be discarded, and a new scene will be created. Save Scene Save the current scene in UNIZ file format which include 3D model data, support structures, operation history (translation, orientation, scaling), and slice profile. You can load any saved scene and resume editing at a later time. Save Scene as Save current scene to another .UNIZ file. Undo Operation Repeal one previous operation. Redo Operation Remake one previous operation repealed by “Undo”.
MAN70628 REV A D TROUBLESHOOTING Problems 1. The first layer does not stick Reason Solutions The calibration for platform Calibrate again initial point is not in place Build platform surface is not Use provided sandpaper to roughen the surface rough of the build platform and clean up Replace a new resin tank if you have, 2.
3. Abnormal LCD panel, It does The LCD cable is not inserted Follow the guidance to re-insert the LCD cable not display or flash the logo, properly display differently on the left and right side of the panel under the The screen is damaged Follow the guidance to replace the LCD panel show logo function 4.
MAN70628 REV A At the beginning of the printing, there is solid resin 7. The surface of the screen has Replace a new resin tank and clean the residual residue on the build platform liquid or solid resin residue resin on the screen surface that causes damage to the resin tank film Clean up the residual resin follow the guidance, Used resin bottle with old seal and replace a new resin bottle with new seal solution solution 8.
10. Printed model has ripples on Z axis shaking the side Return to the factory to repair 11. Oily liquid exuded at the seams area in the front of the label at the bottom of the The cooling system is broken machine, and the level of the liquid in the coolant tank is significantly reduced Return to the factory to repair 12.
MAN70628 REV A E MAINTENANCE MANUAL 1. Before using the printer, please be aware to adjust the 4 adjusting screws at the bottom of the printer to ensure that the build platform is leveled. 2. Please be aware to check if the LCD panel stick together with the resin tank film when you use the printer. The area stick closely together, as circled below, is darker than the area without sticking. Normal Abnormal 3.
4. Please keep the build platform surface clean and wipe off the residual resin timely; 5. Please keep the casing of the printer clean and wipe off the residual resin timely; July 2017 | uniz3d.
MAN70628 REV A 6. Do not scratch the “DO NOT PRESS” area on the LCD panel when scraping the resin tank to prevent LCD panel damage. 7. Clean the residual resin after removing the resin level sensor from the resin tank; 8. Do not touch the main button by your hand with residual resin; July 2017 | uniz3d.
9. It is suggested to use the resin tank cover to store resin in the tank. 10. If the machine is not used for a long time after using the resin level control system, please clean the resin injection conduit by ethyl alcohol from the CLEAN bottle; 1. 2. 3. 4. 5. 6.
MAN70628 REV A July 2017 | uniz3d.
July 2017 | uniz3d.com 38 UNIZ 9400 Activity Rd Ste L, San Diego, CA 92126 support@uniz3d.com uniz3d.