FCC Statement FCC Class B Radio Frequency Interference Statement Note: This equipment has been tested and found to comply with the limits for a Class B digital device , pursuant to part 15 of FCC Rules. These limits are designed to provide reasonable protection against harmful interference in a residential installation. This equipment generates, uses, and can radiate radio frequency energy and.
Notice 1: The changes or modifications not expressly approved by the party responsible for compliance could void the user's authority to operate the equipment. Notice 2: Shielded interface cables, if any , must be used in order to comply with emission limits.
Table of Contents 1-0 About this product 1-1 Introduction 1-2 Do's and Don't for Usage 1-3 Parts List 1-4 Warranty 1-5 Features 1-8 Identification of Features 2-0 installation 2-1 Location 2-2 Power Connection 3.0 Connecting 3-1 Connecting to your Computer 3-2 Connecting the connectors of the use Cable 4.0 Initial Connection 5.
1.0 About this product 1-1 Introduction This product confirms to USB Specification Rev. 1.0 and HID class definition Rev.1.0 It requires at least Windows Windows 98 to operate and your computer must have a USB port. The Hub topology supports up to 127 physical devices in a tired-star configuration, with each device having a maximum of 16 end points.
0 It is recommend that you disconnect the power supply if the unit is not going to be used for a long period of time. 0 Do not leave the unit in a location exposed to high humidity, high temperatures, direct sunlight, excessive dust, or excessive moisture. 3 Do not touch the unit or cable with a wet hand, as a electric shock is possible. Should the unit become wet, unplug from it's power source before handing.
1-3 Park List Each unit should include the following parts : * USB 4 Ports HUB * Warranty Card * USB * Instruction Manual * AC Adapter 1.4 Warranty 0 This product is warranted for a period of one year after the date of purchase to be free of manufactures defects and to operate properly. During the one year period should a problem occur, please return the unit, along with your warranty card to the place of purchase, and we will replace the defective unit.
1-5 Features 0 This product confirms to USB Specification Revision 1.0 and HID Class Definition Rev.1.0. 3 This product is plug and play compatible. J A maximum of 127 devices can be supported. 0 A maximum 5 m connection cable can be used between two hubs. 3 This unit can be self-powered by using the AC Adapter supplied or Bus powered. 0 All 4 downstream ports are supported with over current capacity. 0 Both low speed and high speed devices are supported.
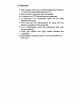
1-6 Identification of Features m Tag Side ®Power LED | Red light is lighted when power is supplied to the unit @LED 1~4 Green light is light for each of the four ports when they are connected and active
®Down Stream Ports Four, USB A-type connector ports connect to USB devices a Up Port Stream Port @Power Socket Please note : USB B-type connector port for connect to the PC For the AC Adapter jack connection OUp Stream means to the PC and Down Stream means to the USB device. OUST device means, a device that confirms to USB specifications.
2.0 Installation 2-1 Location The best location for the placement of this unit is in the USB devices to be connected and close enough to the PC to allow the supplied cable to reach the PC. Important Do not place the unit in any of the following locations: O High temperature or high humidity location. OA location that has a strong magnetic field. OA location with excessive dust. OA location that has excessive extremes in temperatures. JA location that is in direct sunlight for long periods of time.
2-2 Power connection Locate the unit close enough to a electrical outlet so that the AC adapter cable will reach the outlet without putting a strain on the cable causing the adapter jack to be pulled out of the unit. Olt is recommended that the AC adapter be plugged into the electrical outlet first, and then plugged into the unit . Olt is recommended that the AC power adapter be used at all times.
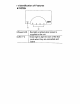
3.0 Connecting the unit 3-1 Connecting to your computer This unit can be connected or disconnected to your PC when the computers on and running programs, using any USB port on your computer. This product allows your computer to interface with various USB devices. See figure below . | Connector | i Connector A Connector B connector Product A.
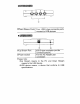
3-2 Connecting the connectors of the USB cable A type connector] Insert USB cable into the down stream port of the PC (or) this product. Make sure that it goes all the way into the socket and is firmly connected. Insert USB cable to up stream port of this product (or) USB devices Make sure that it does all the way into the socket and is firmly connected.
4.0 Initial Connection D When connecting this unit for the first time a message box will display : “Searching for unknown hardware device, searching software for installation” O Your computer will then start up the Device Driver Wizard, and will install the unit. This product is recognized as "Common USB Hub” Once your computer has confirmed installation, you can then plug in whatever USB devices you wish to the Hub.
s Trouble shooting If you encounter problems in using this product, please refer to the following list of common problems encountered and possible causes. If you cannot solve the problem or it does not appear in the list below, please contact the place of purchase for repair or replacement. Trouble * Computer cannot recognize this product.
Hardware Specifications Specification USB specification Rev.1.0 and HID class definition Rev 1.