
User's Manual


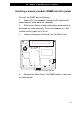
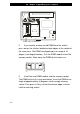


Table Of Contents
- 223IIx_English_C_02.pdf
- 223IIx_English_Index_01.pdf
- 223IIx_English_Index_02.pdf
- 223IIx_English_4_03.pdf

■ chapter 4 upgrading your computer
Notch
7. Pivot the DIMM until the latches on both sides of the
socket snap into place.
Note: Notice the notch on the DIMM. The notches should fit nicely with the
socket.
8. Replace the System Device Cover and 8 Screw A’s.
Congratulations! You have just completed the memory upgrade.
When you boot up the computer, you should expect to see an
increase in DRAM capacity.
Note: Your computer has been tested with a wide range of DIMM on
the market. However, not all memory modules are compatible. Check
with your system vendor for a list of compatible DIMM for your
computer.
4-9