
User's Manual
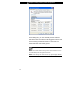
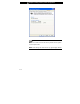


Table Of Contents
- 223IIx_English_C_02.pdf
- 223IIx_English_Index_01.pdf
- 223IIx_English_Index_02.pdf
- 223IIx_English_4_03.pdf

■ chapter 4 upgrading your computer
HDD
Module
Screw B
Screw B
6. Locate and remove 4 Screw C’s from the HDD module.
Remove the metal case.
Screw
C
Screw C
HDD Module
Remove the hard dr ive from
the metal frame
7. Re-attach the metal cover to the new hard drive and
tighten 4 Screw C’s. Note the green PC board of the hard disk
drive is facing against the metal case.
8. Re-insert the HDD module to the HDD connector.
9. Re-attach and tighten 2 Screw B’s. (If the HDD assembly
is not fully inserted into the bay, the screw and its hole will not
line up.)
10. Replace the System Device Cover and 8 Screw A’s.
4-4