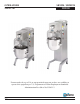
OPERATORS MANUAL SRM20 / SRMF20 MIXER Persons under the age of 18 are not permitted to operate or have accessibility to operate this equipment per U.S. Department of Labor Employment Standards Administration Fact Sheet No. ESA91-3.
Welcome to Univex Thank you for purchasing this Univex Product. Your new SRM20 / SRMF20 mixer has been designed with advanced performance and safety features that make it an excellent addition to your food preparation equipment. Like all Univex mixers, slicers, meat grinders and accessories, this mixer is engineered to provide years of reliable service.
TABLE OF CONTENTS DESCRIPTION PAGE TABLE OF CONTENTS, LIST OF ILLUSTRATIONS . . . . . . . . . . . . . . . . . . . . . . . . . . . . . . . .2 CHOOSING THE RIGHT LOCATION FOR YOUR MIXER . . . . . . . . . . . . . . . . . . . . . . . . . . .3 USER FRIENDLY SWING RING™ SAFETY GUARD . . . . . . . . . . . . . . . . . . . . . . . . . . . . . .3-4 OPERATING THE SRM20 / SRMF20 MIXER . . . . . . . . . . . . . . . . . . . . . . . . . . . . . . . . . . . . .4-6 USING THE POWER TAKE-OFF (PTO) . . . . . . . . . . . . .
CHOOSING THE RIGHT LOCATION FOR YOUR NEW MIXER When selecting the best location for the mixer, it is helpful to consider the following: • Where is the best location for the operator, both for saving steps and easy viewing? • Is this a good location for product flow as in: • Easy to get ingredients to the mixer? • Destination of the mix after mixing? • Is there existing electrical service at this location? • Does this location provide easy access for cleaning and service? • Check to be sure that your mixer w
To remove the guard, simply reverse the installation procedure. Grip the two halves of the guard and pull it open. Use an upward motion to release each half of the guard from the bracket on the machine body. To open the guard for access to the bowl, first turn the mixer off by pushing the red “Stop” pushbutton (Figure 1 [14]). Pull open the two halves of the guard and swing one or both guards outward. It is not necessary to remove them.
USING THE BOWL LIFT The mixer will not operate unless the bowl is in the “up” position. Raise the bowl by turning the bowl lift handle (Figure 1 [15]) clockwise. To lower the bowl, turn the bowl lift handle counter-clockwise. It is necessary to lower the bowl to change the agitator. This also makes the bowl accessible for filling. START/STOP CONTROLS This mixer will start only when the Swing Ring™ Safety Guard is closed and the bowl is in the raised position.
NOTE: Always return to speed “1” before shutting the mixer off. Do not move the speed control lever when the mixer is not running, because this will cause the belt to become loose and the mixer will not operate properly. If the mixer has been shut off by the timer, or the stop button in speed 2, 3 or 4, follow these steps to avoid belt slippage or jerky start: Empty the bowl. Set the timer to “HOLD”. Press the start button and as the mixer begins to operate, move the speed control lever back to speed “1”.
USING THE POWER TAKE-OFF (PTO) The Power Take-Off (PTO) hub (Figure 1 [5]) accommodates #12 tapered attachments such as a vegetable slicer and shredder, or a meat and food chopper. The mixers speed control lever also controls the PTO drive speed. Before installing attachments, turn the mixer off. Remove the PTO cap and loosen the thumb screw (Figure 1 [6]) on the PTO hub. Insert the attachment with a slight twist until it is firmly in place. Tighten the thumb screw.
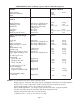
SRM20/SRMF20 Table of Mixing capacity and Recommended Agitators MODEL SRM20 / SRMF20 Bowl capacity Attachment Hub Size Motor 22 qt. #12 1/2Hp 20.8 L 15 lb. 4 qt. 10 qt. (oil) 6.8 kg. 3.8 L. 9.5 L. (oil) Kitchen Capacities (single batches) Agitator Mashed potatoes Whipping cream Mayonnaise Batter beater, 4-Wing beater Wire whip, 4-Wing beater Batter beater, Wire whip, 4-Wing beater Wire whip Wire whip Batter beater Egg whites Meringue Waffle or pancake batter 1 qt. 0.9 L. 1-1/2 pt.(water) 0.7 L.
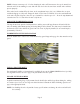
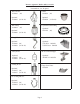
Beaters, Agitators, Bowls, and Accessories Available for the SRM20/SRMF20 Mixer Part numbers (size in quarts) A. Batter Beater 1023083 (20) G. Bowl 1020091 (20) Optional 1020096 (12 for 20) B. Wire Whip 1020095 (20) Optional 1020092 (12 for 20) H. Splash/Extension Ring Optional 1021299 (20) Optional 1020086 (12 for 20) C. Dough Hook I. Vegetable Slicer/Grater Optional 1023089 (20) 1020090 (12 for 20) D. Pastry Knife Optional VS9 Slicer 1000950 VS9H Grater 1001050 J.
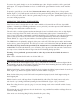
OVERALL VIEW OF FOOD MIXER FIGURE 1 1. 2. 3. 4. 5. 6. 7. 8. 9. 10. BEATER HEAD SHAFT INGREDIENT CHUTE 1000541 SWING RING™ SAFETY GUARD MAGNET PTO HUB #12 THUMB SCREW LOWER MOUNTING BRACKET UPPER MOUNTING BRACKET SPEED CONTROL LEVER SPEED INDICATOR LABEL 11. 12. 13. 14. 15. 16. 17. 18. 19. 20.
CLEANING YOUR MIXER Consistent use of the following procedures will ensure that your mixer is in optimum operating condition. • Warning: disconnect the electrical power supply cord before cleaning. • Wash the body of the mixer, the bowl support, and the beater shaft with warm water and mild soap. • Avoid excess water in the area of the safety switches that protrude from the housing where the Swing Ring™ Safety Guard is mounted. • Do not rinse the mixer with a hose.
SRM20/SRMF20 TROUBLE-SHOOTING GUIDE TROUBLE 1. Mixer will not operate 2. Mixer runs but agitator will not turn. 3. Agitator stalls during mixing. POSSIBLE CAUSE 1.1 Electrical service down. 1.2 Burned switch contacts. 1.3 Timer not turned on. 1.4 Motor capacitor defective 1.5 Burned out motor. 1.6 Safety Ring not mounted and closed. 1.7 Bowl not raised. 2.1 Shifting speed with the mixer not running. 2.2 Broken or slipping belt. 2.
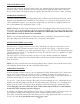
WIRING DIAGRAM (115/208-230V, 60HZ, 1PH) (220-240V, 50HZ, 1PH) (100V, 50HZ, 1PH) FIGURE 2A IMPORTANT: Before making any electrical connections, check the specifications on the data plate, (located on the rear access panel Figure 1 [16]), to make sure that they agree with those of your electrical service.
WIRING DIAGRAM 115V, 60HZ, 1PH (FOR CANADA ONLY) 220-240V, 50HZ, 1PH (FOR EUROPE ONLY) FIGURE 2B IMPORTANT: Before making any electrical connections, check the specifications on the data plate, (located on the rear access panel Figure 1 [16]), to make sure that they agree with those of your electrical service.
WIRING DIAGRAM 380-400V, 50HZ, 3PH (FOR EUROPE ONLY) FIGURE 2C IMPORTANT: Before making any electrical connections, check the specifications on the data plate, (located on the rear access panel Figure 1 [16]), to make sure that they agree with those of your electrical service. WARNING: Whenever maintenance is being performed, or whenever the top cover or rear access panel have been removed, DISCONNECT THE ELECTRICAL POWER SUPPLY CORD and place a tag on it indicating that the mixer is being worked on.
Warranty The Univex SRM20 and SRMF20 mixer carries a two-Year, on-site, parts and labor warranty against any defects in materials or workmanship. The two-year period begins on the date of purchase by the end user and remains in full effect provided the unit is used properly in accordance with our instructions. Any Work to be performed under this warranty must be performed between the hours of 8:00 a.m. and 5:00 p.m. local time, Monday through Friday. Univex will not cover overtime charges of any kind.