
User`s guide


Page | 9
CHAPTER 3 BASIC INSTALLATION
A. INSTALLATION STEPS
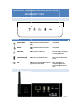
1. Connect the network cable to the Ethernet port at the rear panel of MX3800. Connect the other end to your hub or
switch.
2. Connect the power adapter to a power outlet, and plug the power cord into MX3800’s power input at the rear panel.
3. Press the power button located at front panel of MX3800.
4. MX3800 will start a boot-up process, and the power LED will blink continuously. Boot up time is approximately 3-5
minutes.
5. When the power LED stops blinking and remains on, boot up process is complete.
B. CONFIGURING YOUR MYXERVER™ PRO
Now that everything is connected and powered on, you are ready to configure your MYXERVER™ PRO so that it is
accessible to the users on your network.
This procedure only needs to be done ONCE, by the MyXerver™ Pro Server's Administrator.
Other LAN users should follow the Client PC Setup procedure described in the following
chapter.
The initial configuration can be done either by using a web browser, or by Setup CD (Windows only). Use the Setup CD
method if you have more than one unit of MyXerver™ Pro on your network.
METHOD 1 - USING THE WEB INTERF ACE
1. From web browser, type in: http://MyXerverPro or 192.168.1.100 default IP address. The login screen will be
displayed. Enter user name as “admin” with password “admin”.
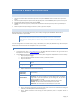
2. Click on Basic, Quick Setup and follow the Wizard to setup basic configuration of MyXerverPro. There are 6 steps.
Step 1: Specify the language
Step 2: Set password. Default username is “admin”, password is “admin”
Step 3: Set hostname.
Server Name
The default name is MyXerverPro. Change this to your own preferred server
name.
Workgroup Name
Normally this name should match the Workgroup name used by PCs on your
LAN.
Step 4: Determine Internet Protocol Setting.
Obtain an IP address
automatically
(DHCP Client)
Select this only if your LAN has a DHCP Server which can allocate IP address
automatically.
Fixed IP Address
You need to enter the following data:
IP address: The utility will suggest an unused IP address within the address
range used on your LAN. If you wish, you can change this, but you must
ensure the address is unused.
Network Mask: This must match the value used by PCs on your LAN.
Gateway: This must match the value used by PCs on your LAN.
DNS Server: This must match the value used by PCs on your LAN.
Step 5: Time setting. Set the date, time and time zone of your local area. For automatic time setting and
calibration, select NTP (Network Time Protocol) option
Step 6: Wizard Confirmation. After setting the above parameters, click on “complete” button to
implement.