
User`s guide


Page | 21
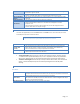
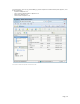
Access Button
Click this Button to view the Groups that have access to the selected Share, and change
these access rights as required.
Delete Button
Click this Button to Delete the selected Share. Deleting a Share does NOT delete its folder or
any data. The folder and its data is still accessible by the "administrators" group.
Save as New Share
Button
After entering the required data in the "Share Properties" area, use this Button to create a
new Share.
Clear Form Button
Clear the form, preparing it for the creation of a new Share.
Save Button
Use this Button change the properties of a Share, as follows:
Select the desired Share in the Share list. Its details will be displayed in the "Share
Properties" area.
Change the Share properties as required. Note that you can NOT change the location.
Click the "Save" button to save your changes.
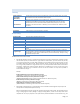
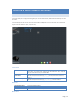
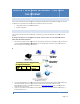
SHARES -ACCESS SCREEN
The screen is displayed when you click the Access button on the Shares screen. This screen allows you to view
and modify the Groups that can access this Share.
Note: The administrators group ALWAYS has R/W access to ALL shares.
Share Name
The name of the Share being modified is shown above the 2 lists of Groups.
Groups with
Access
The "Groups with Access" column on the left shows that group can currently access this
Share. The type of access is shown in brackets. (R = Read Only, R/W = Read-Write).
Note: The "administrators" Group has R/W access to ALL shares.
Other Groups
The "Other Groups" column on the right shows all other Groups on the current Disk Drive.
These Groups cannot access the current Share.
To Add Access Rights: Select the Group or Groups in the right-hand column, and then click the
"<< Read Access" to provide Read-Only access, or the "<< R/W Access" Button to provide Read-
Write access. Multiple Groups can be selected by holding down the CTRL Key while selecting.
To Remove Access Rights Select the Group or Groups in the left-hand column, then click the "No
Access >>" Button. Multiple Groups can be selected by holding down the CTRL Key while
selecting.
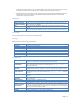
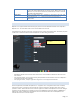
PRINTER SERVER
Print Server
Enable Print Server
If enabled, the MyXerver™ Pro can be functioned as Print Server. User can print from any
computer either with LAN or wifi connection from any computer connected to the same local
network. Multi-function or all-in-one printers are not supported.
Printer Name
Specify one name of the printer that is attached to MyXerver™ Pro USB port. After you plug
one printer into one USB port, the Printer Name will occur in Network Neighborhood and you
can click it to install the Printer Server
Description (optional)
Enter a description such as the location or the owner