
User`s guide


Page | 19
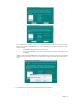
Password
Verify password
Enter the user's password in these fields. Note that 2-byte characters cannot be used in it.
These fields are also used to change an existing user's password, as follows:
Select the desired user
Clear the existing values in the password fields.
Enter the desired password in both the "Password" and "Verify Password" fields. If no
password is required, leave both fields blank.
Click the "Save" button.
When creating a new user, enter the desired password in both of these fields.
Description
(Optional)
Enter a description if you wish. Note that some special characters (e.g. " \ : | , ') and 2-byte
characters cannot be used in it.
Create
Private Folder
(Share)
If creating a new user:
Checking this option will create a Group and a Private Folder (Share) with the same name as
the user.
Read/Write access will be granted to the Share.
If changing an existing user:
The checkbox has no effect - it will neither create nor delete. This option is only available
when creating a new user.
Enable Disk
Quota
Enable the checkbox if you want to set the disk usage for the user, then enter the maximum
amount of disk space this user is allowed to use.
Note! Unless the checkbox is checked, the Disk Quota field has no effect.
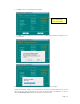
Save as
New User Button
Use this Button to create a new user, after entering their data in the Properties fields.
Clear Form Button
Use this button to clear the form, preparing the form for the entry of a new user.
Groups Button
Clicking this button will display the Groups of which the selected user is a member. You can
then add this user to other Groups, or remove existing membership
Delete User Button
Use this to delete the selected user. When deleting a user, you have the option of deleting the
Group and Share with the same name as the user (if they exist).
How to modify the properties of an existing user
Select the desired user from the list. Their details will be displayed in the Properties fields.
Edit the Properties fields as required. Note that you cannot change the Create Private Folder (Share) option
when modifying a user.
Click the Save button to save your changes.
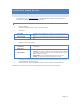
How to define or modify Group membership of a user
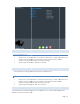
Click on the Groups button. The following screen will be displayed. This screen also allows you to add or revoke
membership.
User name
The name of the user being modified is shown at the top of the screen
Member of
The Member of column on the left shows the Groups that this user belongs to
Other Groups
The Other Groups column on the right shows all the other Groups which may be added to the
list of membership.
To add membership of a Group, select the Group or Groups in the right-hand column, then click the "<<" Button.
Multiple Groups can be selected by holding down the CTRL Key while selecting.
To Revoke Membership of a Group. Select the Group or Groups in the left-hand column, then click the ">>"
Button. Multiple Groups can be selected by holding down the CTRL Key while selecting.
When finished, click the Close button.
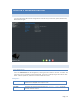
GROU P MA NAGEMEN T
Click on the Administration and Group Management, all existing group will be shown in this menu. A new group can
be created by filling the form and click “Save” button. To delete a specific group, select the user and click “Group”
button.