MyXerver™ Pro MX3800 Wireless Network Storage User’s Guide UNIVERSAL TECH PTE. LTD. www.universal-tech.
TABLE OF CONTENTS Table of Contents........................................................................................................................................................................ 2 Chapter 1 INTRODUCTION .......................................................................................................................................................... 4 A. Overview .................................................................................................................
B. Windows Active Directory Support .......................................................................................................................... 27 C. AjaXplorer................................................................................................................................................................. 27 Chapter 7 ACCESSING MYXERVER™ PRO OVER THE INTERNET ................................................................................................ 29 A. Overview ...
CHAPTER 1 INTRODUCTION A. OVERVIEW Thank you for selecting MyXerver™ Pro Wireless Network Storage! MyXerver™ Pro Wireless Network Storage is the ideal multimedia storage hub for your home or small-business network with both LAN cable and wireless connection.
D. SYSTEM REQUIREMENTS Ethernet connection (router, switch) Windows XP/Vista/7 Mac OS X Tiger, Leopard, Snow Leopard Linux Web browser (IE 6.0 SP1 and later on Windows platforms, Safari 2.0 and later on Mac platforms, Firefox 2.0 and later on Windows and Mac platforms) E. TECHNICAL SPECIFICATIONS Hardware CPU Speed 300MHz RAM 128MB Flash Memory 16MB HDD 1*3.5” SATA Network 10/100/1000 Base-T, IEEE 802.11b/g USB Port 2*USB 2.
Do not move or disconnect the drive while it is operating to avoid hardware damage and potential data loss. Do not stack anything on top of the drive; this can overheat and damage your drive. Do not place the product near any liquid. Liquids can damage the internal electronics. Do not attempt to open the drive’s enclosure. This action voids the warranty.
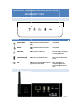
CHAPTER 2 FAMILIARIZATION WITH YOUR MYXERVER™ PRO A. FRONT PANEL LED Indicator B.
Default USB Port USB Copy Ethernet Port This button has 2 functions: IP Address Reset. If the MYXERVER™ PRO’s IP address is lost, press and hold this button for 2 seconds. The IP address will be reset to the default (DHCP client) and the system will beep once to indicate that reset has occurred. Password Reset. If the MYXERVER™ PRO administrator’s password is lost, press and hold the button for 10 seconds. The password will be cleared, and the MYXERVER™ PRO will beep twice.
CHAPTER 3 BASIC INSTALLATION A. 1. 2. 3. 4. 5. INSTALLATION STEPS Connect the network cable to the Ethernet port at the rear panel of MX3800. Connect the other end to your hub or switch. Connect the power adapter to a power outlet, and plug the power cord into MX3800’s power input at the rear panel. Press the power button located at front panel of MX3800. MX3800 will start a boot-up process, and the power LED will blink continuously. Boot up time is approximately 3-5 minutes.
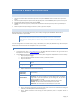
3. MyXerver™ Pro is now operational. You can view the System Information on the first screen after login. METHOD 2 - USING THE SETUP CD ( WINDOWS ONLY) 1. Insert the MyXerver™ Pro MX3800 Setup CD into your CD-ROM drive of your computer. 2. Install MyXerver™ Pro Setup Utility from CD and run the program after installation. The Welcome screen will be displayed. 3. Click Setup to start the Setup Utility.
A list of MyXerver™ Pro network storage on your network will show on the left side. The right side displays details of the currently selected MyXerver™ Pro. If the desired MyXerver™ Pro network storage is not listed, check the following: • • The MX3800 has finished the start up and boot process. Your PC and the MX3800 are on the same LAN segment (there is no Router between your PC and the MX3800). Otherwise, select the desired MX3800 (default name of MyXerverPro), and click the "OK" button.
Select this if your LAN has a DHCP Server, otherwise select “Fixed IP Address” Suggested values are compatible with your LAN. Suggested IP address is currently used. Server Name Obtain an IP address automatically (DHCP Client) Fixed IP Address 5. The default name is MyXerverPro. Change this to your own preferred server name. Select this only if your LAN has a DHCP Server which can allocate IP address automatically.
6. Click Next to continue. The following screen is displayed. All Settings are displayed. Please confirm they are correct, then click Save. 7. Click Save to save your configuration. On the next screen, click OK to close the Setup utility. MyXerver™ Pro is now operational. After the configuration above, all Windows users can access MX3800 with "guest" access rights. However, we recommend creating a "User" for each person on your LAN.
C. SHUTDOWN To shut down MX3800, press power button for about 5 seconds. The power button LED will start blinking and wait for all LEDs to turn off.
CHAPTER 4 BASIC SETUP A. WIZARD SETUP From web browser, type in: http://MyXerverPro or 192.168.1.100 default IP address. The login screen will be displayed. Enter user name as “admin” with password “admin”. STEPS FOR WIZARD SET UP 1. 2. Specify the language Set password. Default username is “admin”, password is “admin” 3. Set hostname 4. Server Name The default name is MyXerverPro. Change this to your own preferred server name.
B. ADD USER ADD USER WIZARD 3-STEP 3 -STEP 1. 2. 3. C. Specify the user name and password. If “Create Private Folder (Share)” is checked, a new folder will be created for security and privacy. Else, if not checked, user will be restricted to public area access. Add user to a certain group and assign the user to group access right Specify the right permission either “Read Only” or “Writable” ADD GROUP This screen allows you to manage the User Groups that exist on the MyXerver™ Pro.
ADD SHARE WIZARD 3-STEP 1. 2. 3. Specify the share name and path Assign user’s right to this directory Specify IP address or Subnet address to the device. If “Allow for all” is checked, there will be no restriction for all users.
CHAPTER 5 ADMINISTRATION A. OVERVIEW This section describes the Administration configuration for Users and Groups, File and Print, System, Network Service, Maintenance and Log file. B. USERS AND GROUPS USERS MANAGEMENT Click on the Administration and User Management, all existing users will be shown in this menu. The "admin" and "guest-share" users are pre-defined, and cannot be deleted. A new user is created by filling the form and click “Save” button.
Password Verify password Description (Optional) Create Private Folder (Share) Enter the user's password in these fields. Note that 2-byte characters cannot be used in it. These fields are also used to change an existing user's password, as follows: Select the desired user Clear the existing values in the password fields. Enter the desired password in both the "Password" and "Verify Password" fields. If no password is required, leave both fields blank. Click the "Save" button.
New Group Use this area to create a new group. Note that some special characters (e.g. " / \ [ ] : ; | = . , + * ? < > ' ` $ % @) and 2-byte characters cannot be used in Group Name. This shows the list of all Groups. “guest-share” - always exist. This group cannot be deleted. Existing Groups Create Button Use this Button to create a new Group. Enter the desired name for the new Group in the "Name" field, and then click this button.
Access Button Delete Button Save as New Share Button Clear Form Button Save Button Click this Button to view the Groups that have access to the selected Share, and change these access rights as required. Click this Button to Delete the selected Share. Deleting a Share does NOT delete its folder or any data. The folder and its data is still accessible by the "administrators" group. After entering the required data in the "Share Properties" area, use this Button to create a new Share.
D. SYSTEM LAN Setting Obtain IP Address automatically (DHCP Client) Fixed IP Address Save Button Do NOT select this unless you have a DHCP Server on your LAN. A DHCP Server can provide an IP Address to PCs and other devices when they boot. Select this if your LAN does not have a DHCP Server, and enter the following data. IP Address: The IP Address must be unused, and compatible with the PCs on your LAN. Network Mask: Enter the same Network Mask (Subnet Mask) used by PCs on your LAN.
passphrase can include symbols (!?*&_) and spaces. Make sure you enter this key exactly the same as on your access point or wireless router. You may also enter a hexadecimal key (using characters 0-9, A-F). WPA incorporates user authentication, which is generally missing in WEP, through the extensible authentication protocol (EAP). EAP is built on a more secure public key encryption system to ensure that only authorized network users can access the network.
E. MAINTENANCE The Maintenance facility allows you to format disk and upgrade the MyXerver™ Pro's firmware. Note that the MyXerver™ Pro is unavailable during the upgrade process, and all connections will be lost. The MyXerver™ Pro will reboot once the upgrade installation is completed. The procedure may take from 5 to 10 minutes . Disk Utility This utility displays device name, file system type, volume mounted, and disk mount status of both internal and external Disk installed in this MyXerver™ Pro.
F. LOG FILE This part shows the history of system usage and important events such as disk status, network connectivity, and system booting.
CHAPTER 6 ADDITIONAL FEATURES A. BONJOUR This screen allows you to configure the settings Bonjour. Click on Administration, Network Service and Bonjour to reach this screen. If iTunes enabled, then the user can listen music that stored in the MyXerver™ Pro via iTunes client. This iTunes Server supports files with extensions .mp3, .m4a, and .m4p. iTunes Server Enable iTunes Server Server Name Content Directory If enabled, then the user can listen music that stored in the MYXERVER™ PRO via iTunes client.
Enable Media Server Server Name Content Directory B. If enabled, the MyXerver™ Pro can be located by compatible Media Adapters, using the UPnP AV standard developed by Intel and its partners. Media content on the MyXerver™ Pro (in the Content Directories specified below) can then be accessed and played by the Media Adapters. Name of the Media Server that is displayed on client devices. Note that some special characters (e.g. " \ : | , ') and 2-byte characters cannot be used in it.
To access AjaXplorer, go to http://ip_address:8080/ ( ip_address is MyXerverPro’s WAN IP address).
CHAPTER 7 ACCESSING MYXERVER™ PRO OVER THE INTERNET A. OVERVIEW If your LAN is connected to the Internet, typically by a Broadband Gateway/Router and Broadband modem, you can make the MyXerver™ Pro available via the Internet. Features available to Internet users include: B. Using a Web browser to view and download files.
Default HTTP port number is 80. If you prefer to use a different port number, for example, 8080 for accessing MyXerver™ Pro using AjaXplorer, then you need to C. Specify port number “8080” on the MyXerver™ Pro System screen Specify “8080” port number on your router’s Port Forwarding/Virtual Server settings. Specify “8080” port number in your web URL address when trying to access the MyXerver™ Pro, for example “http://:8080.
CHAPTER 8 FREQUENTLY ASKED QUESTIONS A. I CANNOT FIND MYXERV ER™ PRO ON THE NETWO RK USING THE MYXERVER™ PRO UTILITY B. Check that the MyXerver™ Pro is installed properly, LAN connection is OK, and Power LED is not blinking. Ensure that your PC and the MyXerver™ Pro are on the same network segment (not on different networks across a router) Ensure that your PC has the TCP/IP network protocol loaded. In Windows, this is done by using Control Panel-Network.
Note: Windows uses the Computer name, as shown on Control Panel - Network Identification, as the default Logon Name. But you can create a new Windows logon name by merely entering a new name and password at the Logon prompt. D. HOW TO DO A DIRECT USB COPY Scenario: Sometimes you may want to quickly transfer contents from a USB flash drive to your MYXERVER™ PRO without using the computer. 1. Plug in the USB device into MyXerver™ Pro USB port.
E. HOW CAN I ADJUST DATE AND TIME SETTING To set date and time, go to Administration, System, and Time Settings If NTP Server is using some NTP sites (eg. time.nist.gov or time.windows.com), choose this default setting as None as shown below. After changing NTP Server’s default value as None, you can change the time setting. F. HOW CAN I RESTORE MYXERVER™ PRO AFTER FORMATTING THE HARD DRIVE To recover MyXerver™ Pro files after formatting the Hard Drive, follow the steps below: 1. 2. 3. 4. 5. G.
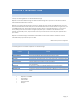
LIMITED WARRANTY STATEMENT MyXerver™ Pro MX3800 Wireless Network Storage Warranty Duration Hardware: 3 years Limited Warranty Hardware Limited Warranty Universal Tech warrants that the product that you have purchased from UT is free from defects in materials or workmanship under normal use during the Limited Warranty Period. The Limited Warranty Period starts on the date of purchase. Your dated sales or delivery receipt showing the date of purchase is your proof of purchase date.