
User manual


PAT700 Total Organic Carbon Analyzer – Bottle Mode Page 97
Anatel Operator Manual
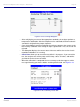
11) Install the standards bottle following the instructions as shown in the load bottles
dialog box and ensuring that you place the standards bottle in the correct position.
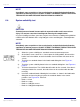
See Figure 6-14. From left:
• Bottle 1 = empty
• Bottle 2 = 100 µS potassium chloride conductivity test standard
• Bottle 3 = empty
• Bottle 4 = empty
Figure 6-14 Load bottles dialog box, conductivity calibration
• Bottle positions graphics show you the order in which to install the bottles.
• Unlock icon energizes the bottle bay door lock for five seconds, allowing you to
open the door.
• Back icon takes you to the run standards dialog box.
• Forward icon takes you to the review test options dialog box.
• Cancel icon returns you to the previous dialog box. All changes made in any of the
dialog boxes are lost.
12) Close the bottle bay door.
13) Touch the forward icon. If bottles have been properly loaded and the RFID tags can
be read, the review test setup dialog box appears. See Figure 6-6, page 91.
Otherwise, the enter bottle information dialog box appears. See Figure 6-7,
page 91.
14) If the selection has been made to use the conductivity meter verification resistor,
install the resistor onto the analyzer’s 9-pin printer/calibration port, as illustrated in
Figure 6-15.
• If the calibration is being performed on a schedule, the conductivity meter test
dialog box does not appear, and the calibration occurs automatically.
• Otherwise, the conductivity meter test dialog box appears when the analyzer
passes the conductivity meter test. See Figure 6-16.