
Owner`s manual


Page 26
MRX-20 ADVANCED NETWORK SYSTEM CONTROLLER
Installing the MRX-20
Physical Installation of the MRX-20 and Accessories
The MRX-20 Advanced Network System Controller can be installed
anywhere in the home with a Cat-5 cable. Up to eight MRX-20’s
can be installed, where the first unit is the primary and the other
seven units are auxiliary. Once installed it can then be programmed
to operate all local equipment using IR, RS-232, Relays or 12V
Triggers. It can either be placed on top of the equipment or rack
mounted (using the optional rack-mount adapter.) It must receive
power using the included power supply. All IR emitters, HDMI, RS-
232 cables and sensors are plugged into their respective ports on
the back. Wires are connected to the detachable connectors for use
of the relays.
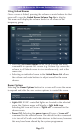
Network Installation
1. Connect an Ethernet cable (RJ45) to the rear of the MRX-20 and
into the network router or switch.
2. Connect your laptop into the same network router as the MRX-20.
3. Plug flashers into any of the ten flasher ports on the rear of the
MRX-20.
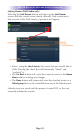
Locating the MAC Address
The network MAC Address is a unique number that identifies a
device on a network. By listing the MAC address during
programming, URC network devices can use DHCP. The MAC
address of the MRX-20 can be discovered over the network through
programming. The unit’s MAC address can be found on a label on
the side of the unit (left side when facing rear).
MAC Address