
Operating instructions


Part 1 – Introduction
10
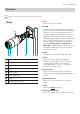
Cable
DC-T1233WHR model
1
2
3
4
5
DC-T1234WR model
3
4
5
6
DC-T1232WR model
3
4
5
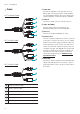
1
Audio Out (Black Cable)
2
Audio In (White Cable)
3
BNC Video Out (Yellow Cable)
4
Power In (Red Cable)
5
Network Port
6
Alarm Out
1 Audio Out
Connect an amplifier to this port (line out). This
device does not feature a built-in audio amplifier
unit and therefore requires the user to purchase a
separate speaker system with a built-in amplifier.
2 Audio In
Connect an audio source to this port. (line in)
3 Video Out (BNC)
Connect the monitor. Use these ports for
previewing video and not monitoring video.
4 Power In
Connect to the power adapter (12 VDC).
5 Network Port
Connect a network cable with an RJ-45 connector
to this port. If using a PoE switch, you can supply
power to the camera using an ethernet cable. For
more information on PoE switch use, refer to the
switch manufacturer's operation manual. You can
configure, manage, and upgrade this camera and
monitor its images from a remote computer over
the network. For more information on network
connection setup, refer to the IDIS Discovery
operation manual,
6 Alarm Out
Connect an alarm-out device to the NO (Normally
Open) and COM (Common) connectors. NO is a
relay output which sinks 0.3A @ 125 VAC and 1A
@ 30 VDC.