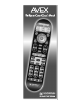
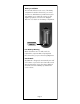
Congratulations! Congratulations on purchasing Universal Remote Control’s AVEX™ R6 Pre--Programmed and Learning remote control. You now have the power to control your entire home entertainment system with one easy--to--use remote. The AVEX R6 can be used with thousands of audio/video components because of the extensive library of codes that have already been programmed into the remote. So... get ready to sit back, relax, and simplify your home entertainment experience.
Table of Contents Getting Started - Overview • Control up to 6 Components…………………..5 • Activating Component Buttons…………………5 • Learning Capability……………………………..5 • Battery Installation………………………..........6 • Low Battery Warning…………………………...6 • Couch Mode……….………….........…..........6 Special Advanced Features • MacroPower™ & Other Macros……………....7 • ‘My Favorites’ - Favorite Channels……………..7 • SimpleSound™ & Other ‘Punch Throughs’......7 Keypad Layout & Button Functions...
Pre-Programmed Code Tables ......31 • CABLE/SAT ...........................................32 • TV ........................................................33-34 • DVR/VCR ..............................................35-36 • DVD ..................................................... 37 • AUDIO ..................................................38 • AUX ......................................................39 FAQs ........................................40 Warranty ..................................
Getting Started - Overview Control up to 6 Components The AVEX R6 remote control is designed to control up to six different Audio/Video components and operate virtually all brands of AUDIO, TV, DVD, VCR/DVR, SAT/CABLE and AUX (Light, Music Server, etc.) components. Component Buttons Once you have programmed the AVEX R6 for all of your components, all you need to do is press a component button and all the buttons on the AVEX R6 will work with that component.
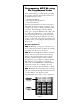
Battery Installation Press the tab and remove the cover of the battery compartment located in the back of your remote. Insert the two AAA batteries (included in the package) making sure to match the positive (+) and negative (-) symbols as shown in the diagram. Place the cover back over the battery compartment. INSERT BATTERIES CORRECTLY Low Battery Warning When the batteries are low and need to be replaced the component LED will quickly blink three times when you press the Power [ON] button.
Special Advanced Features The AVEX R6 also offers the following special advanced features that can offer you many time-saving conveniences: MacroPower™ & Other Macro Buttons MacroPower is a unique feature that enables you to turn all your components ON or OFF, all at the same time, simply with the press of one button. The AVEX R6 has six Macro buttons that are designed to store up to 20 commands in each button.
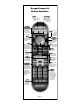
Keypad Layout & Button Functions POWER SYSTEM OFF Allows you to turn the selected component on and off. Designed to send Power On/Off commands for up to six components with one button press. TV, CBL, VCR, AUDIO, DVD, AUX GUIDE Used to select the component you want to operate and signals remote control activity. Displays the Program Guide listings through the Cable Set Top Box. MENU CURSOR NAVIGATION PAD Displays the Applications Menu through the Cable Set Top Box.
Programming AVEX R6 using Pre-Programmed Codes There are three ways you can program your AVEX R6 using the component brand codes that are preprogrammed into the remote. • Quick Set-Up Method • Three-Digit Code Entry Method • Auto-Search Method The Quick Set-Up Method is a unique new feature that enables the fastest and easiest set-up by using one-digit codes for up to 10 major brands for each component.
Three-Digit Code Set-Up Method STEP 1: Find the 3-digit code numbers assigned to your brand from the lists in the back of this manual. The codes are listed by component category (i.e., TV, VCR, DVD, etc.), then by brand name. For instance, if you would like to locate a code for a Sony television, first locate the TV category and then look for the Sony brand.
STEP 5: Point the AVEX R6 toward the component (in this example the TV) and punch in the first 3-digit code that you wrote down for that specific component. Use the Number buttons 0~9 on the remote to punch in the code. The TV LED light will blink each time a number is pressed. NUMBER BUTTONS If the 3-digit code number you just punched in is the correct number, the component you are trying to program will turn off. If it did not turn off, enter the next code number from your list until it does turn off.
Auto-Search Method The Auto-Search Method is a way you can scan through all of the codes in the table to find the right code for your component. STEP 1: Manually or using your old remote, turn on the component you want to program—for example, to program your TV, turn on your TV set. STEP 2: On the AVEX R6, press the Component button that you want to program (in this case the button that says TV) and the SELECT [SEL] button at the same time.
STEP 4: Once you have found the right code number and the component has turned off, press the POWER button on the AVEX R6 remote to turn the component back on. Next test the VOLUME and CHANNEL buttons (or PLAY and STOP buttons for VCR and DVD) to make sure they all work. If any of the buttons do not work properly, you need to find a new code. Continue pressing the UP (or DOWN) arrow button until you find a new code that turns off the component and makes the VOLUME or PLAY buttons respond correctly.
Programming AVEX R6 using the Learning Method STEP 1: Line up the AVEX R6 to the remote control you want to ‘learn’ from, head--to--head as shown below. Make sure the heads are one to two inches apart. STEP 2: On the AVEX R6, press the Component button that you want to program (in this case the button that says TV) and the SELECT [SEL] button at the same time. Hold down both buttons for 2 seconds until the TV Component button light turns on. This signals that you are in programming mode.
STEP 5: Once the AVEX R6 has learned all the buttons in the selected component mode, press and hold the Component button and SELECT [SEL] buttons at the same time to save the learned functions. The component LED light will blink three times to confirm the programming. Now test all the buttons to make sure they learned correctly. Repeat Steps 1-5 to program any other component modes.
AUX Function: Programming a 6th Component After you’ve finished programming the AVEX R6 for five primary components and you did not use AUX, you can take advantage of the AUX function to program a 6th component, such as a second TV, DVD, or any other audio/video component that you may have in your system. Finding a Component’s Set-up Code Number If you used the Auto--Search or Learning Methods to program a component, you may not know the code number you programmed.
Programming Special Advanced Features Programming Multi-Commands to Macro Buttons The AVEX R6 has six Macro buttons (POWER, SYSTEM OFF, A, B, C, D) that are designed to store up to 20 commands in each button. Pressing any one of the Macro buttons will send out the series of commands that are stored in that particular button. MacroPower™ Total System On/Off MacroPower makes several devices work together by pressing one button.
IMPORTANT: You have 30 seconds to perform the next step while you are in programming mode. If you do not press a button within 30 seconds, the component LED light will turn off. The remote will exit the programming mode and you will have to start over. STEP 2: Press the component button you want to turn on and then the POWER button; repeat for all other components in the order you want them to turn on. The component LED lights will blink once each time you press the P OWER button.
Notes regarding programming multi-commands to Macro buttons: • You can program up to 20 commands on each Macro button. • You can program delays in between commands by pressing the PAUSE button. Each press adds a one-half second delay. • Also, if you add the delay time as the first step of Macro commands, the remote will not send h t eMacro unless the button is held for two seconds. (This is the Press & Hold Function).
Programming ‘My Favorites’ - Favorite Channel Buttons In Cable mode, the A, B, C, D buttons are also designed to serve as dedicated Favorite Channel buttons. Each button will access one of your favorite channels with just one button press. Here’s how to program Favorite Channels: STEP 1: Press the CBL button to select the Cable mode. STEP 2: Press the ‘A’, ‘B’, ‘C’ or ‘D’ button and the MUTE button at the same time for 2 seconds until the CBL component LED turns on.
SimpleSound™ Total System Volume Control SimpleSound is one of the most exciting features of the AVEX R6. It gives you total volume control over ALL the components in your system, even those that do not have built--in volume control, such as TIVO, DVD and VCR. SimpleSound saves you the hassle and inconvenience of constantly switching between component modes just to control volume. First you should identify which device in your system will be used to deliver sound.
STEP 2: Press the VOLUME UP button and then press either the TV or AUDIO component button that you want to use for volume. The Component LED light will blink three times to confirm that it is saved. This sets up three buttons (Volume Up, Volume Down and MUTE) as a group for that component. VOLUME UP Repeat Steps 1-2 for all other components. Note: SimpleSound is what’s technically referred to as a “Punch Through” feature and is not limited to volume control.
Channel Control ‘Punch Through’ This ‘punch through’ enables you to program the AVEX R6 so that either the Cable or TV Channel Controls (CHANNEL UP, DOWN, LAST, CHANNEL NUMBERS 0-9, +10 and ENTER) will also operate in other component modes on the remote control. STEP 1: Press and hold the component button you want to add channel control to, such as DVD or VCR, and the SELECT [SEL] button at the same time for two seconds until the Component LED light turns on.
Transport Control ‘Punch Through’ This ‘punch through’ enables you to program the AVEX R6 so that VCR or DVD Transport Controls (PLAY, STOP, FF, REW, PAUSE, SKIP and RECORD) will also operate in other component modes on the remote control. STEP 1: Press and hold the component button you want to add Transport Control to, such as CBL or TV, and the SELECT [SEL] button at the same time for two seconds until the Component LED light turns on.
OSD (On-Screen Display) Control ‘Punch Through’ This ‘punch through’ enables you to program the AVEX R6 so that CBL or DVD OSD Controls (MENU, GUIDE, INFO, EXIT, SEL and 4 Cursor Controls) will also operate in other component modes on the remote control. STEP 1: Press and hold the component button you want to add OSD Control to, such as TV or VCR, and the SELECT [SEL] button at the same time for two seconds until the Component LED light turns on.
Erasing Commands -Overview You can erase a single learned command, all learned commands in each component mode, SimpleSound programming, MacroPower commands, or re--set the remote to original factory default settings. Erasing a Single Learned Command from One Component STEP 1: Press the component button where the learned command is stored and the ENTER buttons at the same time for two seconds until the component LED light turns on.
Erasing All Learned Commands from One Component This function allows you to erase all the learned commands from one component. For example, if you want to erase all learned commands on the TV component button because you bought a new TV, the process is very simple. STEP 1: Press the component button where all the learned commands are stored and the ENTER button at the same time for 2 seconds until the component LED turns on.
Erasing MacroPower & Other Macro Commands STEP 1: To erase MacroPower commands on the POWER ON or SYSTEM OFF button, press and hold either the POWER ON or SYSTEM OFF button and the MUTE button simultaneously for two seconds until the current status component LED turns on. IMPORTANT: If you don’t proceed to the next step within 30 seconds, the LED will turn off and exit set-up mode and you will need to start over.) STEP 2: Press the CHANNEL UP button to erase and exit Erase mode.
Erasing SimpleSound & Other ‘Punch Through’ Commands STEP 1: Press and hold the Component button you want to erase volume control from, such as DVD or VCR and the SELECT [SEL] button at the same time for two seconds until the Component LED light turns on. STEP 2: Press the VOLUME UP button and the same component button from Step 1. The component LED light will blink three times to confirm the erasure.
Factory Reset You can reset your AVEX R6 remote to the original factory default settings. Press and hold both the TV and RECORD buttons for about five seconds until the SAT/CABLE component LED light blinks five times. All programming and setup codes that you have entered into the remote will be erased and the AVEX R6 will return to the original factory default settings. Warning This procedure will erase all programming and set-up codes that you have entered into the remote.
Pre-Programmed Code Tables The AVEX R6 Pre-Programmed code library is classified by category (TV, VCR, DVD, etc.). Within each category, the code numbers are listed in rows by brand (Sony, Panasonic, B & K, etc.). Some brands have more than one three-digit code. Circle the correct row and refer to it while you perform setup operations.
CABLE/SAT Brand CABLE Boxes ABC ADELPHIA Code Numbers 004 042 043 110 ADVANCED NEWHOUSE 043 ALTRIO 043 AMERICAST 099 ARMSTONG 110 AT&T BROADBAND 110 ATLANTIC BROADBAND 043 110 BELL SOUTH 099 BLUE RIDGE 043 110 BRESNAN 110 BRIGHT HOUSE 043 110 BUCKEYE COMM 110 CABLEVISION 043 110 108 CHARTER 043 110 COGECO 110 COMCAST 043 110 COMSAT 110 COX DIGITAL 043 110 DIRECTOR 110 EAGLE 030 GENERAL INSTRUMENT 110 004 GNC 099 GOLDEN CHANNEL 030 INSIGHT 110 JERROLD 110 004 MASSILLON 110 MEDIACOM 110 MOTOROLA 110 148 111
TV Brand Code Numbers ABEX ADMIRAL ADVENT ADVENTURA AIKO ALERON AKAI A MARK AMERICA ACTION AMPRO AMSTRAD ANAM AOC APEX DIGITAL AUDIOVOX BELCOR BELL&HOWELL BRADFORD BROKSONIC BROCKWOOD CANDLE CAPEHART CELEBRITY CENTURION CETRONIC CITIZEN CLARION CLASSIC CLP CLASSIC COLORTYME CONCIERGE CONCERTO CONTEC CORNEA CORONADO CRAIG CROSLEY CROWN CURTIS MATHES CXC DAEWOO DAYTRON DELL DIMENSIA DUKANE DUMONT DURABRAND DWIN DYNASTY EIKI ELECTROBAND ELECTROHOME ELEKTRA EMERSON 025 072 251 333 247 002 103 028 116 146 248
TV Brand Code Numbers SCEPTRE SCOTCH SCOTT SEARS 276 116 028 043 363 048 143 138 030 363 007 028 057 143 094 333 082 166 205 011 SELECO SHARP SHENG CHIA SHOGUN SIGNATURE SIMPSON SONY SOUNDESIGN SPECTRICON SQUAREVIEW STARLITE SSS SUPRA SUPRE MACY SUPREME SVA SYLVANIA SYNTAX OLEVIA TANDY TATUNG TECHNICS TECHNOL ACE TECHWOOD TEKNIKA TELEFUNKEN TELERENT TERA TMK TNCI TOSHIBA TOTEVISION TVS UNIVERSAL VICTOR VIDEO CONCEPTS VIDIKRON VIDTECH VIEWSONIC VIKING VIZIO WARDS WAYCON WESTINGHOUSE YAMAHA YORK YUPITERU
DVR/VCR Brand Code Numbers ADMIRAL ADVENTURA AIKO AIWA AKAI AMERICA ACTION AMERICAN HIGH AMPRO ANAM ASHA AUDIO DYNAMICS AUDIOVOX BEAUMARK BROOKSONIC CALIX CANON CAPEHART CCE CITIZEN COLT CRAIG CURTIS MATHES CYBERNEX DAEWOO DAYTRON DBX DYNATECH ELECTROHOME ELECTROPHONIC EMERSON 025 053 034 117 034 161 016 146 043 124 125 117 031 072 145 040 012 023 039 043 101 040 035 037 129 101 028 145 108 024 117 101 117 024 003 102 135 145 040 111 116 117 005 010 108 110 112 108 012 023 039 043 034 053 059 101 006 029
DVR/VCR Brand Code Numbers DVR Receivers HUGHES 001 HUMAX 001 PHILIPS 001 RCA 809 REPLAY NETWORKS 775 SONY 804 805 TIVO 001 TOSHIBA 001 Page 36
DVD Brand AIWA AKAI ALLEGRO ALPINE APEX DIGITAL BLAUPUNKT BROKSONIC CINEVISION COBY CYBERHOME DENON DURABRAND DVD 2000 EMERSON ENTERPRISE FISHER FUNAI GE GOLDSTAR GO VIDEO GREENHILL Code Numbers 146 281 091 098 087 111 115 111 130 091 260 271 173 138 080 091 017 091 143 074 147 143 027 091 137 091 220 221 222 111 HARMAN KARDON 084 140 HITACHI 101 HITEKER 087 ILO 268 INITIAL 111 INTEGRA 142 180 280 JBL 084 JVC 012 KENWOOD 151 KISS 279 KLH 135 KRELL 104 LITEON 264 265 LEXICON 148 LG 091 057 074 MAGNAVOX 001
AUDIO Brand Code Numbers ADCOM AIWA AKAI ANTHEM ARCAM 082 092 225 161 269 356 170 018 104 202 203 213 211 188 189 335 337 141 077 342 071 096 097 409 460 347 070 170 224 447 006 028 061 071 201 214 226 185 013 077 284 148 026 515 001 109 215 230 234 330 057 290 099 098 451 214 182 378 148 342 008 148 233 077 154 118 318 020 589 275 017 046 108 080 209 398 216 163 191 114 279 291 026 066 145 192 182 005 280 374 331 216 573 072 384 357 360 120 235 236 237 124 377 009 139 052 165 115 004 086 164 152 208 006
AUX Brand Code Numbers iPod Controls APPLE / iPod BOSE KENSINGTON 901 912 909 906 MEDIA PC Controls DELL GATEWAY HP KEYSPAN SONY TOSHIBA WINBOOK 001 001 001 797 001 001 001 GAMING SYSTEM Controls MICROSOFT / XBOX 908 607 SONY/PS2 914 LIGHTING Controls LITE-TOUCH LUTRON X-10 XANTECH 708 757 658 659 577 683 593 688 689 Page 39
Frequently Asked Questions If the batteries run out, will I lose my settings? No. The AVEX R6 stores all of your settings in nonvolatile FLASH memory. You could remove the batteries for months, replace them at your convenience, and the AVEX R6 would still remember your settings. What is MacroPower? MacroPower is a very useful way to make a lot of things happen with one button push.
USA Limited Warranty UNIVERSAL REMOTE CONTROL, INC. warrants this product against defects in material or workmanship for a period of one (1) year and as set forth below. Universal Remote Control will, at its sole option, repair the product using new or comparable rebuilt parts, or exchange the product for a comparable new or rebuilt product. This warranty does apply to the following: • Units purchased from unauthorized resellers. • Units purchased second-hand (used).