
Installation manual

PSX Installation Manual (PSX-1 and PSX-2) ver. 1.1
1
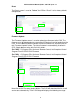
NOTE: Use PSX Setup to update the
firmware of the PSX first (see page 6)!
Connecting the PSX for configuration:
When connecting this product to the end users Local Area Network, use a
standard 100 Base-TX base Ethernet hub / switch and a (Category 5 or
above) network cable.
Only use a crossover cable if connecting directly to a PC.
If this product has been used in or configured for another network, reset it to
the factory default settings before you start the configuration; Press and
Hold the Reset button for ten seconds, then release.
If your PC is using the Windows XP embedded firewall or using the firewall
function of a third party security software such as Norton Internet Security,
“disable the firewall function while configuring this product”.
Step 1 - Connect your PC to an Ethernet switch connected to the Local Area
Network.
Step 2 - Connect an Ethernet cable to the dock and the other end of the cable
to the Ethernet switch connected to the Local Area Network.
Step 3 - Connect the supplied AC Power Adapter to the PSX, then plug in the
AC end into an “Always-On” AC outlet.
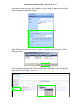
Step 4 - Launch the PSXSetup software.
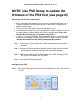
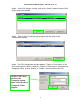
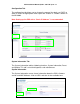
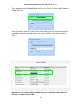
Configuring the PSX
Step 1 – Run “PSX Setup” by clicking on the PSX module icon in the TOOLS menu
of CCP.