
Owner`s manual


6 Click Save and click on the X in the upper right hand corner to exit.
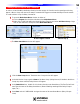
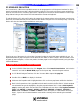
7 The new Macro Group will appear at the bottom of the Model Designer.
8 Click the ‘+’ next to Relay Macros to expand the group.
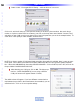
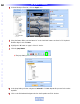
9 Click the Relay 2 Drape Open Smart Macro then click the Relay button within the smart macro tool-
bar. The Relay Setting window will appear.
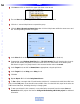
11 In the Value block set the Type of Relay using the pull-down. (ex. Press & Hold On)
12 If appropriate, set a Minimum Press Time from .1 TO 32.3 Seconds. This will have the relay close (or
open) for the duration designated in Minimum Press Time or for the duration of the button press,
w
hichever is longer. For a purely Press & Hold command set the value at
.1 second.
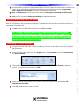
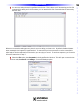
13 In the T
arget
bloc
k, set MSC to
Master/Sla
ve as appropriate, using the pull-do
wn.
14 In the Target block, set Relay port to Relay 1 or 2.
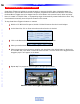
15 Clic
k
Ok.
16 Repeat Steps 9-15 for all other Relay Smart Macros.
17 To Test a Relay command with a Timed Duration (with the PC connected to the MSC400 USB1 front
port) click the Test button. There should be two audible clicks, from the MSC-400, equal to the value set
in Minimum Press
T
ime, indicating the relay is changing state.
18 To test a pure Press & Hold command, or any other Relay commands from the remote, Save and
Download the MSC project. See Section: Saving and Downloading a MSC-400 project for additional
information.
54
Type in Section Title
U
S
I
N
G
C
C
P
E
D
I
T
O
R
T
O
P
R
O
G
R
A
M
Relays