
Owner`s manual
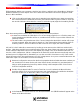
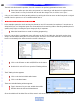

4 In the Target block, select Master/Slave as appropriate, using the pull-down. (ex. Master)
5 In the Target block, select Relay Port 1 or 2 using the pull-down. (ex. Relay 1)
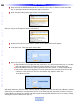
6 To Test the command, with the PC connected to the USB1 front port on the MSC-400, click the Test
button. There should be an audile ‘click’ as the relay opens or closes in test mode.
7 Click Ok. The command will appear at the bottom of the Smart Macro Function List.
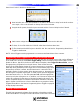
8 Drag the Relay command to the appropriate position in the smart macro inside the If statement.
DVD1
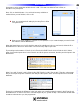
9 Click the Relay command to highlight it. Copy (Ctrl + C) and Paste (Ctrl + V) the command, then
drag it to the appropriate position in the Else statement. This way the sub will activate regardless of
system status.
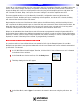
DVD 1 Source Select Smart Macro With Embedded Relay Commands
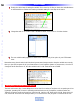
10 To Test the edited macro, Save
the project and then Download to the MSC-400.
11 If already programmed with a RF TRIGGER for DVD 1 SOURCE SELECT, press the DVD 1 BUTTON
on the remote. If not see section: PROGRAMMING MACRO TRIGGERS TO THE REMOTE. Pg #
TIP - Some additional tweaking of the macro, such as adding some delay or a
mute command while the sub comes on, may be desirable. Each system and set of
components will behave differently.
52
Type in Section Title
U
S
I
N
G
C
C
P
E
D
I
T
O
R
T
O
P
R
O
G
R
A
M
Relays