
Operating instructions


Table Of Contents
- Comfort Panels
- Legal information
- Preface
- Table of contents
- 1 Overview
- 2 Safety instructions
- 3 Mounting and connecting the HMI device
- 3.1 Preparation for mounting
- 3.2 Mounting the device
- 3.3 Connecting the device
- 3.3.1 Notes on connection
- 3.3.2 Connecting the equipotential bonding circuit
- 3.3.3 Connecting the power supply
- 3.3.4 Connecting the configuration PC
- 3.3.5 Connecting the PLC
- 3.3.6 Connecting a USB device
- 3.3.7 Connecting a printer
- 3.3.8 Connecting an audio device
- 3.3.9 Switching on and testing the HMI device
- 3.3.10 Securing the cables
- 4 Commissioning the device
- 4.1 Overview
- 4.2 Using the service concept
- 4.3 Operating the device
- 4.4 Configuring the device
- 4.4.1 Reference for functions
- 4.4.2 Changing settings for operation
- 4.4.3 Changing password protection
- 4.4.4 Changing HMI device settings
- 4.4.4.1 Setting the date and time
- 4.4.4.2 Changing regional settings
- 4.4.4.3 Backup registry information
- 4.4.4.4 Changing monitor settings
- 4.4.4.5 Setting the screen saver
- 4.4.4.6 Changing the printer properties
- 4.4.4.7 Enabling sound and setting sound volume
- 4.4.4.8 Assigning sound to an event
- 4.4.4.9 Restarting the HMI device
- 4.4.4.10 Displaying information about the HMI device
- 4.4.4.11 Displaying system properties
- 4.4.4.12 Displaying memory distribution
- 4.4.5 Setting storage location
- 4.4.6 Setting the delay time
- 4.4.7 Setting the uninterruptible power supply
- 4.4.8 State of uninterruptible power supply
- 4.4.9 Enabling PROFINET services
- 4.4.10 Synchronizing the time via the time server
- 4.4.11 Changing transfer settings
- 4.4.12 Configuring network operation
- 4.4.13 Changing Internet settings
- 4.4.14 Saving to external storage device (backup)
- 4.4.15 Restoring from external storage device
- 4.4.16 Activate memory management
- 5 Commissioning a project
- 6 Operating a project
- 7 Maintenance and care
- 8 Technical specifications
- 8.1 Certificates and approvals
- 8.2 Directives and declarations
- 8.3 Dimension drawings
- 8.3.1 Dimension drawings of the FKP400 Comfort
- 8.3.2 Dimension drawings of the KP700 Comfort
- 8.3.3 Dimension drawings of the KP900 Comfort
- 8.3.4 Dimension drawings of the KP1200 Comfort
- 8.3.5 KP1500 Comfort dimension drawings
- 8.3.6 Dimension drawings of the KTP400 Comfort
- 8.3.7 Dimension drawings of the TP700 Comfort
- 8.3.8 Dimension drawings of the TP900 Comfort
- 8.3.9 Dimension drawings of the TP1200 Comfort
- 8.3.10 Dimension drawings of TP1500 Comfort
- 8.3.11 Dimension drawings of TP1900 Comfort
- 8.3.12 Dimension drawings of TP2200 Comfort
- 8.3.13 Dimensions for labeling strips
- 8.4 Technical specifications
- 8.5 Bit assignment of the direct keys
- 8.6 Description of the ports
- 8.7 Communication with PLCs
- 8.8 Scope of functions with WinCC
- A Technical Support
- B Abbreviations
- Glossary
- Index
Commissioning the device
4.4 Configuring the device
Comfort Panels
124 Operating Instructions, 03/2012, A5E03404994-02
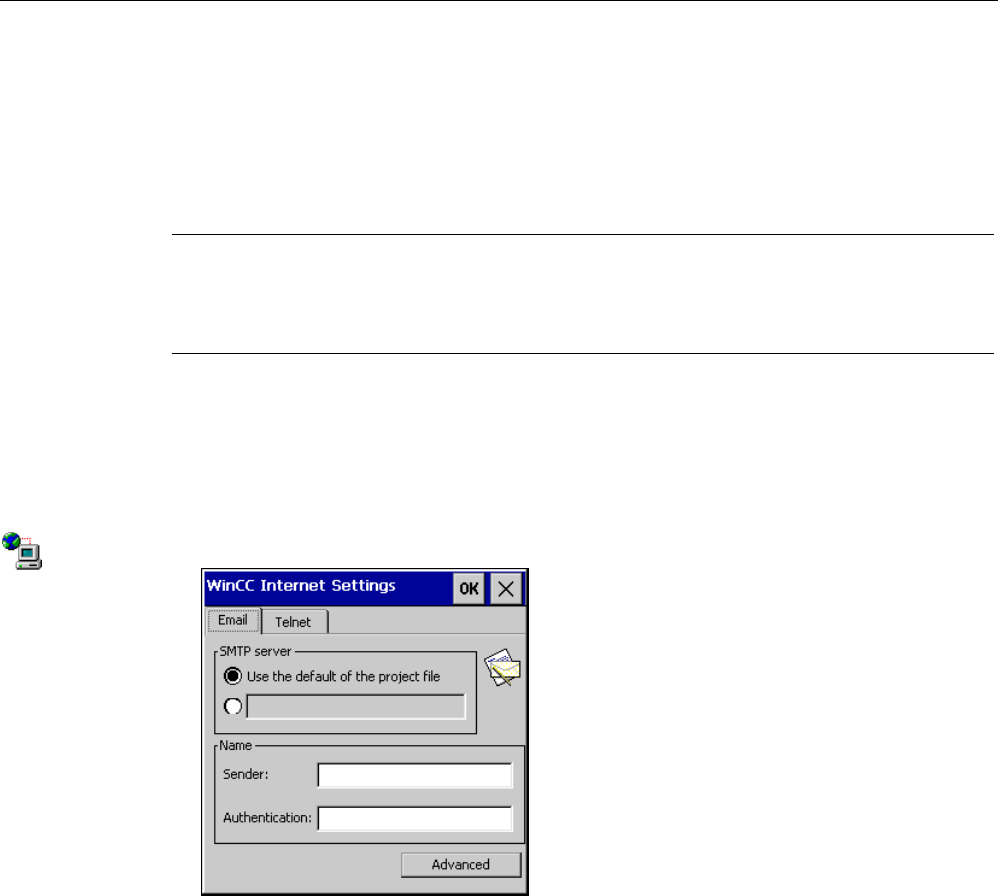
4.4.12.5 Changing e-mail settings
Requirement
The Control Panel is open.
Note
Additional tabs may appear in the "WinCC Internet Settings" dialog. This depends on the
options that have been enabled for network operation in the project. For more information,
please refer to the WinCC or WinCC flexible Online Help.
Procedure
Proceed as follows:
1. Open the "WinCC Internet Settings" dialog with the icon of the same name.
2. Open the "Email" tab.
3. Specify the SMTP server:
– Select "Use the default of the project file" if you want to use the SMTP server defined
in the project.
– Select the empty box and enter the desired SMTP server if you do not want to use the
SMTP server configured in the project.
4. Enter information about the e-mail account:
– Enter the name for the sender under "Sender".
– Enter the e-mail account for sending your e-mail under "Authentication".
Some e-mail providers only allow you to send mail if you specify the e-mail account.
The "Authentication" text box can remain empty if your e-mail provider allows you to
send mail without checking the account.