
User guide


Link to Table of Contents
User Guide
110
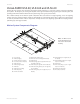
VLS3.60, VLS4.60 and VLS6.60 Accessories
Printer Driver Settings
With your graphics software open, proceed immediately to “Printer Setup” and open the printer driver.1.
In the printer driver, click on the Engraving Field sub-tab within the Manual Control Tab.2.
Click on the “Max Size” button.3.
Then click on the “Enable” selection box in the Rotary section.4.
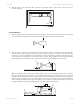
Type in the diameter of the glass that was measured.5.
Notice that while typing in the diameter, the size of the height dimension changes automatically. Make a note of 6.
this new page size.
Once you have the new height, exit the printer driver.7.
Go back to the graphics software and change the page height to the exact number the printer driver established.8.
This new vertical page size is now the actual circumference of the object that is going to be engraved.9.
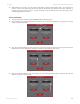
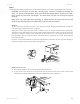
Position the graphic on screen so that it will t vertically within the new vertical page height and 10.
horizontally within the upper and lower engraving limits that we earlier determined with the Red Diode Laser
Pointer.
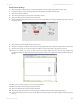
Once you are ready to engrave, proceed to the printer driver.11.
Enable the Rotary under the Engraving Field sub-tab.12.
Type in the diameter of the glass that was measured.13.
Then set the appropriate power and speed settings in the printer driver before engraving the object.14.
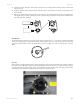
You are now ready to print to the laser system. Make sure that your system is ready to engrave and then begin the 15.
process.