
User guide


Link to Table of Contents
User Guide
107
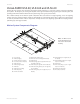
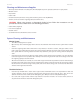
VLS3.60, VLS4.60 and VLS6.60 Accessories
1
2
3
4
5
6
7
8
9
10
11
12
123456 78910 11 12 13 14 15 16 17 18 19 20 21 22 23 24
6
1
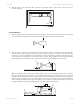
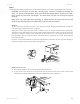
With the power to the system still OFF, connect the 7-pin Rotary Fixture control cable to the receptacle on 7.
the laser system (6).
2
4
3
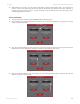
Note: If engraving a tapered object (1), the Rotary Fixture can be rotated to maintain proper focus. To do this,
lift up the left end of the xture and place a spacer underneath the xture (2) to prop it up. Slide the spacer left
and right until the surface of the object is parallel (3) to the Focus Carriage. Be careful not to raise the Rotary
Fixture too high (5), otherwise parts of it might interfere with the Focus Carriage (4). If you operate the xture
in this manner, you might need to taper your graphic in your software so that it matches the taper angle of
your object. Otherwise your graphic might appear to be tapered when it is engraved.
5
1
2
3
4
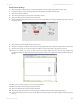
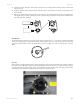
Loading Material
Before loading the glass into the xture, measure the diameter (1) of the glass in the area where the engraving 1.
is to be located by using a caliper or similar measuring device. Make a note of the measurement.
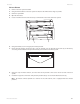
Place the open end of the glass (4) on the right side of the Rotary Fixture. Lift the lever (2) on the adjustable 2.
end of the xture and slide it up against the base of the glass so the glass rests rmly centered inside of the
inverted cone. Push the adjustable end of the xture (3) to the right rmly against the bottom of the glass.
Do not to apply too much pressure, especially with glass. You only need enough pressure to prevent the object
from slipping on the cone while it rotates. Lower the lever on the end of the xture to lock it in place.