
User guide

Link to Table of Contents
User Guide
106
VLS3.60, VLS4.60 and VLS6.60 Accessories
1
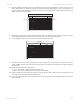
2345678910 11 12 13 14 15 16 17 18 19 20 21 22 23 24
1
2
3
4
5
6
7
8
9
10
11
12
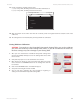
2
1
3
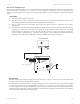
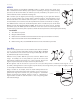
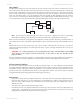
Rotary Fixture
The Rotary Fixture is designed to engrave cylindrical
objects. Two attachments come with the xture: a cone shaped
disk attached to the motorized end of the xture and an inverted
cone shaped disk attached to the adjustable end of the xture.
These attachments are used to hold wine glasses, mugs, cups,
baseball bats, etc.
Note: If the rotary is installed and mounted on the table in
any other manner than the one mentioned below, please
contact the Customer Service Department at 480-609-0297 (USA), +43 1 402 22 50 (Austria), +81 (45) 224-2270
(Japan) or support@ulsinc.com for further instructions.
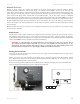
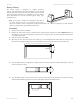
Installation
Turn the UCP and laser system ON.1.
Remove any materials that may be underneath the engraving table and lower the table 2. all the way down to
the bottom or at least far enough down so that the focus carriage will clear the top of the Rotary Fixture when
it is installed on the table.
Now turn the laser system OFF.3.
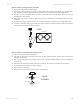
Open the top door. Place the bracket on the table (1). Insert the thumbscrews and washers (2) into the screw 4.
holes, but do not tighten completely. Leave the thumbscrews loose enough so that the bracket can slide.
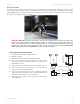
Place the Rotary Fixture on a at surface. Using an Allen wrench, attach the two socket head shoulder screws (3) 5.
to the side of the base plate.
Place the Rotary Fixture on top of the bracket so that its pivot bolts set into the forks in the bracket. Gently 6.
push the xture (4) at up against the top ruler. Now tighten down the thumbscrews (5).
1
2
3
4
5
6
7
8
9
10
11
12
123456 78910 11 12 13 14 15 16 17 18 19 20 21 22 23 24
4
5