
User guide

Link to Table of Contents
User Guide
100
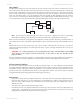
VLS3.60, VLS4.60 and VLS6.60 Accessories
Installation
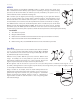
Turn on your laser system.1.
Lower the table all the way down.2.
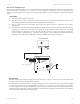
Remove the strip(s) from the exhaust plenum(s) (1) with an Allen wrench. There is one exhaust plenum on the 3.
VLS3.60 and VLS4.60 and two on the VLS6.60 laser system (as the diagram indicates).
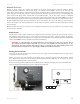
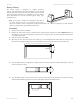
Before installing the cutting table in the laser system, loosen the screws on the side of the cutting table just 4.
enough to allow the adjustable manifold to slide in and out. Extend the adjustable manifold out as far as it can
go.
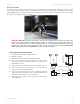
Open the front door of the laser system and carefully slide the cutting table into the laser system, so that 5.
its body is squarely pushed up against the engraving table rulers on the top ruler and ush left of the table. The
rulers of the cutting table should now overlap the rulers on the engraving table.
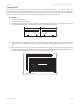
1
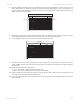
Cutting Table
The purpose of the Cutting Table is to support the material that you are cutting above the
engraving table’s surface to minimize surface contact area. It also redirects exhaust airow below and above the
material for ecient smoke removal. The cutting table is installed directly on top of the engraving table. The cutting table
material is reective only in the area that contacts your material to minimize laser beam reection.
1 234567 8910 11 12 13 14 15 16 17 18 19 20 21 22 23 24
1
2
3
4
5
6
7
8
9
10
11
12
1 23456789101112131415161718192021222324
1
2
3
4
5
6
7
8
9
10
11
12
ENGRAVING TABLE
CUTTING TABLE
ADJUSTABLE MANIFOLD