
User guide

Link to Table of Contents
User Guide
74
User Manual
Hidden Vector Lines in Artwork
The driver does not automatically lter out outlines that are overlapped by engraved objects such as lls. If there
are lled objects with some hidden outlines underneath, the laser system will engrave the ll and cut the hidden
outline on top of the ll. This is a common occurrence when using pre-drawn clipart designed for laser printers. To
prevent this from happening, turn on the Clipart Mode feature in the driver. This feature disables the cutting mode
and converts all visible outlines to engraved objects and ignores all hidden outlines.
Speed Optimizing
It is advantageous to engrave an object in its longest direction because total engraving time will be reduced when
the motion system has to make fewer stops and starts. If the engraving object is taller than it is wide, rotating the
graphic 90 degrees and placing the material in the laser system sideways can achieve a greater engraving speed. Be
aware that some graphics programs do not allow the rotation of bitmaps. In this case, it may be necessary to use a
bitmap image processing software to rst rotate the bitmap before importing the bitmap into the graphics program.
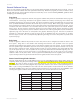
If the artwork contains engraved objects of the same color with a great deal of space between them in the engraving
direction, processing time can be longer since the laser must make long strokes to engrave both objects at the same
time. To reduce engraving time in cases like these, use dierent colors for each of the objects, but assign the same
power setting to both colors. This will cause the laser to engrave one object at a time, skipping over all blank space,
which in many cases will reduce engraving time. On the other hand, if the objects are relatively close together in the
engraving direction, then leave them the same color because it will be quicker to engrave them both at the same
time. Experiment with these techniques to optimize the speed of engraving.
Bitmapped / Scanned Images
There are primarily three types of bitmaps available: monochrome (black and white), grayscale and color. Bitmaps
are patterns of dots (pixels) blended to form pictures. Scanning artwork into a computer through a scanner creates
most bitmaps. Drawing them in a bitmap image-processing program creates others.
The laser system can print all three types of bitmaps providing that either the driver or the bitmap image-processing
program converts the grayscale and/or color bitmaps into a monochrome bitmap. Essentially, the laser system is a
monochromatic printer, either it res the beam to burn a dot or it does not re the beam to leave an empty dot on
the material.
There are several dierent bitmap storage formats available: TIF, JPG, BMP, PCX and others. The format makes no
dierence to the laser system. The dierence in formats involves how they are stored on your computer’s hard disk.
Bitmaps cannot be edited in most graphics software. Some basic functions such as cropping, scaling or mirroring
might be possible. It is usually necessary to use a bitmap image processing software to perform a dot by dot editing,
rotation or scaling of the bitmap.
Monochrome Bitmaps
If you scan the image in monochrome (black and white) mode, set your scanner to at least 600 DPI. The
higher the DPI, the smoother the image will be. Scanning monochrome images at 300 DPI is the minimum
recommended resolution, but scanning them at 600 DPI will provide a signicant improvement in image
quality. You can either print the image directly from your bitmap image processing program or import the
bitmap into a graphics program and print it from there. Monochrome bitmaps are engraved in the same manner
as black lled text. The black area will turn the laser on and the white area turns the laser o.
Grayscale Bitmaps
When scanning an image in grayscale mode, you should scan the image at no more than 300 DPI. Scanning
at a higher DPI does not improve image quality and it consumes more memory and will take longer to print.
Grayscale images cannot be printed directly to the laser system. Since the laser system actually works like a black
and white printer, grayscale images must be converted into black and white images. To do this, the driver will
do it automatically or you can convert the grayscale image to a black and white image in your bitmap
image-processing program.
The two primary grayscale image conversion techniques are Halftone or Error Diusion. The printer driver
can print either one and it is selected in the driver under the Raster Sub-Tab. Please refer to the printer driver
section for more details on how to set these parameters. Since the driver has a xed method of conversion,