
User guide


46
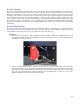
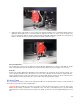
3. Adjust the angle of the nozzle as necessary by loosening the thumbscrew (1), rotating the bracket and re-
tightening the thumbscrew. A convenient way to align the air flow is to focus on the material to be
processed and then align the nozzle using the angle and height adjustments toward the red target laser
which is on when the laser system is powered on and the top door is open.
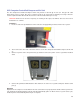
Air Flow adjustment
The needle valve can be used to adjust air flow for different applications. It is best to start with the needle
valve at maximum flow (turn the needle valve counterclockwise until it seats), then adjust as necessary.
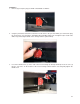
Removal
Remove the height
adjustment thumbscrew
and detach the air assist back sweep from the mount. You
can re-attach the thumbscrew to the mount so as not to lose it. Detach the hose from the needle valve by
using a small wrench or needle nose pliers to loosen the nut that attaches the hose to the needle valve and
unthreading the nut from the needle valve. The needle valve will stay with the carriage
.
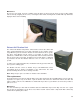
Air Assist Cone
The cone attaches to the base of the Focus Carriage and will force air directly onto the surface of your material. It
also helps to protect the lens from contamination.
CAUTION: Do not install the cone unless you plan on using Air Assist and never use the Air Assist Cone
without proper airflow. Leaving the cone attached to the cone base and running the laser system without
airflow will cause smoke from laser processing to be drawn up into the cone and rapidly damage the focus
lens.