
User guide

36
System Tab
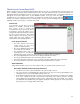
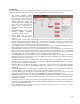
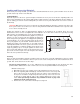
The System Tab allows you to configure certain features of the laser system. If your laser system needs to be
calibrated, you will need to do so from this tab. The System tab contains the following controls:
• The PRINT CACHE number
indicates the maximum number of
print jobs that will be stored on
your hard drive. If you exceed the
number shown, the software will
automatically begin deleting the
oldest jobs as newer jobs enter the
queue, unless “Permanent” is
checked in the File Management
window.
• LANGUAGE allows you to switch
between available languages
according to your preference.
• UNITS allows you to choose
between Metric or English units of
measure.
• AUTO Z enables a feature that automatically moves the Z axis to the material thickness value entered
into the printer driver properties window. If it is disabled, the Z values entered in the printer driver
properties window will be ignored and you will need to set focus manually by using the Focus Tool. If you
use this feature make sure the Z axis has been properly homed.
• The TUNING value is used compensate for mechanical lag when raster engraving by shifting the left to
right and right to left raster lines with respect to each other by the amount entered.
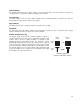
• The LENS SIZE selection lets the laser system know which lens you have installed. This is important for
proper function of the auto Z mode in the laser system and auto-focus feature in those laser systems with
autofocus. Lenses are calibrated to the laser system at the factory, but if you replace a lens you will need
to recalibrate the lens. Select the Calibrate feature and follow the instructions given.
• The ALIGNMENT Mode Launch button opens the Alignment Mode window for checking and adjusting
alignment of the laser to the motion system. The Alignment feature should only be used if instructed by
the Customer Service Team at ULS.
• CUTTING TABLE allows you to calibrate the Z axis to the top surface of a removable cutting table. You
need to have the cutting table installed in the system to activate the CALIBRATE button. To calibrate,
press the button and follow the instructions.
• ROTARY allows you to calibrate the Z axis to a rotary fixture. You need to have the rotary fixture installed
in the system to activate the CALIBRATE button. To calibrate, press the button and follow the
instructions.
• PULSE CALIBRATION is set at the factory to calibrate laser pulsing for the installed laser. It should not
be adjusted unless you are instructed to do so by the Customer Service Team at ULS.
• If the SOUNDS box is checked, the computer will play the sound file selected every time the selected
event occurs. You can attach sounds to the JOB COMPLETE, PAUSE and RESUME events.
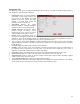
• HOMING OPTIONS allows you to change behavior of the homing features in the laser system. By default
after a job is complete the motion system will return home. To prevent this, select the ‘Don’t Return Home
After Engraving’ switch.
• If the laser loses its Z location, the materials processing table will home at start-up. To have this feature
turned off, check the ‘Disable Automatic Z-Homing’ switch. Disabling this feature can also be helpful when
troubleshooting Z-Axis problems.
• If you would like the laser system to re-home the X and Y axes before it processes each job, select the
‘Home XY Before Engraving’ switch.