
Troubleshooting guide

BASIC MAINTENANCE
Section 4-3
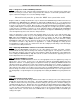
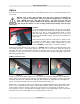
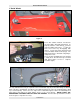
Beam Window
Figure 5 Figure 6
The Beam Window is where the laser beam enters into the engraving area. It is located in the upper left
hand corner of the engraving area against the back wall and is yellow in color. It is only necessary to
clean the front side of the beam window. Do not remove the optic to clean it; simply clean it in the same
manner as the #2 mirror. To clean you must remove the beam window diffuser by slightly rotating CCW
until diffuser is free (Fig 5). Using a Cotton Tipped Applicator and Lens Cleaner lightly wipe debris away
from beam window (Fig 6).
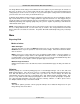
Exhaust Plenum Cleaning
• Power system ON.
• Using the Z-axis controls, raise the
Z-axis table as high as possible.
Power the system OFF.
• Locate and remove the two button
head screws (1) found on the back
of the laser system.
• Open the front door. Using both
hands, reach in and grab exhaust plenum. Lift the plenum straight up until the tabs (2) of the plenum
clear the two flat head screws (3) they are resting on. Tilt the bottom of the plenum towards you and
remove it from the system. Using your soap and water solution, clean the inside of plenum as well as
the inside rear wall of the Laser System.
• Installation is opposite of removal. Make sure that the plenum tabs rest on the two flat head screws.
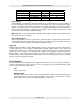
Adjustments and Lubrication
There are no periodic adjustments normally required. The Guide Wheels in the motion system will self
adjust to take up any clearances as they begin to wear. The belts are fiber reinforced and will not stretch
under normal use so that periodic tension adjustment is not necessary. Optical alignment is not
necessary because the laser and the #2 mirror are fixed.
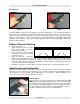
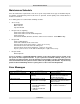
X Guide Wheels
All wheels in the system are sealed and do not require lubrication. DO
NOT lubricate the tracks that the wheels ride in. The X Axis Carriage
has 4 wheels, 2 located on top and 2 underneath. Clean all 4 wheels
(Fig 7) using a Cotton Tipped Applicator. Press the applicator against
the wheel and slowly move the carriage until bearing makes at least 1
complete revolution. Repeat on the 3 remaining wheels.
Figure 7