
Troubleshooting guide

OPERATION AND PRINTER DRIVER CONTROLS
Section 3-11
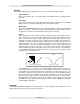
Image Density (DPI) settings will also have an effect on vector quality and vector speeds when vectoring
other than straight horizontal or vertical lines. For example, a circle is made up of very small straight-line
segments linked together at very small angles. If you choose a high quality setting such as 6 (1000 DPI),
then these segments are as small as possible and they are high in quantity. The result is the smoothest
looking circle but will take longer to vector engrave or cut because the focus carriage must start and stop
at the ends of each line segment.
Since there are many segments, it will take longer to process, but the quality will be the highest that the
machine can produce. If using a low quality setting such as 1 (DRAFT), these segments become longer,
but there are less of them resulting in more flat-edged looking curves that will process faster. By running
samples on scrap materials and practicing with different settings, you can find a compromise between
throughput and engraving quality.
Settings
A unique feature of the printer driver is the ability to store all of its settings in a file without you having to
write them down. These settings files are what we call LAS files.
Save
By clicking Save, the “Save Engraving Setup” dialog box will appear and will allow you to enter in a
file name. All settings will be stored in this file that has a “.LAS” extension. DO NOT rename the
extension; the driver will not recognize the file as a laser settings file if it does not have the “.LAS”
extension name. These files can be stored in any directory on your hard drive or floppy disks and you
can have as many setting files as your disks can hold.
Load
To recall printer driver settings that have been previously saved, click on the “Load” button and
choose the desired .LAS settings file. The settings that are currently on screen will be replaced by
the settings from the .LAS file. You may abort this change by clicking Cancel; clicking OK will
approve the change.
Default
This button will reset the driver settings to the originally installed values.
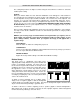
Print Special Effects
In this dropdown list, you can choose from 4 different printing modes, Normal (default), Clipart, 3D, and
Rubber Stamp.
Clipart Mode
This control simulates laser printer output and is very useful if using a drawing with many colors,
shades of gray, or many outlines. It is recommended to turn this control ON when using DRAWN
clipart because there may be some underlying cutting lines hiding behind filled areas. Having this
control ON gives a what-you-see-is-what-you-get output very similar to laser printer output. The
entire drawing will be raster engraved, including all outlines, and only the Black color setting is used.
The driver automatically turns OFF its color-mapping feature and all colors are engraved as different
shades of gray, represented by a halftone pattern. The type of halftone pattern is based upon the
“Quality” setting of the driver the same way grayscale bitmaps are interpreted. Since clipart images
use a wide variety of colors, shades, and outlines, the only effective way of engraving these images is
to have this control turned ON. Clipart mode also provides greater compatibility with Windows
software that does not work well with vector devices such as the laser system. Do not activate this
control when printing photographs or bitmapped images; use it ONLY with DRAWN clipart.