
Specifications


CAUTION
The next step is very important. Please follow the directions otherwise a
beam misalignment can occur.
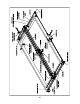
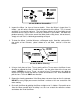
7. Install the Thumbscrew, and before tightening it down all the way, gently press your
finger against the back side of the Mirror so it rests flush against the Holder (refer to
the next diagram). . Now tighten the Thumbscrew finger tight.
#2 and #3 Mirror Installation
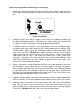
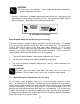
The Beam Window is located inside the mach
eals the engraving area off from the laser tube and #1 Mirror area. This prevents the
need to clean the #1 Mirror or the laser tubes optics because it is in a sealed
environment. Visually inspect the Beam Window for signs of dirt or debris. The Beam
Window’s front surface can be cleaned while remaining installed. There is no need to
clean the back side of the Beam Window as it will not get dirty.
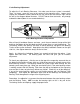
1. To clean the Beam Window, soak a cotton swab with Lens Cleaner.
2. Roll the cotton swab across the Beam Window in one direction.
3. Dry off any remaining so dry, cotto swab across the
Beam Window.
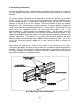
As the motion system undergoes heavy use,
ea sate for this wear, the Bearing Clearance between the outer bearing
d
Bearings will need adjustment more often than t
a ve maintenance step, they only need adjustment if
reduced by excessive clearances between the bearing
races and the rails of the motion system.
Beam Window Inspection and Cleaning (as necessary)
ine in the left hand corner. This window
s
lution by rolling a fresh, and n
CAUTION
DO NOT press the cotton swab down with force, only roll it across the
Window. DO NOT wipe it across as this can scratch the outer coating.
5.4 Bearing Clearance Adjustments (as necessary)
the outer bearing surface will start to
r. To compenw
surface and the bearing tracks will need to be adjusted to maintain peak performance
an engraving quality. Since most of the motion is in the X-axis direction, the X-axis
he Y-axis bearings. It is not necessary
djust any bearings as a preventito
the engraving quality becomes
87