
Specifications


9. Experiment with some scrap materials to determine where the graphic will engrave
when the graphic is located in different areas on screen.
10. Set the driver parameters, send the file to print, and begin engraving.
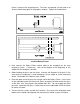
Operation of the Rotary Fixture in the Portrait mode
1. The Rotary Fixture can also operate in the Portrait mode providing that the
engraving object is not too heavy. The Portrait mode will cause the Rotary Fixture to
spin the object back and forth very quickly. The normal Landscape mode will rotate
the object very slowly and raster the X-axis arm from left to right very rapidly.
Landscape mode usually takes longer to engrave than Portrait mode. If using
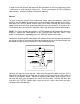
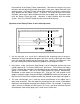
2.
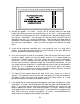
ined engraving area as the diagram below illustrates:
Portrait mode, make sure to engrave or cut at speeds lower than 50% otherwise the
object might slip as the Rotary Fixture spins back and forth. If the object slips, it is
either too heavy or the engraving speed is too fast. To use the Portrait mode,
simply click on Portrait in the graphics software’s page setup and then in the ULS
Printer Driver.
The graphic on screen will now need to be adjusted. The graphic will have to be
rotated another 90 degrees so that the graphic is upside down. Reposition it within
the def
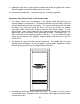
Do nothing to the Rotary Fixture inside of the laser. The setup on it is the same as
in Landscape mode. Experiment with using both the La
3.
ndscape and Portrait modes
and note the results.
59