
Specifications


fixture is square to the engraving area. The rulers also provide a visual guide as to
to locate the graphic in the graphics software. Tighten the thumbscrews. where
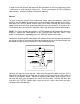
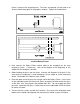
Installed Rotary Fixture
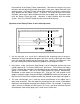
. Before loading the glass into the fixture, measure the diameter of the glass in the
area where the engraving is to be located by using a caliper or similar measuring
or write it down.
with glass. Lower the lever on the adjustable end of the fixture
to secure it in place.
6.
3. Next, connect the Rotary Fixture control cable to the receptacle on the laser
engraving system. If necessary, refer to the diagram at the beginning of this
chapter for the receptacle’s location.
4
device. Remember this number
5. Place the open end of the glass on the right side of the Rotary Fixture. Lift the lever
on the adjustable end of the fixture and slide it up against the other end of the glass
so the glass rests firmly against the padded foam disk. Do not to apply too much
pressure, especially
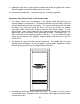
Turn on the laser system and wait for it to home. Press one of the directional arrow
buttons on the motion control panel and notice that the motion system will align to
56