
Specifications


Step 3 Press the “SETUP” button and by using the motion control buttons, position
the focus lens assembly over the engraving material. Adjust focus by using
tep 5 Before printing, go to the ULS Printer Driver and assign the power settings.
If using DOS based programs, go to the laser system and enter in the power
settings on the control panel in the “DOS POWER SETTINGS” submenu.
Step 6 Now send the job down to the laser system.
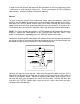
4.5 Using the Optional Rotary Fixture
The Rotary Fixture controls in the ULS Printer Driver are used along with the optional
otary Fixture to engrave onto round or cylindrical objects. In order to compensate for
ering in the diameter of
e object being engraved.
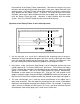
e shaped disk attached to the motorized
nd of the fixture and a flat disk with foam padding attached to the adjustable end of the
xture. These attachments are designed to hold wine glasses, mugs, cups, etc. The
i procedure in the installation and operation of the Rotary
ixture. We are going to use a glass as an example.
of the Rotary Fixture
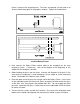
turn th the top door of the laser engraving system and
place the Rotary Fixture on the engraving table with the black box on the Rotary
2. Attach
the ta
squarely aligned with the rulers. Being square to the rulers will ensure that the
the focusing tool and adjusting the height of the engraving table.
Step 4 Create a graphic using the graphics software program and position the
graphic on screen so that it matches the placement of the object in the laser
system.
S
Step 7 Turn on the exhaust blower.
Step 8 Supervise the engraving or cutting function. DO NOT leave the job
unattended.
Step 9 Finally, when the job is in the laser system’s buffer, press the “START”
button to start engraving.
R
different diameter objects, the image must be adjusted. This is done automatically by
the ULS Printer Driver when selecting “Rotary Fixture” and ent
th
Two attachments come with the fixture, a con
e
fi
follow ng is a step by step
F
Installation
1. Turn the laser system ON and lower the table all the way down to the bottom. Next,
e laser system OFF. Open
Fixture to the right.
the Rotary Fixture to the engraving table by aligning it with the screw holes on
ble. Before tightening the thumbscrews, position the fixture so that it is
55