
Specifications


Electric (optional)
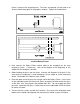
To focus using the electric Z-axis table adjustment, open the top door. Load your
aterial into the upper left hand corner of the engraving table up against the rulers.
ow press the “SETUP” button and the focus lens holder assembly will move into the
t hand corner of the engraving table right over your material. If the focus lens
not directly over your material, reposition it by using the motion control arrow buttons.
m
N
upper lef
is
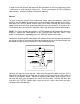
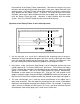
Note that the following menu will appear on the display:
By pressing and holding the “UP ARROW” button, the table will move up rapidly and by
ressing and holding the “DOWN ARROW” button the table will move dop wn rapidly.
button to change the
EIGHT ADJ.” to “FINE”.
This is due to the “COARSE” setting on the display. If you quickly depress and release
the arrow button, the table will move in smaller increments. Use the focus tool in the
same manner as adjusting the Z-Axis table manually. When you get close enough to
eing in focus by using the focus tool, press the “SELECT” b
“H
This will allow even finer adjustments of the Z-Axis table. Practice using the controls
until you get a feel for how to use this easy method of focusing.
Remove the focus tool and press the “SETUP” button again to get out of this menu and
return the focus carriage to the home position.
4.4 Running a Sample
order.
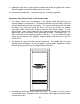
Step 2 Load the object that will be engraved into the laser system and position it in
the desired location in the engraving area. Usually, the object is placed up
against the rulers in the upper left hand corner of the engraving area. Use the
rulers to determine the size of the engraving object. Use either the top door
or the front door for loading.
The following outline is a step by step procedure used to produce a laser engraved
object. Please follow this procedure to understand the steps necessary for laser
engraving.
Step 1 Turn on the computer and then the laser system. Be sure to turn the
equipment on in this
54