
Specifications

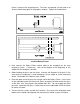


In order to cut and engrave with precision the laser beam in the laser engraving system
focused to a small spot by the focus lens. There are two types of Z-Axis engraving
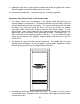
g table up against the rulers.
ow press the “SETUP” button and the focus lens holder assembly will move into the
pper left hand corner of the engraving table right over your material. If the focus lens
ectly over your material, reposition it by using the motion control arrow buttons.
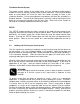
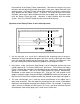
top surface of the material to be processed and the flat of the focusing tool can
e placed flat against the lens holder as in the following diagram:
is
table controls, manual (standard) and electric (optional).
Manual
To focus using the manual Z-axis Adjustment Knob, open the top door. Load your
material into the upper left hand corner of the engravin
N
u
is not dir
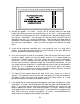
NOTE: The Z-axis controls (pressing the “SETUP” button) are only accessible when the
display is showing the “MAIN MENU” or the “OPERATIONS DISPLAY” menu. If the
either is not displayed, repeatedly press the “ESCAPE” button until it does.
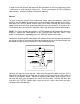
Position the engraving table up or down until the base of the focusing tool can be placed
on the
b
top of the focusing tool. Now raise the engraving table using the Z-Axis
Observe the
tool just starts to tilt away from the lens holder as Adjustment Knob until the focusing
shown in the diagram above. Back the engraving table down again slightly so the
focusing tool again sets flat against the side of the lens holder. Remove the focus tool
and press the “SETUP” button again to get out of this menu and return the focus
carriage to the home position.
53