
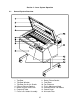
Specifications

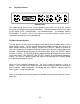
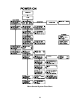
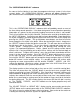

The “OPERATIONS DISPLAY” submenu
As soon as the first job that is sent from the computer to the laser system is in the laser
system’s buffer, the “OPERATIONS DISPLAY” submenu will appear displaying the
job’s filename and associated power settings the were set in the ULS Printer Driver.
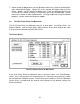
This is the “OPERATIONS DISPLAY” submenu which will probably remain on most of
the time during normal operation. It has been designed to show all pertinent operating
information at a glance so that constantly jumping from menu to menu is not needed.
The first line indicates the first job’s filename. To move to the next job in the buffer press
the “NEXT JOB” button, if more than one job has been downloaded. Page through the
list of jobs available in the buffer by placing the cursor on the first line of this display and
pressing the “SELECT” button. The up and down arrow buttons can then be used to
move through the list of jobs in the buffer. When the desired job is found, simply press
the “SELECT” button to make that job the current job. This will move the cursor back to
the left hand side of the display. To run the currently selected job simply press the
“START” button. Changing the current job is not possible while running the laser
system. For experimental purposes, Power, Speed, and PPI settings can be altered
while the file is running allowing you to adjust these settings until the desired depth or
effect is achieved. To adjust these settings, press the up or down arrow button until the
cursor is on the desired selection. Press the “SELECT” button which moves the cursor
to the right and then use the arrow buttons to increase or decrease the values.
Pressing the “SELECT” button again will accept the change and pressing the “ESCAPE”
button will restore it to the original setting. It is possible to adjust the settings while
engraving on some scrap material until the desired “POWER”, “SPEED”, and “PPI”
settings are obtained. Note these settings, change them in the ULS Printer Driver and
re-send the job to the laser system for the final run.
The display contains a timer to time jobs as they are run (this is useful for costing jobs).
The timer will pause when the “PAUSE” button is pressed and starts up again when
cutting or engraving has been “RESUME”d. If the same job is run again, the timer will
count backwards displaying how much remaining time is left. The “COPIES” feature
indicates the number of times the current job has been used since it was loaded into the
buffer (the system keeps a running count of the number of times each job in the buffer
has been processed). The DPI section displays the current DPI that the job is running
at. The “TIMER”, “COPIES”, and “DPI” readouts are for display purposes only and
cannot be altered.
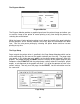
The “ADJUST FOCUS” or “HEIGHT ADJ”. display can be accessed by pressing the
“SETUP” button on the control panel while in the “OPERATIONS DISPLAY” submenu.
This will assist you in setting the focus of the laser beam. Please refer to the section on
“Loading and Focusing the Laser System” for specific details.
40