
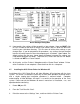
Specifications

2.5 Laser System Installation
CAUTION: Please make the following connections in the exact order
described otherwise static electricity can damage the computer and/or the
laser system’s electronics.
1. Connect the laser system’s power cord to a good quality surge suppresser and
then the surge suppresser to a grounded outlet. Do the same for the computer
system.
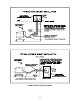
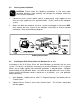
2. Make sure both the computer and laser system are plugged in and turned OFF,
then connect the laser system to the computer using either a serial or parallel
connection. Refer to the following diagram:
Cabling Connections
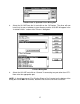
2.6 Installing the ULS Printer Driver for Windows 3.1 or 3.11
Installation of the ULS Printer Driver will allow Windows to interface with the laser
system. This driver is installed the same way as most other Windows 3.1 or 3.11 printer
drivers and a simple step-by-step installation procedure is outlined below. Complete
understanding of how Windows works is essential to the operation of the laser system.
Please consult the Windows owner's manual on its installation, use, and operation
before continuing.
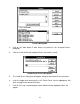
1. Start Windows, double click on “Main” in “Program Manager” and double click on
“Control Panel”.
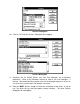
2. Double click on “Printers” from inside “Control Panel”. The “Printers” dialog box
will now appear.
15