
Specifications

Printer Driver Controls
Section 3-3
PPI
Available settings are 10 to 1000. The laser beam is always pulsed and never “on” continuously even
though it may appear that way. The PPI setting indicates how many laser pulses, per linear inch, the
laser cartridge will emit. The pulsing of the laser beam is electronically linked to the motion system.
These pulses will always fire, equally spaced, from one to the next, regardless of changes in speed.
In raster mode, the laser pulses are applied in bi-directional, horizontal scan lines just
like a dot matrix printer. If you set the PPI to 500 and use the standard focusing lens
(2.0”) which has a laser spot size of five thousandths of an inch (.005”), pulses will
fire every .002 inches (500 PPI), which will produce pulse overlap. Raising the PPI
higher, such as 1000, the pulses will overlap more whereas lowering the PPI to
something like 150 will spread the pulses out far enough where they may not overlap
at all. When raster engraving filled objects, it is advisable to use a PPI setting of 500 or higher. If
using less, the image resolution of the engraving is reduced. In some rare cases, using less than 500
PPI may produce better results.
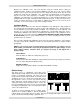
In vector mode, laser pulsing follows the path of the outline of the object. Imagine
the laser system working like a sewing machine where the stitching always remains
consistent whether you sew fast, slow, or around curves. The setting you use will be
application material dependent. Using less than 150 PPI may result in the pulses
being spread so far apart that they may or may not touch one another. Perforated
paper has this characteristic. Higher PPI settings may cause more of a melting or
burning effect on the edges whereas lower PPI settings may reduce the burning, melting, or charring,
but may result in a serrated or perforated-looking edge. Increasing or decreasing the PPI setting
does not affect engraving speed, only the frequency of the pulses.
Set Button
After making % Power, % Speed, and PPI adjustments, you must click the Set button to register the
change. If you do not click on Set, but click the OK button instead, the settings will revert back to the
previous settings.
?
This selection, located in each tab, opens the printer driver’s help screens.