
User`s manual


43
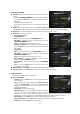
3.4 Network Setting
To use a Network connected to the STB Ethernet port, you have to prepare the STB Network settings.
When the STB and a PC are connected via a network, you can access the files of the STB storage device
such as the SATA Hard Disk Drive (HDD) or USB storage device.
NOTE : If you use DHCP function of router, you can set
easily network configuration.
DHCP : You can select On/Off for the Dynamic Host
Configuration Protocol (DHCP) to get the all configuration
from the router.
- If you select ‘On’ : You will obtain the configuration from
network and be set up automatically. In this case, the
remaining item (IP Address, Subnet Mask, Gateway, First
DNS, Second DNS) are automatically set and you don’t have to configure them manually.
- If you select ‘Off’ : You have to input the IP address manually together with the following data.
IP Address, Subnet Mask, Gateway, First DNS, Second DNS : You can input the address with the OK
button, NUMERIC buttons and the LEFT/RIGHT buttons. You can move to the next item of Subnet
Mast with the DOWN button and you can configure the following items in the same way.
Firmware Upgrade Server : This feature is not supported for the time being. It will be available in
the future.
MAC Address : This will display the MAC address of the STB Ethernet interface and is a fixed
assignment unique to each STB.
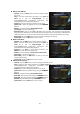
Control of the files via the network and your PC.
- Check the IP Address of the STB on the Network Setting
menu.
- Press Enter button on your PC, after writing IP Address on
the web browser address line.
Ex.) //168.158.10.146/storage
- You can see the folder name of HDD, USB1 and USB2 in the
Storage folder.
HDD : SATA HDD (internal HDD or external-SATA)
USB1 : Front USB Storage Device
USB2 : Rear USB Storage Device
- You may be able to load and retrieve data between the PC and the STB via the browser
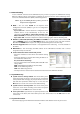
3.5 System Recovery
System restore to factory default : This menu allows you to
restore the factory set values in case the user has encountered
some problems after changing any new parameters of service
data and other parameters which may be in error. Press the
OK button to erase all services and restore default setting.
System restore to stored position : This menu allows you to
restore the stored values including service data and system
parameters. Press the OK button to restore all data.
Store system data : If you want to use system parameters and
service data in the future, this menu allows you to store current state. Press the OK button to store
current state.
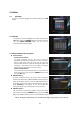
3.6 System Information
This menu displays general information about the hardware and software version of your receiver.