Hashi User Manual FCC ID: MG3-7010 Ver1.
Hashi User Manual Content 1 Summary....................................................................................................................................... 2 2 Key feature.................................................................................................................................... 2 3 Using the Configuration Menu ................................................................................................... 3 3.1 Preparation ........................................
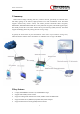
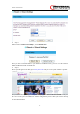
Hashi User Manual 1 Summary Hashi wireless bridge collecting with wire, wireless network, specifically for satisfied office and family getting on the Internet, high-speed data tone video transmission need.
Hashi User Manual ¾ ¾ ¾ ¾ ¾ ¾ Supports 64/128-bit WEP encryption, WPA/WPA2, WPA-PSK/WPA2-PSK data security Supports MAC/IP filtering and URL filtering Supports DHCP server Supports Web user interface Supports System status and security log Supports Firmware upgradeable 3 Using the Configuration Menu Please conclude the steps of installing Hashi as below: A. Power on Hashi B. Use an Ethernet cable to connect Hashi to your PC with windows OS. C.
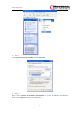
Hashi User Manual ¾ Step 5 Choose Internet Protocol (TCP/IP) and click Properties. ¾ Step 6 Please choose “Obtain an IP address automatically” to specify IP addresses automatically. Please click the OK button after your configuration.
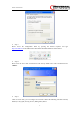
Hashi User Manual ¾ Step 7 Please access the configuration menu by opening the Internet Explorer and type http://192.168.1.55 in the Address band. The Hashi’s default IP Address is shown below: ¾ Step 8 Please enter the User name and Password. The factory default User name and Password are “admin”. ¾ Step 9 Click on a menu item, you can configure it. The menu contains the following sub-menu: Wizard, Wireless, LAN, QOS, Security, Service, Management, Status.
Hashi User Manual 3.2 Setup Wizard The wizard setting will guide you to configure the Hashi. Please follow the wizard setting step by step. ¾ Step 1 Please begin by clicking on Next. ¾ Step 2 Please click Scan, and select the wireless router which you want to connect.
Hashi User Manual ¾ Step 3 Please enter the password of your wireless router, and click Next. ¾ Step 4 Please select Client as your DHCP mode, and click Finished.
Hashi User Manual ¾ Step 5 When it show “Connect successfully!”, click “Reboot Now” Now you have connected Hashi to your Wireless broadband router, your PC can visit wireless WIFI broadband network via Hashi now. ¾ Step 6 Please open IE again to test this, input www.yahoo.com and you can see yahoo website is opened: Now, Hashi is correctly configured and you can unplug the Ethernet cable between Hashi and your PC. You can also power off Hashi now.
Hashi User Manual 3.3 Wireless ¾ Basic This page provides the basis wireless settings, which keep the default configuration when you access it the first time. 1. Band: 2.4 GHz (B) Select it if your wireless router is configured in 802.11b. 2.4 GHz (G) Select it if your wireless router is configured in 802.11g. 2.4 GHz (N) Select it if your wireless router is configured in 802.11n. 2.4 GHz (B + G) Select it if your wireless router is configured in mix mode of 802.11b and 802.11g. 2.
Hashi User Manual 4. SSID: Service Set Identifier (SSID) is the name of your Hashi, the SSID is case-sensitive. 5. Channel Width: 40MHz This is default setting, Select it if you are using both 802.11n and non-802.11n wireless devices. 20MHz Select it if you are not using any 802.11n wireless clients. 6. Control Sideband: Upper Select it so you can change the channel number from 5 to 11. Lower Select it so you can change the channel number from 1 to 9. 7.
Hashi User Manual It is specified in bytes, determines whether packets will be fragmented. Packets exceeding the 2346 byte setting will be fragmented before transmission. 2. RTS Threshold: This value should remain at its default setting of 2347. If inconsistent data flow is a problem, only a minor modification should be made. 3. Beacon Interval: Beacons are packets sent by an Access Point to synchronize a wireless network. Specify a value. 100 is default setting and is recommended. 4.
Hashi User Manual 1. Select SSID: Select the SSID which you want to set as Encryption mode. 2. Encryption: Set the encryption mode at the SSID which you select. ¾ Access Control 1. Wireless Access Control Mode: You can choose one of the strategies. 2. MAC Address: Type the MAC Address. For example: 00e1a2b3c456 ¾ WDS WDS is commonly used in areas requiring multiple APs, where wiring is not possible or costly and for providing back-up paths between APs.
Hashi User Manual and set MAC Address of other AP which you want to communicate with in the table. 1. MAC Address: Specify the MAC address of the destination access point. 2. Data Rate: The default setting is Auto. ¾ WPS The WPS settings are valid when Hashi works in AP mode.
Hashi User Manual 1. WPS(Wi-Fi Protected) Settings: There are two ways to start PBC(Push Button Configuration) mode: you can click “Start PBC” button on the configuration menu or press “WPS” button on Hashi. After started PBC mode, press PCB button on Wireless Network card. 2. Client PIN: You can type the PIN Number of Wireless Network card at Client PIN Number blank, and click “Start PIN” button. After started PIN mode, configure PIN mode on Wireless Network card.
Hashi User Manual This page shows the equipment information of AP which Hashi can connected to, it displays BSSID, Channel etc, you can select the wireless router which you want to connect. 3.4 LAN 1. IP Address: The IP address of LAN. 2. Subnet Mask: The subnet mask of LAN.
Hashi User Manual 3. Default Gateway: You can enter the Gateway IP address here. 4. DHCP: Enabled – select it if you want to user Hashi as a DHCP server, and enter the starting IP address and ending IP address for the DHCP server’s IP assignment. 5. DHCP Client Range: Enter the starting IP address and ending IP address here. 6. Domain Name: Enter the domain name here. 7. 802.1d Spanning Tree: The 802.
Hashi User Manual 1. Enable Port Filtering: Select it to apply the port filtering policy. 2. Port Range: Enter in the port range of the TCP/UDP ports that you want the policy to apply to. If it is only a single port that you want the policy applied to, then enter the same port number in the Port Range blank. 3. Protocol: Select the protocol type to allow or deny certain ports. ¾ MAC Filtering 1. Enable MAC Filtering: Select it to apply the MAC filtering policy. 2.
Hashi User Manual ¾ IP Filtering 1. Enable IP Filtering: Select it to apply the IP filtering policy. 2. IP Address: Enter the IP address which you want to set. 3. Protocol: Select the protocol type to allow or deny certain types of IP address. ¾ URL Filtering 1. Enable URL Filtering: Select it to apply the URL filtering policy.
Hashi User Manual 2. URL Address: Enter the URl address which you want to set. For example: www.sina.com ¾ Firewall Enable DoS Prevention: Select it to apply the DoS(denial of service) prevention. 3.7 Service ¾ DMZ The DMZ (Demilitarized Zone) screen allows you to expose one network user to the Internet for use of a special-purpose service such as Internet gaming or video conferencing. DMZ hosting forwards all the ports at the same time to one computer.
Hashi User Manual 1. Enable DMZ: Select it to enable the DMZ. If an application has trouble working from behind the router, you can expose one computer to the Internet and run the application on that computer. Note: Placing a computer in the DMZ may expose that computer to a variety of security risks. The option is only recommended as a last resort. 2. DMZ IP Address: Specify the IP address of the computer on the LAN that you want to have unrestricted Internet communication.
Hashi User Manual 2. IP Address: Enter the IP address of the computer on your local network that you want to allow the incoming service to. 3. Protocol: Select TCP, UDP or TCP+UDP, if you are not sure, select TCP+UDP. 4. Port Range: Enter the port range of the computer on your local network that you want to allow the incoming service to. 5. Comment: Enter a name for your virtual server entry.
Hashi User Manual 1. 2. 3. 4. Current Time: You can change the current time here. Time Zone: Select the Time Zone from the drop down menu. Enable NTP client update: Select it to enable updating NTP client. NTP Server: NTP is short for Network Time Protocol. NTP synchronizes computer clock times in a network of computers. You can select it or enter a NTP server manually. This will only connect to a server on the Internet. 3.
Hashi User Manual 1. Gateway: If you select Gateway, The NAT is enabled. 2. Bridge: If you select Bridge, all LAN ports and wireless interfaces are bridged together, firewall is not supported. 3. Wireless ISP: In this mode, all LAN ports are bridged together and the wireless client will connect to ISP access point. The NAT is enabled. You can set the wireless to client mode and connect to the ISP AP in Site-survey page. ¾ System Settings 1.
Hashi User Manual ¾ Upgrade Firmware You can upgrade the firmware or bootloader of the device using this tool. Make sure that the firmware you want to use is saved on the local hard drive of the computer. Click on Browse to search the local hard drive for the firmware to be used for the update. Upgrading the firmware or bootloader will not change any of your system settings but it is recommended that you save your system settings before doing a firmware upgrade.
Hashi User Manual user name and password. Note: The new user name and password must not exceed 14 characters in length and must not include any spaces. Enter the new password twice to confirm it. And click Apply button when finished. ¾ System Log The Hashi automatically logs (records) events of possible interest in its memory. If there isn’t enough space in the memory for all events, logs of older events are deleted but logs of the latest events are retained.
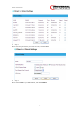
Hashi User Manual ¾ Statistics It displays the current Wireless LAN interface and LAN port packet message for the Wireless LAN Sent Packets, Wireless LAN Received Packets, Ethernet LAN Sent Packets, Ethernet LAN received Packets.
Hashi User Manual 4 Wireless Basics The Hashi is based on industry standards to provide easy-to-use and compatible high-speed wireless connectivity within your home or public access wireless networks. Strictly adhering to the IEEE standard, the wireless family of products will allow you to securely access the data you want, remote control the Infrared Ray devices, when and where you want it. You will be able to enjoy the freedom that Hashi delivers.
Hashi User Manual In a wireless local area network, a device called an Access Point (AP) connects computers to the network. The access point has a small antenna attached to it, which allows it to transmit data back and forth over radio signals. With an indoor access point, the signal can travel up to 300 feet.
Hashi User Manual User Manual Statement: MPORTANT REGULATORY INFORMATION This device complies with Part 15 of the FCC Rules: Operation is subject to the following two conditions: 1. This device may not cause harmful interference and 2. This device must accept any interference that is received, including any interference that may cause undesired operation. NOTE: This equipment has been tested and found to comply with the limits for a Class B digital device, pursuant to part 15 of the FCC Rules.