
User's Manual

2
1. The Green Pairing LED will stay off during the normal operation.
2. The sensor is equipped with a tamper switch. If the cover of sensor is removed, the sensor will send an alarm to the home
controller or security system.
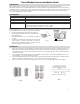
If sensor needs to be factory defaulted (for example, to prepare it for joining with a home controller or security system).
1. Remove sensor cover.
2. Remove the battery from sensor.
3. Depress the tamper switch for three seconds before inserting the battery.
4. Insert the battery. The sensor should illuminate the LED once when boot-up/initialization tasks are complete.
5. Release the tamper switch while the LED is illuminated (it will be lit for 4 seconds). The sensor should then
reset to factory default settings and begin searching for any available home controller or security system. If you need to
reboot the device, remove the battery for at least 5 seconds, then re-insert the battery.
6. Place the cover back on sensor.
Note: Replace Battery with Panasonic CR2450 or Sony CR2450 only. Use of another battery may negatively impact the
performance of the product.
If device has trouble with pairing to the home controller or security system:
1. Separate the sensor and magnet or trigger tamper. The sensor will re-attempt to pair.
2. If device continues to have trouble pairing, remove the battery for 5 seconds and then re-insert it.
3. If device continues to have trouble pairing, use “Reset to Factory Defaults” procedure to attempt pairing again.
If device was communicating with the home controller or security system but is no longer communicating:
1. Move the device to a location closer to the controller. Separate and close the magnet or trigger tamper from the sensor. If
the controller successfully shows the sensor's status, then install a repeater so the system's range can reach the desired
location for the sensor.
2. If the device has been in use for months or years and the failure is sudden, check the controller to see if the
device has a low battery. Follow the instructions provided to replace the battery.
FCC Statement: This equipment has been tested and found to comply with the limits for a Class B digital device, pursuant to
Part 15 of the FCC Rules. These limits are designed to provide reasonable protection against harmful interference in a residential
installation. This equipment generates, uses and can radiate radio frequency energy and, if not installed and used in accordance
with the instructions, may cause harmful interference to radio communications. However, there is no guarantee that interference
will not occur in a particular installation. If this equipment does cause harmful interference to radio or television reception,
which can be determined by turning the equipment off and on, the user is encouraged to try to correct the interference by one of
the following measures:
• Reorient or relocate the receiving antenna.
• Increase the separation between the equipment and receiver.
• Connect the equipment into an outlet on a circuit different from that to which the receiver is connected.
• Consult the dealer or an experienced radio/TV technician for help.
You are cautioned that changes or modifications not expressly approved by the party responsible for compliance could void your
authority to operate the equipment.
This device complies with Part 15 of the FCC Rules. Operation is subject to the following two conditions:
(1) This device may not cause harmful interference, and
(2) This device must accept any interference received, including interference that may cause undesired operation.
ETL Statement: This device conforms to ANSI/UL STD 634
Reset to Factory Defaults & Reboot
Troubleshooting
Certification
Operation