Crestron MLX-2 InfiNET EX™ LCD Handheld Remote Operations & Installation Guide
This document was prepared and written by the Technical Documentation department at: Crestron Electronics, Inc. 15 Volvo Drive Rockleigh, NJ 07647 1-888-CRESTRON All brand names, product names and trademarks are the property of their respective owners. ©2008 Crestron Electronics, Inc.
infiNET EX™ LCD Handheld Remote Crestron MLX-2 Contents InfiNET EX™ LCD Handheld Remote: MLX-2 1 Introduction ............................................................................................................................... 1 Features and Functions ................................................................................................ 1 Specifications ..............................................................................................................
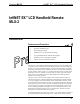
infiNET EX™ LCD Handheld Remote Crestron MLX-2 InfiNET EX™ LCD Handheld Remote: MLX-2 Introduction Features and Functions • Ergonomic handheld design • Elegant high-gloss finish • infiNET EX™ 2-way RF wireless technology • 57 programmable buttons with blue EL backlight • Backlit LCD screen w/dynamic text display • Operates on four AAA alkaline batteries The MLX-2 is a state-of-the-art handheld remote featuring Crestron® infiNET EX™ 2-way RF wireless communications.
infiNET EX™LCD Handheld Remote Crestron MLX-2 onscreen menu navigation, transport control, and alphanumeric entry. Electroluminescent blue button backlighting creates an alluring appearance while facilitating control in a darkened room. Specifications Specifications for the MLX-2 are listed in the following table. MLX-2 Specifications SPECIFICATION LCD Display DETAILS Monochrome 1.
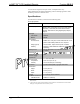
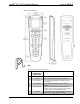
infiNET EX™ LCD Handheld Remote Crestron MLX-2 Physical Description This section provides information on the connections, controls, and indicators available on your MLX-2. MLX-2 Physical View Operations & Installation Guide – DOC.
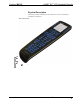
infiNET EX™LCD Handheld Remote Crestron MLX-2 MLX-2 Overall Dimensions MLX-2 Controls, Connectors, & Indicators # CONNECTORS, CONTROLS, & INDICATORS 1 POWER (1) programmable button for power functions. 2 LIGHTS (1) programmable button for lighting functions. 3 Menu Buttons 4 i, HOME, h 5 Device Control (42) programmable function buttons labeled for volume, mute, channel, onscreen menu navigation, transport control, and alphanumeric entry.
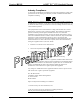
infiNET EX™ LCD Handheld Remote Crestron MLX-2 Industry Compliance As of the date of manufacture, the MLX-2 has been tested and found to comply with specifications for CE marking and standards per EMC and Radiocommunications Compliance Labelling. NOTE: This device complies with part 15 of the FCC rules.
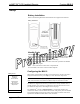
infiNET EX™LCD Handheld Remote Crestron MLX-2 Setup Battery Installation Refer to the following illustration and install the four supplied AAA batteries. Battery Installation Identity Code The RF ID of the MLX-2 has been factory set to 03. The RF IDs of multiple MLX-2 devices in the same system must be unique. RF IDs can be changed from the “Setup Mode” on page 7, or from a personal computer (PC) via the Crestron Toolbox.
infiNET EX™ LCD Handheld Remote Crestron MLX-2 “PROGRAM DEVICE” Screen PROGRAM DEVICE BASIC SETUP VIEW TSID SET RFID RF CHANNEL ACQUIRE PAGE 1/1 Setup Mode In Setup Mode, use the keys on either side of the function name displayed on the PROGRAM DEVICE screen to select that function. The following paragraphs describe each of the setup options in the order listed in the menus.
infiNET EX™LCD Handheld Remote Crestron MLX-2 Version Info From the BASIC SETUP screen, select VERSION INFO. The Version Info screen displays the version numbers of the software and firmware programs currently loaded on the MLX-2 remote. Version Info Bootloader Ver: 3.0.0.3 Application Ver: 3.1.1.11 RF Firmware Ver: 3201 Setup File Ver: 0.0.2.1 Use < / > to navigate. At any time, press and hold HOME to exit. Press > to continue. Press > to continue.
infiNET EX™ LCD Handheld Remote Crestron MLX-2 Display Timeout From the BASIC SETUP screen, press one of the keys on either side of the DISPLAY T/O menu option to select the Display Timeout Setup function. Display Timeout Setup -DISPLAY T/O+ - SAVE PAGE 1/1 5.0 + SAVE PAGE 1/1 Display Timeout successfully adjusted. Press > to continue. PAGE 1/1 Use < / > to navigate. At any time, press and hold HOME to exit. Press > to continue.
infiNET EX™LCD Handheld Remote Crestron MLX-2 “VIEW TSID” Screen VIEW TSID 0x0034ad97 View TSID From the PROGRAM DEVICE screen, press one of the keys on either side of the VIEW TSID option. The display shows the TSID number (32-bit number derived from the unit serial number). Press h to continue. The display returns to the “PROGRAM DEVICE” screen. Press > to continue.
infiNET EX™ LCD Handheld Remote Crestron MLX-2 RF Channel Screen To block a RF channel, press the key to the right of that channel in the following list. To unblock a channel, press the key to the left. Press > to Continue. RF Channel From the PROGRAM DEVICE screen, press one of the keys on either side of the RF CHANNEL option. This option allows you to block or unblock the available channels. The display, shown to the left, provides basic instructions. Press h to continue.
infiNET EX™LCD Handheld Remote Crestron MLX-2 Programming Software Have a question or comment about Crestron software? Answers to frequently asked questions (FAQs) can be viewed in the Online Help section of the Crestron website. To post a question or view questions you have submitted to Crestron’s True Blue Support, log in at http://support.crestron.com. First-time users will need to establish a user account.
infiNET EX™ LCD Handheld Remote Crestron MLX-2 Locating the CEN-RFGW-EX in the Device Library Locating the MLX-2 in the Device Library • The system tree of the control system displays the device in the appropriate slot with a default RF ID as shown in the following illustration. C2Net Device, Slot 9 Operations & Installation Guide – DOC.
infiNET EX™LCD Handheld Remote Crestron MLX-2 • Additional MLX-2 devices are assigned different RF ID numbers as they are added. • If necessary, double click a device to open the “Device Settings” window and change the RF ID, as shown in the following figure. “MLX-2 Device Settings” Window • Programming Manager The ID code specified in the SIMPL Windows program must match the RF-ID of each unit.
infiNET EX™ LCD Handheld Remote Crestron MLX-2 Uploading and Upgrading Crestron recommends using the latest programming software and that each device contains the latest firmware to take advantage of the most recently released features. However, before attempting to upload or upgrade, it is necessary to establish communication. Establishing Communication Use Crestron Toolbox for communicating with the MLX-2; refer to the Crestron Toolbox help file for details.
infiNET EX™LCD Handheld Remote Crestron MLX-2 Program Checks infiNET Connections For infiNET connections, using Crestron Toolbox, display the network device tree (Tools | Network Device Tree) to show all network devices connected to the control system and all infiNET devices that have been acquired by the MLX-2 (CEN-RFGW-EX). Right-click on the MLX-2 (CEN-RFGW-EX) to display actions that can be performed on the MLX-2 (CEN-RFGW-EX).
infiNET EX™ LCD Handheld Remote Crestron MLX-2 Operation Operation of the MLX-2 is determined by the program developed for the system in which it is used. Operations & Installation Guide – DOC.
infiNET EX™LCD Handheld Remote Crestron MLX-2 Problem Solving Troubleshooting The following table provides corrective action for possible trouble situations. If further assistance is required, please contact a Crestron customer service representative. MLX-2 Troubleshooting TROUBLE POSSIBLE CAUSE(S) CORRECTIVE ACTION The MLX-2 does not function. Batteries are not installed properly, or need replacement. Check battery orientation.
infiNET EX™ LCD Handheld Remote Crestron MLX-2 run more than 333 feet. NOTE: All Crestron certified Cresnet wiring must consist of two twisted pairs. One twisted pair is the +24V conductor and the GND conductor, and the other twisted pair is the Y conductor and the Z conductor. Strip and Tin Wire When daisy-chaining Cresnet units, strip the ends of the wires carefully to avoid nicking the conductors.
infiNET EX™LCD Handheld Remote Crestron MLX-2 Return and Warranty Policies Merchandise Returns / Repair Service 1. No merchandise may be returned for credit, exchange, or service without prior authorization from CRESTRON. To obtain warranty service for CRESTRON products, contact an authorized CRESTRON dealer. Only authorized CRESTRON dealers may contact the factory and request an RMA (Return Merchandise Authorization) number.
Crestron MLX-2 Operations & Installation Guide – DOC.
Crestron Electronics, Inc. 15 Volvo Drive Rockleigh, NJ 07647 Tel: 888.CRESTRON Fax: 201.767.7576 www.crestron.com Operations & Installation Guide – DOC. 6739 (2022658) 12.08 Specifications subject to change without notice.