D i st r i b u to r www.unitron.
Latitude™ BTE Guide Moxi™ / Moda™II
Table of Contents Your Latitude™ Hearing Instruments .............................1 Overview of your Latitude™ Hearing Instrument ..........2 Features of your Latitude™ Hearing Instrument ...........4 Putting your Hearing Instruments on your Ears .............5 Turning your Hearing Instruments On and Off ..............6 Battery Information.........................................................7 Operating Instructions....................................................9 Using the Telephone ................
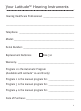
Your Latitude™ Hearing Instruments Hearing Healthcare Professional: _______________________ ___________________________________________________ Telephone: _________________________________________ Model:_____________________________________________ Serial Number: ______________________________________ Replacement Batteries: Size 312 Warranty: __________________________________________ Program 1 is the Automatic Program (Available with Latitude™ 16 and 8 only) Program 2 is the manual program for: _________
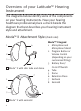
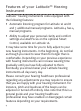
Overview of your Latitude™ Hearing Instrument The diagrams below identify some of the components on your hearing instruments. Have your hearing healthcare professional place a check beside the diagram that best describes your hearing instrument style and attachment.
Moxi™ Attachment Style (check one) 4 1 2 3 6 5 Moxi™ with Shell 4 1 7 Moxi™ Legend 1 Microphone and Microphone Shield 2 Program Button or Volume Control (depending on your customized fitting) 3 Battery Door/ On & Off Switch 4 Tube 5 Speaker unit 6 Shell 7 Dome 2 3 5 Moxi™ with Dome My hearing instrument has (check all that apply) Program Button Push Button Volume Control Optional Accessories (check all that apply) Smart Control See Smart Control User Guide for more information.
Features of your Latitude™ Hearing Instrument Latitude™ hearing instruments come equipped with the following features: • Automatic listening program for Latitude 16 and 8 and 3 additional manual programs. Latitude 4 has 4 manual programs. • Ability to adjust your personal clarity and comfort settings via smartFocus on the optional Smart Control, available on Latitude 16. It may take some time for you to fully adjust to your new hearing instruments.
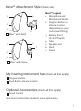
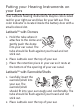
Putting your Hearing Instruments on your Ears Your Latitude hearing instruments may be color-coded red for your right ear and blue for your left ear. This color indicator is located inside the battery door with a small colored dot. Latitude™ with Domes 1. Hold the tube where it attaches to the dome and gently push the dome into your ear canal. The tube should lie flush against your head and not stick out. 2. Place Latitude over the top of your ear. 3.
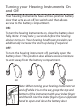
Turning your Hearing Instruments On and Off Your hearing instruments have a three-position battery door that acts as an off/on switch and that allows access to the battery compartment. ON: To turn the hearing instruments on, close the battery door fully. Note: It may take 5 seconds before the hearing device turns on. Your hearing healthcare provider can additionally increase the start up delay if required. OFF: To turn the hearing instrument off, partially open the battery door.
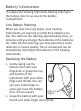
Battery Information To replace the hearing instrument battery, fully open the battery door for access to the battery compartment. Low Battery Warning When you hear two long beeps, your hearing instruments are warning you that their batteries are low. You will hear the warning approximately every 30 minutes until you change the batteries or the batteries die. After the first warning, you may experience some reduction in sound quality.
3. Insert the new battery into the battery compartment with the plus (+) sign on the battery facing the same way as the plus (+) sign on the edge of the battery door. This will ensure that the battery door closes properly. Note: If the battery is inserted incorrectly, the door will not close. 4. Close the battery door. Caring for Batteries • Always discard batteries in a safe and environmentally friendly way. • To prolong battery life, remember to turn your hearing devices off when not in use.
Operating Instructions Push Button Your hearing instrument is equipped with a push button, built into the back of the battery door, which has been set for switching between programs or adjusting your volume. Note that your push button may be disabled by your hearing healthcare professional and, therefore, could be inactive. Program Button If you have an active push button program control, each time you push the button, you will move to a new program.
Your Latitude 16 hearing instruments will learn your volume control adjustments while the hearing instruments are set to the automatic program, if this feature has been enabled by your hearing healthcare professional. Over time, the hearing instruments will adjust the default volume settings in the automatic program to the levels that you typically use. Your hearing healthcare professional can help you identify your different push button volume control settings.
Using the Telephone As telephones don’t all work the same, you may experience different results from different phones. You can use many phones by simply holding the receiver to your ear, without the need to change to a dedicated telephone program on your hearing instrument. Remember to move the handset slightly up or back to find the position that sounds best to you.
Consult your hearing healthcare professional if you experience difficulties using your hearing instruments on the phone. To affix the optional easy-t magnet: 1. Clean the telephone receiver. 2. Hold the magnet near the “listening end” of your telephone receiver and release it (Figure 1). The magnet will flip to the appropriate side and seek the optimal position on the telephone receiver. 3.
Caring for your Hearing Instruments • Open the battery door when not in use. • Always remove your hearing instruments when using hair care products. The hearing instruments can become clogged and cease to function properly. • Do not wear your hearing devices in the bath or shower or immerse them in water. • If your hearing instruments do become wet, do not attempt to dry them in an oven or microwave. Do not adjust any controls.
Cleaning your Hearing Instruments Ear wax is natural and common. Ensuring your hearing devices, earmolds and domes are free of ear wax is an important step in your daily cleaning and maintenance routine. • Never use alcohol to clean your hearing devices, earmolds or domes. • Do not use sharp tools to dislodge ear wax. Sticking household items into your hearing devices or earmolds can seriously damage them.
Wash only the earmolds in warm water with a mild soap. Rinse them with cool water and allow them to dry overnight. Make sure the earmold tubes are dry before reconnecting them to each hook on your hearing devices. Latitude™ Hearing Instruments with Slim Tubes and Domes You should have the slim tubes and domes replaced by your hearing healthcare professional approximately every three to six months or when they become stiff, brittle or discoloured. Clean the domes daily with a damp cloth.
gently insert the cleaning pin where the slim tube attaches to the hearing instrument and push the pin all the way through the tube. Note: The slim tubes and domes should never be rinsed or submerged in water as water drops may become lodged in the tube, block sound or damage the electrical components of the hearing instrument. 6. Once the slim tube has been cleaned, reattach it by gently turning the hearing instrument onto the slim tube. Latitude™ Hearing Instruments with Shells and Domes 1.
Signature Features of your Latitude™ Hearing Instruments SmartFocus™ If your Latitude 16 hearing instruments come with the optional Smart Control remote, you may have access to adjust the smartFocus control. It allows you to focus on hearing speech or background noise in your listening environment. This control provides an additional fine tuning adjustment beyond a traditional volume control.
Assistive Listening Devices Listening in Public Places Latitude’s telecoil option can also help you listen in public places equipped with telecoil compatible assistive listening devices such as a loop system. When you see this symbol, it means that there is loop system installed; this loop system is compatible with your hearing instrument. Please contact your hearing healthcare provider for more information on loop systems.
Warnings • Hearing devices should only be used as directed by your physician or hearing healthcare professional. • Hearing devices will not restore normal hearing and will not prevent or improve a hearing impairment resulting from organic conditions. • Do not use your hearing devices in explosion hazard areas. • Allergic reactions to hearing devices are unlikely.
Magnet Warnings • Be sure the magnet is securely affixed to the telephone. • Keep loose magnets out of reach of children and pets. • If the magnet falls into your ear, contact your hearing healthcare professional. • If the magnet is swallowed, contact your physician immediately. • The magnet may affect some medical devices or electronic systems.
Warning to hearing healthcare professional: • Domes should never be fitted on patients with perforated eardrums, exposed middle ear cavities, or surgically altered ear canals. In the case of such a condition, we recommend to use a customized ear mold. Precautions • The use of hearing devices is only part of hearing rehabilitation; auditory training and lip reading instruction may be required as well. • In most cases, infrequent use of hearing devices does not provide full benefit.
Labeling The serial number and year of manufacture are located inside the battery door.
Troubleshooting Guide CAUSE POSSIBLE REMEDY No sound • Not turned on • Low/dead battery • Poor battery contact • Battery upside down • Moda II: Earmolds/ slim tubes/domes blocked with ear wax Moxi: Shells/domes blocked with ear wax • Plugged microphone protector • Turn on • Replace battery • Consult your hearing healthcare professional • Insert battery plus (+) side up • Clean earmolds or slim tubes and domes. See “Cleaning your Hearing Instrument”. Consult your hearing healthcare professional.
CAUSE POSSIBLE REMEDY • Plugged microphone shield • Consult your hearing healthcare professional Intermittent • Low battery • Dirty battery contact • Replace battery • Consult your hearing healthcare professional Two long beeps • Low battery • Replace battery Whistling • Moda II: Earmolds/ • Remove and reinsert carefully slim tubes/domes not inserted properly Moxi: Shells/domes not inserted properly • Hand/clothing near ear • Remove hand/clothing from ear • Poorly fitting shells/ • Consult your hear
CAUSE POSSIBLE REMEDY • Moda II: Earmolds/ slim tubes/domes blocked with ear wax Moxi: Shells/domes blocked with ear wax • Low battery • Plugged microphone protector • Clean shells and domes. See “Cleaning Your Heraing Instrument”. Consult your hearing healthcare professional.
Warning to Hearing Instrument Dispensers A hearing instrument dispenser should advise a prospective hearing instrument user to consult promptly with a licensed physician (preferably an ear specialist) before dispensing a hearing instrument if the hearing instrument dispenser determines through inquiry, actual observation, or review of any other available information concerning the prospective user, that the prospective user has any of the following conditions: (i) Visible congenital or traumatic deformity o
pressure capability greater than 132 decibels (dB).] Important Notice for Prospective Hearing Instrument Users Good health practice requires that a person with a hearing loss have a medical evaluation by a licensed physician (preferably a physician who specializes in diseases of the ear) before purchasing a hearing instrument. Licensed physicians who specialize in diseases of the ear are often referred to as otolaryngologists, otologists or otorhinolaryngologists.
hearing instrument to your individual needs. If you have reservations about your ability to adapt to amplification, you should inquire about the availability of a trial-rental or purchase-option program. Many hearing instrument dispensers now offer programs that permit you to wear a hearing instrument for a period of time for a nominal fee after which you may decide if you want to purchase the hearing instrument.
Unitron Distributors Corporate Office/International 20 Beasley Drive, P.O. Box 9017, Kitchener, ON N2G 4X1 Canada Australia Level 2, Norwest Quay, 21 Solent Circuit, Baulkham Hills, NSW, NSW 2153 Belgium Baron de Vironlaan, 60 b-1700 Dilbeek Canada 20 Beasley Drive, P.O. Box 9017, Kitchener, ON N2G 4X1 China No. 78, Qi Ming Road, Export Processing Zone District B, Suzhou Industrial Park, P.R.