unitech PA982 Ultra Rugged Mobile Computer User’s Manual 400546G Rev.
Federal Communication Commission Interference Statement This equipment has been tested and found to comply with the limits for a Class B digital device, pursuant to Part 15 of the FCC Rules. These limits are designed to provide reasonable protection against harmful interference in a residential installation. This equipment generates, uses and can radiate radio frequency energy and, if not installed and used in accordance with the instructions, may cause harmful interference to radio communications.
Preface About This Manual This manual explains how to install, operate and maintain the PA982 Ultra Rugged Mobile Computer. No part of this publication may be reproduced or used in any form, or by any electrical or mechanical means, without permission in writing from the manufacturer. This includes electronic or mechanical means, such as photocopying, recording, or information storage and retrieval systems. The material in this manual is subject to change without notice.
Laser Information The Unitech PA982 series is certified in the U.S. to conform to the requirements of DHHS/ CDRH 21CFR Subchapter J and to the requirements of IEC 825-1. Class II and Class 2 products are not considered to be hazardous. The PA982 series contains internally a Visible Laser Diode (VLD) whose emissions do not exceed the maximum limits as set forth in the above regulations.
Table of Contents PA982 Ultra Rugged Mobile Computer i Preface About This Manual i Regulatory Compliance Statements ............................................................................. i FCC Statement ........................................................................................................................ i Canadian Compliance Statement ............................................................................................ i European Conformity Statement ....................
Using the Laser Scanner ................................................................................................ 16 Chapter 3 Getting Connected 17 Establishing Device-PC Connection.......................................................................... 17 Installing Microsoft ActiveSync ............................................................................................. 17 Connecting the Device to Your Computer ...........................................................................
Chapter 1 Getting Started Introducing the PA982 Thank you for purchasing the PA982 Ultra Rugged Mobile Computer. Your PA982 was designed for users needing a compact and durable portable computer for data collection and real time transactions. ch nuite Ultra-rugged Design The Unitech PA982 Ultra Rugged Mobile Computer is a compact mobile computing device designed for maximum durability.
Features Powerful system • Microsoft Windows CE.NET 5.0 Professional Plus operating system • Intel Xscale PXA255 processor with speed up to 400Mhz • Intel PXA270 processor with speed of up to 520 MHz System memory • 128 MB SDRAM • 64 MB Flash ROM Display • 3.
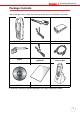
Chapter 1 Getting Started Package Contents After opening the box, ensure the following accessories for the PA982 are present: ch nuite PA982 ESC ENTER 1+- 2 ABC 3 DEF 4GHI 5JKL MNO TAB 7PQRS TUV 6 8 9 WXYZ FUNC * 0 / # BKSP [ Alpha PA982 Terminal Stylus CD-ROM Power Adapter and Cable Battery Pack USB Charging Cable (optional) Synchronization and Power Cable Quick Reference Guide Cradle (optional) If anything is missing or appears damaged in any way, contact your dealer.
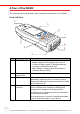
A Tour of the PA982 The following sections describe the main components and features of the PA982. Front Left View 1 9 EN TE R 8 3 4 5 6 8 7 BK SP E S C 1 2 9 0 7 a h NC A FU TA B lp 2 6 3 5 4 No. 1. 2. 3. 4. 4 Component Status indicator Left scanner trigger button Power button Universal connector Description Indicates the battery charging and barcode scanning status.
Chapter 1 Getting Started 5. Stylus 6. 7. Desktop cradle connector Infrared (IR) port 8. Keypad 9. LCD Touch screen Enables you to interact with the operating system. To use the stylus, remove it from its holder and hold it the same way you hold a pen or pencil. Enables you to interface with the optional desktop cradle. Uses infrared technology to transmit and receive data from other IR-enabled devices. Keypad interface for controlling the PA982.
Setting up the PA982 This section explains how to install and charge the battery, how to check battery status, how to connect the PA982 to a PC, how to turn on the PA982 for the first time how to install an optional Wireless Local Area Network PCMCIA card, and how to calibrate the screen. Installing the Battery WARNING! There is a risk of fire and burns if the battery pack is handled improperly. DO NOT disassemble, crush, puncture, short external contacts, or dispose the battery pack in fire or water.
Chapter 1 Getting Started 2. Position the battery pack, making sure the battery contacts are aligned with the contacts in the compartment, as shown in the following illustration. Battery contacts Compartment contacts 3. Place the battery pack into the battery bay and press the battery securely into the compartment. 4. Replace the battery compartment cover and the four compartment screws.
Charging the Battery Before using the PA982 for the first time, you need to charge it for about 16 hours. After that, you can charge the PA982 every day to recharge the battery to full capacity. Charge the PA982 using the RS232 charging cable or the docking station. CAUTION! Operating the PA982 for the first time without the AC adapter, and without fully charging the backup battery may result in loss of data stored in RAM memory.
Chapter 1 Getting Started Charging the Battery with the Docking Station 1. Plug the AC adapter cable into the power jack on the docking station, then connect the AC adapter into an electrical outlet. 2. Slide the device into the docking station until it clicks into place. 3. The connection is secure when the bottom edge of the device is aligned with the docking station, and the LED indicator on the device lights up red.
Checking the Battery Status If the main battery level becomes low in the course of normal use, a status icon appears on the device screen system tray indicating low or very low battery status. In both cases, perform an ActiveSync operation to back up your data, then recharge your device as soon as possible. If the battery level reaches low status, the device will enter suspend mode; if the battery level reaches very low status, the device will enter deep sleep mode.
Turning the PA982 on for the First Time After you have initially charged your device for about 16 hours, the device is ready to be used. You can now start up your device where you’ll adjust the screen brightness, calibrate the display, and set up the system time zone, date and time. Powering On 1. Turn on your device by pressing the power button on the front panel. NOTE: The PA982 screen ships with a protective plastic film. You may remove this if desired by peeling from one corner.
Chapter 1 Getting Started When you have completed the series of taps, press the [ENT] key to confirm calibration or press the [ESC] key to cancel it. After confirming calibration, the Date/Time Properties screen appears prompting you to set the date and time. Setting the Time and Date In the Date/Time Properties window, use the stylus to select the current date and time, time zone, and daylight saving time option.
Chapter 2 Using the Hardware The following table describes the main keypad keys. Key Main Function Press this button to turn the PA982 on. Press and hold this button for two seconds to turn the PA982 off. Pressing this button corresponds to tapping the cancel or X button on the screen. Press the backspace key to erase characters. Press the function key to perform alternative key functions. Refer to Using Hotkeys on page 15.
Chapter 2 Using the Hardware Using Hotkeys The PA982 provides eight combination hot keys to activate specified screen setting functions or programs. These hotkeys are useful for calibrating the touch screen, toggling the backlight, and adjusting screen contrast when the menu-driven operation is disabled. Below is the list of hotkeys. To use them, press and hold the [FUNC] key in combination with the corresponding second key. [FUNC] + [ESC] Check stylus properties and re-calibrate the PA982 touch screen.
Using the Stylus CAUTION! Never use anything other than the PA982 stylus on the screen. Using another object as a stylus could cause permanent damage. 1. Slide the stylus in the direction of the arrow (A) and then pull out (B) to remove the stylus from its holder. B A 2. Hold the stylus as you would a pencil. 3. To make a choice from a menu, lightly tap the tip of the stylus on that choice. 4. To write data into a field on a form, use the stylus to print the letters or numbers.
Chapter 2 Using the Hardware Using the Laser Scanner The PA982 has an integrated laser scanner which reads all major bar code labels with excellent performance. NOTE: Reading software must be enabled in order to operate the scanner. This can be a user-loaded application or a pre-loaded utility such as Scanner Setting. Activate the laser scanner by pressing either one of the trigger keys located on the left and right side of the unit.
Chapter 3 Getting Connected The Unitech PA982 enables users to link to a host computer using an RS-232 or IrDA connection for data communication. This chapter provides an overview of PA982 communication options. Establishing Device-PC Connection Installing Microsoft ActiveSync In order to exchange data between your computer and the PA982, Microsoft ActiveSync must be installed on your computer.
Chapter 3 Getting Connected NOTES: If ActiveSync doesn’t start automatically, click Start → Programs → Microsoft ActiveSync. If a message appears indicating that it is unable to detect a connection, click the Cancel button and manually configure the communication settings. 4. Follow the onscreen instructions. 5. When the configuration process is complete, the ActiveSync window appears. 6.
Using ActiveSync to Exchange Files You can use ActiveSync to exchange information from your device your computer and vice versa. Changes you make to the information on one location will not affect the information on the other one. If you want to automatically update information on both your device and computer, synchronize the information instead. You can copy two types of information to your device: files and Pocket Access Windows CE Store information. The following procedure only applies to copying files.
Chapter 3 Getting Connected 3. Locate the file that you want to copy on your device or computer. 4. Do either one of the following: – To copy the file to your device, right-click the file and click Copy. Place the cursor in the desired folder for your device, right-click, then click Paste. – To copy the file to your computer, right-click the file and click Copy. Place the cursor in the desired folder for your computer, right click, then click Paste.
Chapter 4 Barcode Scanner Programs Scanner Settings When it is necessary for the user to change the default barcode symbology for a different application, the Scanner Control Panel provides the ability to change default symbology, place delimiter characters behind scanned data, and save the settings. Press [FUNC] + 7 to display the Scanner Control Panel. NOTE: Alternatively, tap Start → Settings → System → Scanner Settings to display the Scanner Control Panel.
Chapter 4 Barcode Scanner Programs Barcode Symbologies Symbology Enable / Disable Send Check Digit Send Max/Min Leading Length Digit Code 39 Yes Yes Yes — I 2 of 5 Yes Yes Yes — S25/Toshiba Yes Yes Yes — Code 32 Yes — — — Telpen EAN 128 Code 128 MSI/Plessy Yes Yes Yes Yes — — — Yes — — Yes Yes — — — — Code 93 Code 11 Yes Yes Yes Yes Yes — — CodaBar Yes Yes Yes — Label Code UPC-A Yes Yes Yes Yes — — — Yes UPC-E Yes Yes — Yes EAN 13 EAN 8 Delta Code Supplement
Chapter 5 Advance settings Adjusting Settings This section describes how to adjust the settings of your device to accommodate your work habits. To access Settings, tap Start → Settings→ Control Panel. The Control Panel appears. From here you can adjust such user configurable items as the backlight, auto power off timer, system volume, and processor speed. You can also assign functions to buttons, configure menus, enter owner information, and set up connections. 23 Copyright 2006 Unitech Electronics Co.
Chapter 5 Advance settings Checking the Main and Backup Battery Status This section describes how to view the power level for both the main and backup battery. To minimize power consumption, you can define settings for the auto-off function and the processor’s operation speed. To check the main and backup battery status: 1. Tap Start → Settings → Control Panel → Power: The Power Properties screen appears. 2. The battery menu item displays the status of the main and backup batteries.
Extending Battery Life You can extend the PA982 battery life by doing either of the following: • • Changing the automatic power settings Minimizing the use of backlight Changing the Automatic Power Settings The PA982 enters idle mode when there is no task, or all tasks are waiting for input. In the default setting, the PA982 enters User Idle mode when there is no user input after one minute. The remains idle for 3 minutes and when there is no external charging power connected.
Chapter 5 Advance settings Adjusting Backlight Setting The power consumption of the LCD backlight is high. To conserve battery power, turn off the backlight function if it is not necessary. To change backlight settings: 1. Tap Start → Settings → Control Panel. 2. Tap Backlight. The Backlight screen appears. 3.
Performing a Hardware Reset You may have to perform a reset if the device freezes (i.e., device no longer responds to the buttons on the screen). There are three ways to Performing a Warm Boot A warm boot allows your device to get a fresh start, similar to rebooting a computer. This will restart your device and adjust memory allocation. All records and entries are retained after a warm boot. Unsaved data in open programs may in some cases be lost. 1.
Chapter 5 Advance settings Preforming a Cold Boot A cold boot cuts off power to your device, erasing all records and entries, deleting all programs you have added, and restoring the device to default factory settings. Never perform a cold boot unless a soft reset does not correct your problem. When you perform your next ActiveSync operation, you can restore any data that you previously synchronized to your computer or you can restore data that you backed up to a storage card. 1.
Appendix System Specifications Processing/Memory Intel Xscale PXA255 400Mhz Memory SDRAM:128MB Flash ROM:64MB OS Microsoft Windows CE.NET 5.0 Professional Plus Keypad 18-Key, including numeric key, alpha key and function key Display 240x320 QVGA, Color Transflective TFT with Touch Screen & backlight Scanner Integrated liner barcode scanner Long Range (optional) RFID Reader (optional) Indicator Dual color (red/green) LED Communication USB Host & Client IrDA 1.