PA970 Operation Manual PA970 CE.
PA970 Operation Manual Table of Contents Chapter 1 Introduction ...................................................................................................4 Chapter 2 Unitech’s Application.................................................................................5 2.1 Bootmode......................................................................................................5 2.2 RegFuncKey .................................................................................................7 2.
PA970 Operation Manual 4.13 Regional Settings ......................................................................................86 4.14 Remove Program ......................................................................................89 4.15 Stylus.........................................................................................................90 4.16 System.......................................................................................................91 4.17 Volume & Sounds ..........
PA970 Operation Manual Chapter 1 Introduction This operation manual aims at instructions of using Unitech’s applications, some useful application programs under “Windows” folder, setting application under “Control Panels” and available function keys in .NET 4.2 environment. * Based on Firmware Version: V1.03.
PA970 Operation Manual Chapter 2 Unitech’s Application This chapter introduces some Unitech’s made applications which are embedded in the firmware. These applications offer additional facilities and usage to the user besides standard WinCE applications. Unitech’s Made Applications 1. Bootmode 2. I/O Card Control 3. REGFUNCKEY 4. Registry Backup 5. Scanner Setting 6. Virtual Keys 7. Device Info 8. GetVK 9. Scan2Key 10. PSMFormat 2.1 Bootmode Path: My computer/Windows/Bootmode.
PA970 Operation Manual 2. Tap “Warm Boot”. The system will be restart. Note: If you press and hold “ ” key then tap “Warm Boot”, the terminal will be cold started. (Caution: Please backup any important data before you perform cold start) Update OS 1. Double tap “Bootmode”. Tap “Update OS”. 2. Update OS window pops up. The registry will be restored to default.
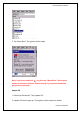
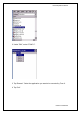
PA970 Operation Manual Proceed anyway? Tap “Yes”. 3. System will be restarted and enter bootloader screen. Insert your CF card contains OS image file. Select “2” to update OS. 2.2 RegFuncKey Path: My computer/Windows/RegFuncKey.exe This tool allows you to re-define the function key. For default value: Func 6 = Task Manager Func 7 = Scanner Setting Func 8 = Power Management Func 9 = Device Info 1. Double tap “REGFUNCKEY”.
PA970 Operation Manual 2. Under “Edit”, select “FUNC 6”. 3. Tap “Browse”. Select the application you want to be executed by Func 6. 4. Tap “Set”.
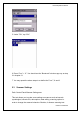
PA970 Operation Manual 5. Under “File”, tap “Exit”. 6. Press “Func” + “6”. You should see the “Bootmode” windows pop up, as step 2 in chapter 2.1 7. You may repeat the above steps to re-define the Func 7, 8 and 9. 2.3 Scanner Settings Path: Control Panel/Scanner Settings.exe This tool allows you to make some settings on scanner such as barcode symbologies, barcode IDs, data options, data editing, scanning options in order to change the scanner behaviour. Besides, it allows a scanning test.
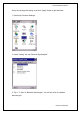
PA970 Operation Manual Every time change the setting, must click “Apply” button to get the effect. 1. Double tap “Scanner Settings”. 2. Under “Setting” tab, tap “Barcode Symbologies”. 3. Tap “+” in front of “Barcode Symbologies”. You will see a list of available barcode type.
PA970 Operation Manual 4. Tap “+” to expand the tree. Under each barcode type, there are more options such as enable/disable, check digit verification, transmit check digit etc. Tick the options that you want to apply on that barcode. Then, tap “Apply” button. 5. The scanner decoder will work as what you have specified. 6. Tap “Barcode IDs”. A list of barcode type is shown with their IDs in front.
PA970 Operation Manual 7. Double tap the barcode type which you want to change ID. (Example: D: EAN13). Change to other ID by scrolling the button. 8. Tap “Data Options”.
PA970 Operation Manual 9. Tap “Transmit code ID character” if you want to transmit code ID. 10.Double tap “Preamble” or “Postamble” if you want to add them to the barcode. Key in the special character stated in the Set Data window. Tap “OK”. 11. Double tap “Interblock delay”. Select the delay time from the drop down list.
PA970 Operation Manual 12. Tap “Data Editing”. Tap “Add” at the bottom. A menu will pop up. 13. Select “Add Formula” or “Add Formula: Output All Data”. A formula will be added under “Data editing”.
PA970 Operation Manual 14. Tap “Formula 2”. Tap “Add” button. Select “Add Qualifier”. 15. Tap the qualifier you just added. Tap “Add” button. Select “Add modifier”.
PA970 Operation Manual 16. To delete a formula or qualifier or modifier, just tap it and tap “Del” button. 17. To add additional formula , just tap “Data Editing”, tap “Add” and select “Add Formula”. 18. Double tap “Magnetic Reading Options”. (The effect will only work for PA970 CE.NET -MSR model).
PA970 Operation Manual 19. Double tap the options below “Magnetic Reading Options” to make settings. 20. Tap “Scanning Options”. Double tap options below to make setting.
PA970 Operation Manual 21. Under “Test” tab, tap “A-Scan” button at the bottom. 22. Set the interval time you want the laser to emit. (Ex: 3 seconds). Tap “Start”.
PA970 Operation Manual 23. Laser emit every 3 seconds. Place the laser head towards to the barcodes. Barcode will be read and shown on the screen. 24. Tap “Stop” button. This will stop to emit the laser.
PA970 Operation Manual 25. Tap “Clear” button. The screen of “Test” will be cleared. 26. Under “To Kpd” tab, tick “Start Scan2key When Exit”. Then, tap “OK”. Scan2Key icon will appear at the task bar.
PA970 Operation Manual 27. Tap “Version” tab, the screen will show the general information of Hamster decoder. 28. Back to “Settings” tab. Tap “Menu” at the bottom. You will see a selection menu pop up.
PA970 Operation Manual 29. Select “Load Settings From File” or “Load Formulas Only From File”. Load the existing scanner settings / formula file. (If you have saved a settings / formula file before) 30. Select “Save Settings to File”. Save the current scanner setting as *.USI file.
PA970 Operation Manual 31. Select “Set To Factory Default”. Tap “Yes”. The scanner setting will be reset to the original setting. 32. Select “Verify Scanner At Next Start”. The scanner will be verified next time you run “Scanner Settings”.
PA970 Operation Manual 2.4 Virtual Keys Path: Control Panel/Virtual Keys.exe This tool allows you to enable/disable the alpha keys on the terminal keypad. 1. Tap “Virtual Keys”. 2. Uncheck “Enable Virtual Keys Applet”. Tap “OK”. 3. Open pocket word and test alpha keys.
PA970 Operation Manual key. The characters output are non-alpha keys. 4. Back to step 2. Tick “Enable Virtual Keys Applet”. Tap “OK”. The alpha keys are enabled again. 2.5 Device Info Path: /My Computer/Windows/DeviceInfo.exe This tool displays the general information of the terminal such as platform, firmware version, PCMCIA slot and compact slot. 1. Double tap “DeviceInfo”. 2.
PA970 Operation Manual 2.6 GetVK Path: /My Computer/Windows/GetVK.exe This tool is a keyboard driver that generate standard keyboard event. It is automatically executed every time the terminal is power on. 2.7 Scan2Key Path: /My Computer/Windows/Scan2Key.exe Scan2Key application can route input from scanner port to keypad buffer, so that all input from scanner or magnetic reader will be treated as they are just input from keypad.
PA970 Operation Manual 2. You will see Scan2Key icon on the task bar. Scan2Key is enabled. 3. Under “Start” > “Program”, select Microsoft Pocket Word. 4. Scan some barcodes. The barcode data will be displayed on MS Pocket Word.
PA970 Operation Manual 5. To disable the Scan2Key, place the stylus on the Scan2Key icon on task bar, a selection menu will pop up. Select “Disable”. 6. To close Scan2Key, select “Exit” on the pop menu.
PA970 Operation Manual Chapter 3 Tools and Applications under “Windows” Tools and Applications under “My Computer/Windows” 1. ActiveNet 2. Calibration 3. connmc 4. Image Viewer 5. MSTSC 6. pdfviewer 7. pegterm 8. pmail 9. presviewer 10. pword 11. Regview 12. repllog 13. Taskman 14. visadm 15. wceload 16. xls 17. Screen Rotation 18. WMAGS46 3.1 ActiveNet Path: My computer/Windows/ActiveNet.
PA970 Operation Manual 2. Tap “PC Connection”. Tap “Change connection”. Select “USB to PC”. 3. Connect the terminal with your PC by using USB communication cable. 4. Execute Microsoft Activesync on your host, make connection setting and get connected. 5. After connected, “Do you like to set up a partnership?” Select “Yes”. Click “Next”.
PA970 Operation Manual 6. Give a name to the device. Example: WINNET, click “Next”. 7. Select Synchronization Settings. Check “Files”. Click “Next”. Setup complete. 8. On your terminal, insert your wireless LAN card and select “Obtain IP by DHCP”. 9. Setup the settings and WEP of wireless LAN card (For Cisco Aironet, please refer to Chapter 3.2) 10. Unplug the USB communication cable. 11. Under “Windows”, double tap “ActiveNet”.
PA970 Operation Manual 12. Choose a method to connect to the selected desktop computer. Select “Network Connection”. Connect to . Tap “Connect”. 13. Activenet will connect terminal to Activesync on your host via wireless network and proceed the file synchronization. 14. To synchronize again, tap “Sync Now”. 15. Tap “Disconnect” to disconnect the communication.
PA970 Operation Manual 3.2 Calibration Path: My computer/Windows/Calibration.exe This tool allows you to do calibration while the original screen calibration is no longer accurate. 1. Double tap “Calibration”. 2. Use the stylus to touch the “+” (Center, Top left, Bottom left, Bottom right, Top right), then press “Enter” key.
PA970 Operation Manual 3.3 connmc Path: /My Computer/Windows/connmc.exe This application is to set up a new wireless connection while you connect the terminal to wireless network by using GPRS PC card/Modem card (Insert the GPRS PC/Modem card. For GPRS, must specify the APN name first) 1. Select “My Computer/Windows/connmc.exe”. 2. Double tap “Make New Connection”.
PA970 Operation Manual 3. Enter a name for the connection. 4. Select “Dial-Up Connection”. Tap “Next”. 5. Select a modem. Select the type of the GPRS PC card you are using. 6. Tap “Configure”.
PA970 Operation Manual 7. Set the port settings. 8. Set the call options. 9. Tap “OK”. 10. Tap “Next”. 11. Key in the phone number. Tap “Finish”. 12. A new connection is added.
PA970 Operation Manual 13. Double tap this new connection. Tap “Dial Properties”. 14. Tap “Edit”.
PA970 Operation Manual 15. Edit the dialing patterns. Tap “OK”, “OK”. 16. Tap “Connect”.
PA970 Operation Manual 17. Terminal is connected to wireless network by GPRS PC/modem card. 3.4 Remote Desktop Connection Path: Desktop/Remote Desktop Connection This tool allows multi user to telnet and login to a RDP host server. (Your terminal must connect to the network) *Note: Must install RDP in the host first. 1. Double tap “Remote Desktop Connection”.
PA970 Operation Manual 2. Key in the IP address of the RDP host in “Computer” field. Tap “Connect”. 3. Terminal login to RDP host.